

As we talked about last week, the beginning of a new year is the perfect time to learn a new skill. Motivation tends to be high, and it’s nice to distract yourself from the realization that the holidays are officially an entire year away.
While now is a great time to start learning more about the various 3D modeling software programs out there, we know it can feel like too much information to start with. However, one of the best ways to start learning is to…just start modeling!
Luckily for beginners, 3D printing is now accessible to everyone through easy-to-use 3D modeling tools and creator apps. If you are just beginning and haven’t started playing around with any 3D software, try using an image you already love or a drawing you’ve created and convert it to a 3D model using 2D to 3D. Using an app like this is a great way to learn some of the basics of 3D printing, before really diving into the specifics.
Check out the video below to see how 2D to 3D works!
In this post, you’ll learn:
- What images work best when using 2D to 3D
- How to upload your image
- How to scale your design
- How to pick the perfect material for your model
- How to order your product
Let’s get started!
Pick an image:
There are a couple of images you can upload to 2D to 3D. If you want to create a doodle-style design, draw it yourself on white paper or a white dry erase board. You can also use an image that has already been created, including fonts, shapes, patterns, “pop art” inspired original photos and more. For best results you’ll want to use a simple black and white drawing. Either way, make sure your image follows the following criteria:
- Simple black and white: The black portions will “pop” and be thickened into your 3D product, while the white represents empty space
- Cropped to the edges: The viewer measures the width of the image you upload, not the design itself, so make sure to crop your image before uploading
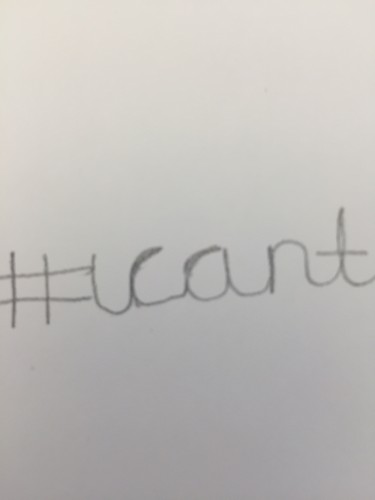
Here’s an example of a drawing that won’t work. Notice how the letters aren’t connected? If you tried to upload this version, you would receive your part in pieces as opposed to one solid product:

Another one that will be hard to make work because the grey pencil does not stand out enough against the white background:
(Note: It is possible to make pencil work, but you’ll need to make sure you press firmly and don’t have any gaps in your design.)
Below is the image we used for this post:

Upload your design:
Once you’ve picked your image, you’re ready to upload! To start, go to Shapeways.com and click “Make” in the top navigation bar. You’ll see “Easy Creator Apps” in the drop down menu – click into it and then find 2D to 3D under “Easy 3D Model Editors.”
When you’re in the app, click “Choose File.”

You’ll quickly see your image come up on the viewer and you’ll be able to play around with the thickness and width of the product.

As you change the thickness and width of your design, be sure to hit “Update View” so that you can preview your final product. When you’re happy with the design, hit the “Buy Now” button to go to your Model page.
Scale your design and pick your material:
To scale your design, click “Scale”

Put in your desired measurements when the new box pops up. Scaling your design will impact the size of your design, as well as the cost depending on the material you choose.

At this point, you’ll also learn which materials your product can be printed in. The entire Shapeways material portfolio will be listed, and each will be indicated if it can be printed or not.

With 54 materials to choose from, it can be a little overwhelming to decide what you want your product to be printed in. If you want to test your product and get a basic idea of what your design will look like in 3D, we’d suggest sticking with our White Strong & Flexible Plastic. For something a little more fun, choose any one of our dyed plastics or even Metallic Plastic.
If you’re planning on creating a pendant or other type of jewelry, we have plenty of metals to choose from. Try Steel, Plated Brass or even Gold! For this design, we chose to go with Polished Brass.

Order your product:
When you’ve made a decision, just hit “Add to Cart” next to your desired material.

Your product will then be in your cart and available to purchase!

2D to 3D is a great way to get started in the 3D printing world. Once you receive your very own 3D printed product that you created yourself, we’re sure you’ll be hooked. Be sure to share you designs with us using the hashtag #shapedbyme on Twitter and Instagram.
Now tell us below – what will you be making with 2D to 3D this month?
what do you have in black and also white earrings, bracelets and necklances. tx. merrel.
I am interested in white and also black jewelry but not pierced earrings. tx, very elegant, architectural yet sensuous. tx, merrel.
I am interested in your jewelry other than charms or pierced earrings in black, white and red. tx,
for the 4th time – any jewelry in red, black or white.