

When I first picked up a toy melodica, I was hooked. It only cost me £20, it was easy to play, and so small I could take it anywhere. I decided to devote a few years to it, and see if I could discover its full potential.
At first it was great fun, and quite a novelty to be playing a toy instrument to a high standard. But it had its drawbacks. You couldn’t play fast melodies without some of the notes dropping out, and the tone was so shrill, I felt sorry for anyone sitting next to me. But perhaps worse of all, I found it difficult to be taken seriously at music sessions when I pulled out a bright plastic instrument which was ultimately designed to appeal to kids.
I was ready for a professional melodica, but there wasn’t anything out there. That’s when I thought about making one. I’d heard of 3D printing, but it was something I know nothing about. How easy was it to learn?
I began the journey by getting some lessons in CAD software. Once I’d covered the basics, I took my melodica apart, and bit by bit, recreated it within a 3D environment. And once it existed in virtual reality, I could make all the changes I needed to create my dream instrument. I wanted something that sounded as good as any other professional instrument, with a clear tone, and I also wanted it to look a bit special, something I could be proud of.
I ended up with the design for one large piece, a sort of frame which was 40cm long, and 32 small keys which slotted into it. I bought a Flashforge Creator Pro with the idea that I’d print the 40cm long frame in sections, and glue them together. After printing out some of the keys, it soon became clear that the accuracy wasn’t sufficient for building a melodica.
So, I sent my files to a printing company, 3D Alchemy, who printed the whole instrument in resin, on a Stratasys Eden 500V. This was much more accurate, but unfortunately, once the melodica was assembled, the keys began bending under the pressure of the springs I was using to keep them in place. It seemed my design and application didn’t suite the properties of the material. 3D Alchemy kindly offered to refund the keys, and took back the frame for extra UV curing.
I decided to get new keys printed in Nylon 12 (strong and flexible) from Shapeways, as I’d heard they were strong. Once they’d arrived, I put them together with the newly cured frame to see how the combination worked. Initially it was great, but over a few days, I was disappointed to find that the resin frame began to warp under the pressure of the springs, just as the keys had earlier. I needed a new frame, but what material should I print it in?

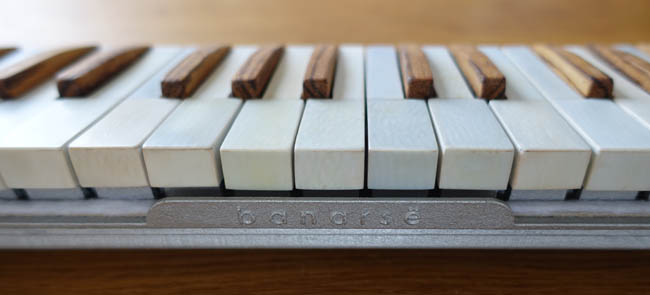
I was so impressed with the strength and accuracy of the Nylon 12 keys, that I decided to reprint the 40cm frame in the same material. There was one potential problem – melodicas need to be airtight and watertight, and Nylon 12 is quite porous. I got around this by coating it in a few layers of acrylic sealant, before finishing it with paint and varnish. Once assembled, I could see that I had the right material. It was strong and light, and looked great with a layer of acrylic paint.
Once it was all working properly, it was time to turn it into an organic looking instrument that would look at home in a professional environment. So I carefully shaped some wood to fit on top of the black keys, and made some end pieces to give the instrument a traditional feel. I also stripped the ivory from some old piano keys to recreate the touch of a quality instrument. And I’m delighted with the result. I finally have a musical instrument that I can take out and play at professional concerts and recordings, and it looks just as good as it sounds.
Daren Banarsë is an artist and composer living in London. Read his blog documenting the making of the first 3D melodica here.