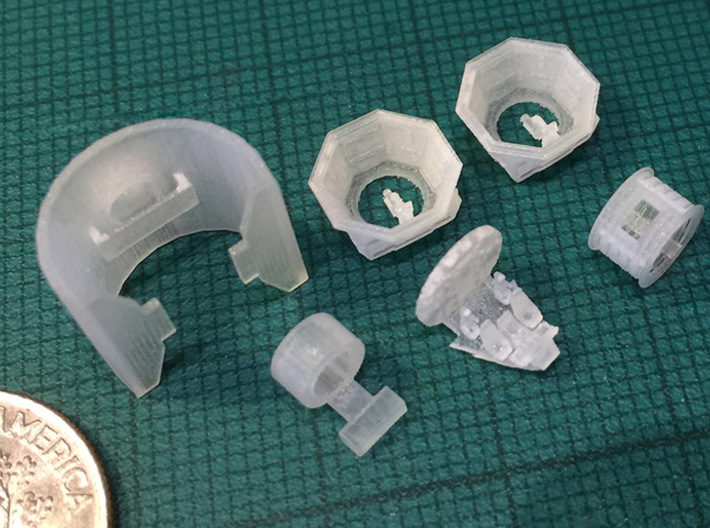
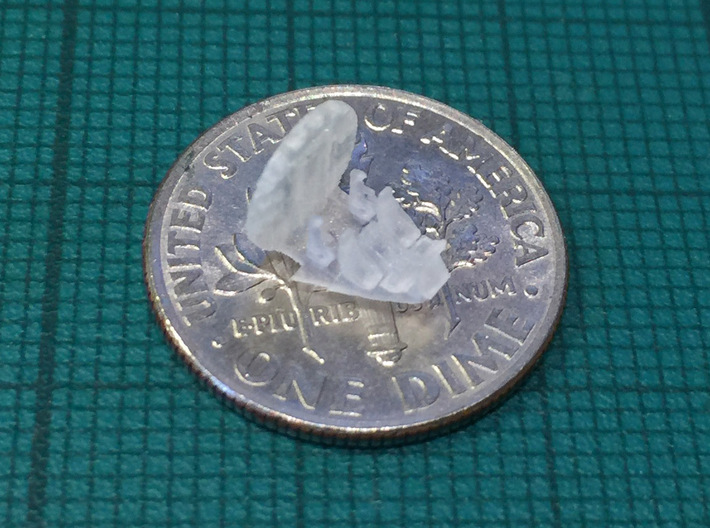
The parts are tiny! (note the large light guide is an earlier version to the one for sale)


Product Description
Bandai 1:350 Falcon. Set 2: the Inside Bits.
Take your Bandai 1:350 Falcon model to levels of detail nobody would think possible! This set lets you detail the visible interior sections, and includes both the cockpit interior, and the two gunbays.
This set is fully compatible with my exterior set of components as well.
Cockpit interior.
I've built the boat-like internal section which fits neatly into the matching cockpit cone that I've built. The "boat" contains a reasonably accurate Falcon dashboard console, two pilots' chairs, and two navigator chairs. Attached to the back of the boat is the circular backwall.
All four seats and the dashboard have additional bracing at the base. This isn't screen-accurate at all, but does mean that the seats are very slightly tougher to break off. An earlier draft of this model had seat posts that were as close as possible to scale, but that meant that the seats snapped off at the brush of a finger. Oh well. The rear seat armrests are also much larger than they should be simply because my test prints kept failing when they had closer-to-scale armrests.
There are no figures, I'm afraid. It's hard enough to get the seats to print at this scale. I couldn't make printable figures that looked any good, as necks, arms and legs are just too thin!
The dash console has a number of small holes for 0.25mm fibre optic. It also has a hollow on the underside for lighting - there's just enough space for a very small (eg: 0402) wired SMD LED. You'd need to feed the wires through the underside of the boat, and out. Unfortunately there's no easy way to illuminate the projecting wings of the dash console. You could glue an 0201 SMD LED (0.65 x 0.35 x 0.2mm!) under there if you really wanted, with conductive paint to power it. But that's pretty microscopic kind of stuff there.
Cockpit backwall.
The backwall will require a lot of cutting of the original kit to fit. The Bandai cockpit tube contains a lot of junk that'll need to be removed. There are covers over the ends and internal tubes to hold the halves together. The backwall has four horizontal openings to simulate the backlit white plastic strips (use Microscale Micro Kristal Klear glazing, or else glue translucent material behind them or into them), and a bunch of tiny square holes for light positions. The model doesn't have any surface detailing, mostly since you can't actually see it at all once it's installed, and also because the design is intended to be backlit.
The lights aren't screen-accurate, but they can't be since they'd be unprintably small if thet were. These large (relative to the prototype) lights are very much a compromise after a lot of test prints.
They'll probably be filled with 3D printing support wax when you receive the product. Run hot water over the part and gently poke an ultrafine wire through the holes to clean them up. Dabs of clear yellow, red, and blue paint will let the holes light up in the proper colours.
The door is permanently closed, even though it was open in ANH, because otherwise it'd be hard to install lighting. And speaking of lights, I've included a cylindrical bracket that you can glue behind the backwall. This is designed to hold a white 3mm LED.
I did not include the side shelf or the interior cockpit sidewalls. This is because they'd be hard to see and easily broken. And, in the case of the sidewalls, very difficult to illuminate properly. The interior of the cockpit tube is fairly thick plastic in the Bandai kit, so it'd also have to be cut or filed back to make room. As it is, paint the interior black and you'll be good. People will be astounded that a cockpit so small has detail anyway!
Gunbay interiors.
It's kind of silly, making these interiors! First, they're insanely small. And second, the bars on the gunbay windows had to be pretty big to make them reliably printable. But hey - if we're going for a completist approach, then let's go all out!
The gunbays are both equipped with gunner seats, the octagonal walls with holes for lights, and a connecting ladder tunnel. Now, the tunnel is famously problematic, since the interior sets could never fit into the exterior set. So we've had to fake it here, with this little short section of tunnel. The tunnel also has concentric cutouts running the length of the tube, so that when lit it vaguely resembles the look of the movie. I've also built a cylindrical tube construction that can accommodate a white 3mm LED, so you can light it all up. Unfortunately the tube doesn't do a very good job of lighting the gunbay walls themselves, so you'll probably need to drill out the holes for 0.25mm fibre optics if you want that look.
As above, you'll have to cut a fair bit of Bandai plastic out to get these parts to fit.
Please read the following if you're interested in these items.
These accurizing parts are not mass-market commercial products. I made them for my own use, and have put them here in case they're of interest to someone else. Possibly you, since you’re reading this.
These are components for the serious model maker who wants to build a more accurate miniature. They require finishing and careful installation. If you don't want to trim, file, sand, and glue, then these aren't the parts you're looking for!
The parts are really really tiny, and easily broken. They push the limits of today's 3D printers and are fiddly to install!
November 2019: Shapeways' changing algorithms affect pricing quite a bit. But by sprueing all the parts and rearranging them I was able to drop the price significantly. However this does mean you have to cut the parts off each sprue/runner very carefully! This is brittle 3D printed acrylic here. Use flush-cut sprue cutters - side-shear cutters tend to break things.


