
Clear Ultra Fine Detail Plastic


Perfect Grade Falcon 1:72 Ramp Hall 1B: Ledge
Made by
Print With Shapeways
 Choose Your Material
 Choose your color and finish
$25.62
Have a question about this product?
contact the designerYou must be logged in and verified to contact the designer.
Product Description
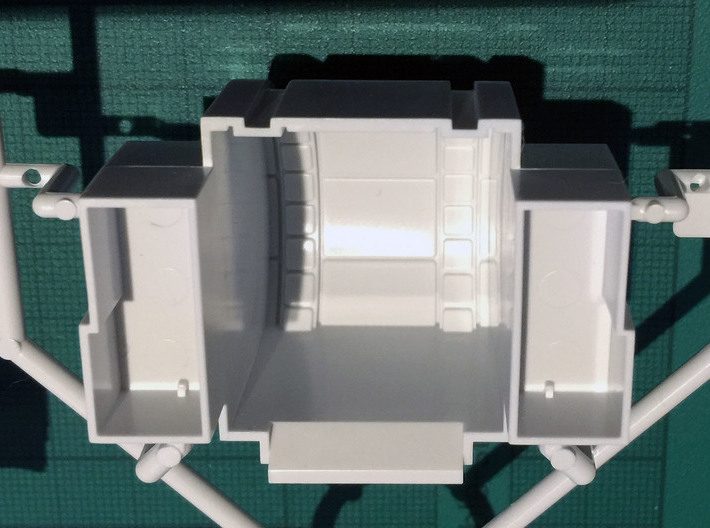
Bandai's 1:72 “Perfect Grade” Falcon model is a pretty impressive piece of engineering, with very few flaws. But one of a handful of things that's arguably a minor error is the small section of corridor visible at the top of the ramp.
WHAT'S WRONG WITH BANDAI'S RAMP CORRIDOR?
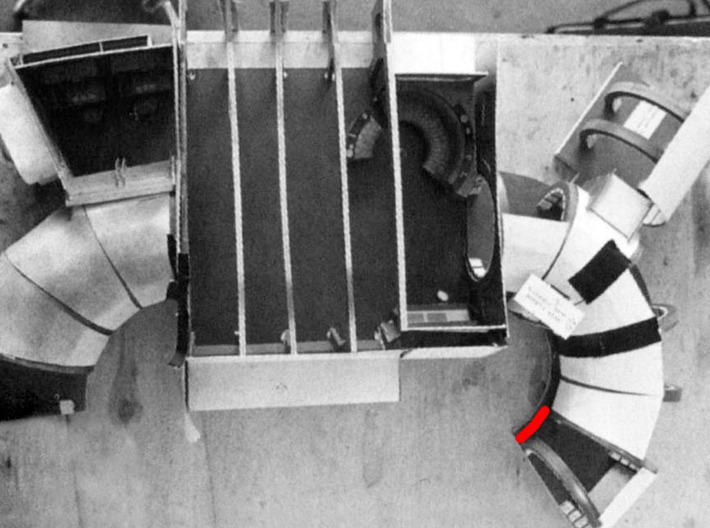
Bandai modelled this interior corridor as a cylinder, which means the two vertical rows of cushions run straight up and down. The actual movie set had a toroid (doughnut shaped) corridor, meaning the rows of cushions appear to curve outwards when seen from the ramp.
So, who cares? After all, the only time this fragment of corridor is actually visible in any Star Wars movie is a split-second moment in Empire Strikes Back. But hey - I want this model to be perfect, and that means correcting this stupid corridor!
THREE DIFFERENT RAMP CORRIDOR VERSIONS.
I have made three versions of this corridor part. ALL VERSIONS REQUIRE MODIFICATION OF BANDAI'S PLASTICS.
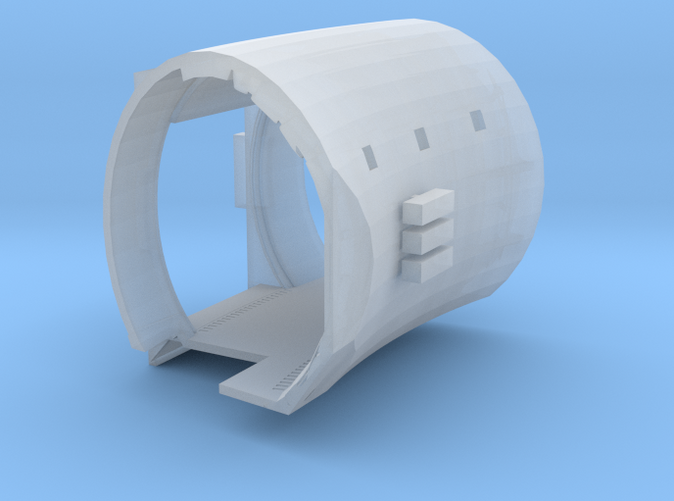
Version 1A: Ledge. This version is the easiest to install. It requires removal of the Bandai mounting pegs at one end, but does not require any other heavy-duty cutting of the saucer internals. It has a notch in the floor (not visible when you look up the ramp) to accommodate internal Bandai parts. It does not have any holes in the floor for lighting (you can see the recesses for the holes in the photo, but they don't go all the way through). Like the Bandai part it has protruding lower wedge which forms a visible ledge at the top of the ramp – one which isn't screen accurate. Finally, it has the ANH-correct missing wall cushion, exposing pipes and conduits.
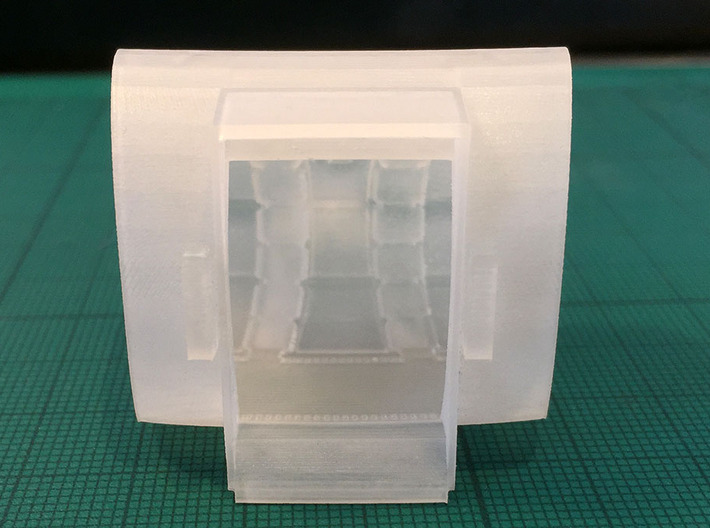
Version 1B: Ledge. This version, that you're looking at now, is mostly the same as version 1A. Only there's no missing wall cushion if you don't like it for some reason.
Version 2: Low Ledge. This version is more work to install, since you need to remove the mounting pegs as above. But you also need to cut out a bunch of plastic at the bottom of the saucer. This version has no holes for floor lighting, and has no ledge at the top of the ramp. It's the low ledge, and the fact that corridor is positioned lower than the Bandai version, which make it look more screen accurate.
Version 3: Low Ledge, Lights. This version is the same as above, only the floor is perforated with little holes. You won't be able to see these holes when the model is finished, but you can put lights under the floor to give a slightly more realistic wash of light up the walls from below. For printing reasons this version is only available in the "frosted detail" plastic material.
THE REAL MOVIE SETS
WALL LIGHTING
THE MISSING CUSHION
OTHER DETAILS
INSTALLATION
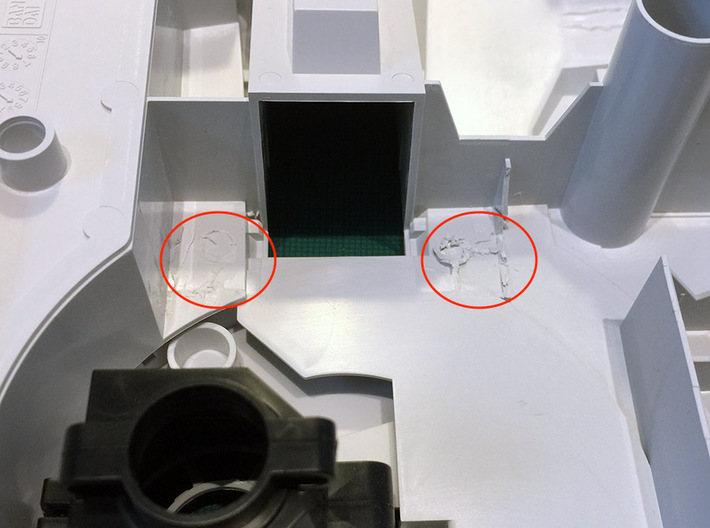
This part is fairly easy to install, but you will need to perform a little surgery. You'll need to cut out the two plastic pegs and tabs that hold the Bandai original part in place. I used a pair of plastic sprue clippers for this - biting out bits of plastic slowly. Note that the Bandai plastic is a bit more brittle than many types of styrene used in model kits. If you're not careful, especially if you twist the tool, the shock waves from snipping pieces off can travel along the plastic, causing splits further down!
An important point - this hallway piece is designed to fit on the end of the ramp interior, which is the separate ramp part with the ramp floor and hydraulic struts, etc. It doesn't fit the outer ramp frame that's part of the lower saucer.
Once the plastic has been cut out, you will be able to glue this piece of hallway directly to the end of the ramp assembly itself, using epoxy or superglue. The floor of the corridor will not be visible from outside the model, but note that you will get a raised lip or ledge at the top of the ramp, just like the original Bandai part. To avoid this ledge you'll need to buy the "no ledge" versions of this part.
CLEANING IS REALLY IMPORTANT
Finally, this part is a partly enclosed cylinder and thus the "fine detail" versions require a lot of wax support to print. That means that there'll be a lot of oil and wax to clean off before you can assemble it! Use a lot of hot water and stiff-bristled paintbrushes, and scrape off any rough-textured white residue using a sharp knife before painting.
I highly recommend a #16-type offset blade, and strong magnifiers! Scrape with the side of the blade, getting things down to raw plastic. Any leftover wax will make it difficult for paint to stick, and can also result in crystalline wax residue showing up.
WHAT'S WRONG WITH BANDAI'S RAMP CORRIDOR?
Bandai modelled this interior corridor as a cylinder, which means the two vertical rows of cushions run straight up and down. The actual movie set had a toroid (doughnut shaped) corridor, meaning the rows of cushions appear to curve outwards when seen from the ramp.
So, who cares? After all, the only time this fragment of corridor is actually visible in any Star Wars movie is a split-second moment in Empire Strikes Back. But hey - I want this model to be perfect, and that means correcting this stupid corridor!
THREE DIFFERENT RAMP CORRIDOR VERSIONS.
I have made three versions of this corridor part. ALL VERSIONS REQUIRE MODIFICATION OF BANDAI'S PLASTICS.
Version 1A: Ledge. This version is the easiest to install. It requires removal of the Bandai mounting pegs at one end, but does not require any other heavy-duty cutting of the saucer internals. It has a notch in the floor (not visible when you look up the ramp) to accommodate internal Bandai parts. It does not have any holes in the floor for lighting (you can see the recesses for the holes in the photo, but they don't go all the way through). Like the Bandai part it has protruding lower wedge which forms a visible ledge at the top of the ramp – one which isn't screen accurate. Finally, it has the ANH-correct missing wall cushion, exposing pipes and conduits.
Version 1B: Ledge. This version, that you're looking at now, is mostly the same as version 1A. Only there's no missing wall cushion if you don't like it for some reason.
Version 2: Low Ledge. This version is more work to install, since you need to remove the mounting pegs as above. But you also need to cut out a bunch of plastic at the bottom of the saucer. This version has no holes for floor lighting, and has no ledge at the top of the ramp. It's the low ledge, and the fact that corridor is positioned lower than the Bandai version, which make it look more screen accurate.
Version 3: Low Ledge, Lights. This version is the same as above, only the floor is perforated with little holes. You won't be able to see these holes when the model is finished, but you can put lights under the floor to give a slightly more realistic wash of light up the walls from below. For printing reasons this version is only available in the "frosted detail" plastic material.
THE REAL MOVIE SETS
- The shooting miniatures used in the Star Wars films never had any interior detailing for the boarding ramp. Bandai's ramp is thus modelled after the full-size physical sets that were built for the actors.
- The section of corridor at the top of the ramp was likely built for Star Wars/ANH as part of the Falcon's interior set, but was never shown to the audience at any point. The area of the ship appeared in two scenes, but the camera was situated in the corridor that leads to the hold, and therefore this wall is never visible. No set photos of this area are known.
- It seems unlikely that the exterior Falcon set for ANH included this bit of internal corridor. The ramp was always photographed at an angle in the first movie, so the top of the ramp is never seen.
- There was a 1976 interview with Alec Guinness on the Death Star Docking Bay set which shows the top of the ramp, but only the edge. It appears to be unfinished, but it's really hard to tell.
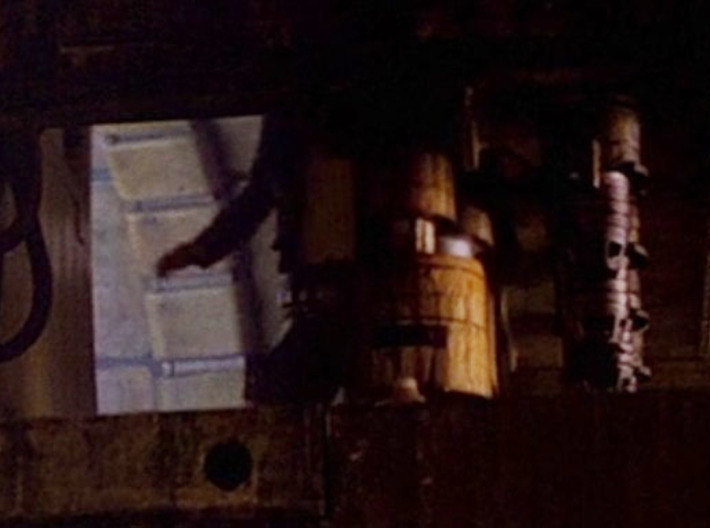
- The ESB full-sized exterior set was thus the only on-screen appearance of this part of the Falcon, when our heroes arrive at Bespin. And even then the corridor is mostly obscured by humans, a Wookiee, and a droid. The only other time I've seen it is in a brief behind the scenes low-rez video clip, and some on-set photos.
WALL LIGHTING
- The corridor wall glimpsed in ESB had a round wall light.
- The Bandai PG Falcon, however, is meant to be a model of the ANH/Star Wars ship, which had square wall lights. Accordingly I've made the wall light for this model square.
- I've included a wall sconce with this model. It's attached with a thin sprues and will need to be cut off. The reason it's a separate part, even though it can't be easily lit if you use the strong white plastic, is to make it easier to paint. Note that it may need some filing down on the end – the "strong white" printing process sometimes results in small projections on the end of small objects.
- If you want a lightable sconce you can either scratchbuild one from clear plastic, or else buy the "No Ledge, Lights" version of this part, which includes a small translucent plastic piece that will fit.
THE MISSING CUSHION
- In ANH there's a missing wall cushion to the lower right as you go up the ramp, revealing a bunch of pipes, conduits, and raw insulation. This missing cushion is not implemented in this version of the part. Version A has the feature.
OTHER DETAILS
- I did not model the floor grids in this version, because the slots would be too small to be printable using the white strong plastic process. You can see shallow depressions where the light grids would be, but the floor isn't visible from outside the model anyway. If you want wall-washing floor lights, you can get the "No Ledge, Lights" version.
- I've included the lower edge of the door, since it's clearly visible in ANH.
- I didn't model the outer wall (eg: the door switch that Han hits during the "Chewie get us outta here!" moment) since you obviously can't see it in the finished model.
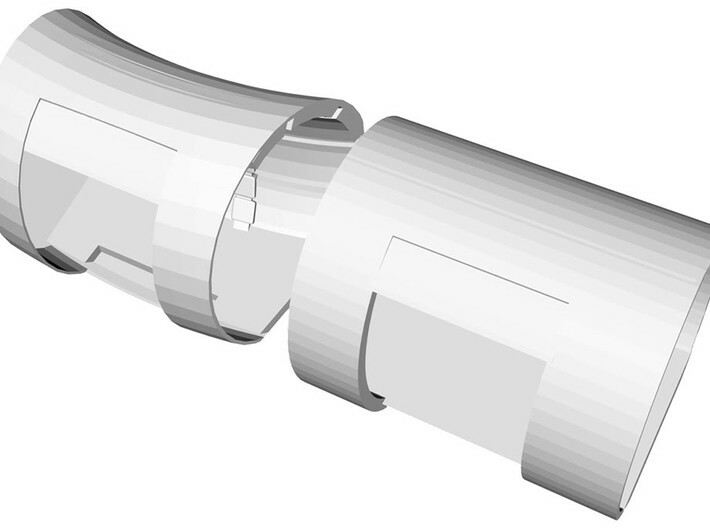
- The original movie set corridor was circular in cross-section. However, to allow clearance with Bandai's gunbay I had to make this model a squashed oval shape. It looks the same when you peer up the ramp, however.
- I'm making this model available in white "strong" plastic, and both grades of "frosted detail" plastic. But frankly there's no point in paying extra for the "extreme" version - the "ultra" version is just fine.
INSTALLATION
This part is fairly easy to install, but you will need to perform a little surgery. You'll need to cut out the two plastic pegs and tabs that hold the Bandai original part in place. I used a pair of plastic sprue clippers for this - biting out bits of plastic slowly. Note that the Bandai plastic is a bit more brittle than many types of styrene used in model kits. If you're not careful, especially if you twist the tool, the shock waves from snipping pieces off can travel along the plastic, causing splits further down!
An important point - this hallway piece is designed to fit on the end of the ramp interior, which is the separate ramp part with the ramp floor and hydraulic struts, etc. It doesn't fit the outer ramp frame that's part of the lower saucer.
Once the plastic has been cut out, you will be able to glue this piece of hallway directly to the end of the ramp assembly itself, using epoxy or superglue. The floor of the corridor will not be visible from outside the model, but note that you will get a raised lip or ledge at the top of the ramp, just like the original Bandai part. To avoid this ledge you'll need to buy the "no ledge" versions of this part.
CLEANING IS REALLY IMPORTANT
Finally, this part is a partly enclosed cylinder and thus the "fine detail" versions require a lot of wax support to print. That means that there'll be a lot of oil and wax to clean off before you can assemble it! Use a lot of hot water and stiff-bristled paintbrushes, and scrape off any rough-textured white residue using a sharp knife before painting.
I highly recommend a #16-type offset blade, and strong magnifiers! Scrape with the side of the blade, getting things down to raw plastic. Any leftover wax will make it difficult for paint to stick, and can also result in crystalline wax residue showing up.
Details
What's in the box:
PG Falcon ramp corridor, ledge
Dimensions:
Success Rate:
First To try.
What's this?
Rating:
Mature audiences only.


