Tan Fine Detail Plastic


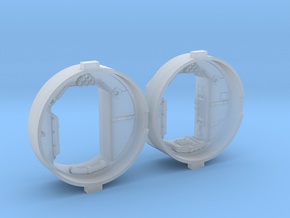
Artoo De Ago's 1:2.3 Battery Harnesses (sequels)
Made by
Print With Shapeways
 Choose Your Material
 Choose your color and finish
$21.21
Have a question about this product?
contact the designerYou must be logged in and verified to contact the designer.
Product Description
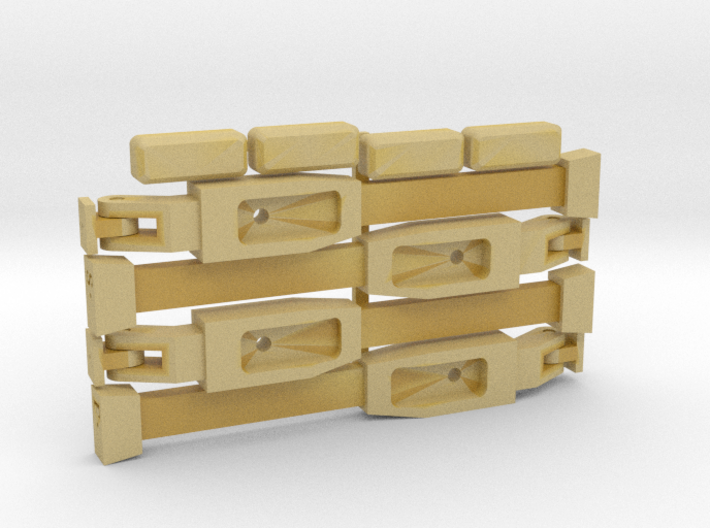
One of the many small details that De Ago abbreviates on their Artoo product are the battery harnesses. These are the four metal thingies on the front of the batteries that sit on the feet. They're supposed to be some sort of tie-down clip or something like that.
The De Ago components look movie-accurate if you don't have your glasses on. They actually just look like lumps of injection-moulded plastic, because they are. They certainly don't look like they actually do anything. So here are some more accurate replacements!
The different versions
The harnesses are one of the details which varied from movie to movie, as I've documented in detail elsewhere. The variants are:
- The original angled ANH versions. These had square corners to the blue buttons. There is evidence that these ones had angled top pieces which fit into rectangular holes that were cut into the upper inside surface of the battery boxes.
- ANH separate piece versions. The original movie harnesses had working hinges at the top. If you want a working hinge version, so you can mount the harness at slightly different angles, you'll want this variant. The hinges and hinge pins are separate pieces, so you can make the top piece movable. Just be very careful applying glue so you don't glue the whole thing together!
- ANH flat-top versions. However, since not everyone agrees that that the ANH harnesses had top pieces that fit into holes, I've also made a version with a flat hinge top, as seen on the ESB droids.
- The ESB versions. These also had square corners to the blue buttons, and had flat hinge tops.
- The sequel versions. These were modelled after the Astromech club spec, and had rounded corners to the blue buttons and long deep hinge recesses.
- A version inspired by the club spec. These have squared-off blue buttons and deep hinge recesses. They are not like those seen in any film, but because people like them I've made a version that looks like them. Note that they do not use any data produced by the club itself.
Screen-accurate.
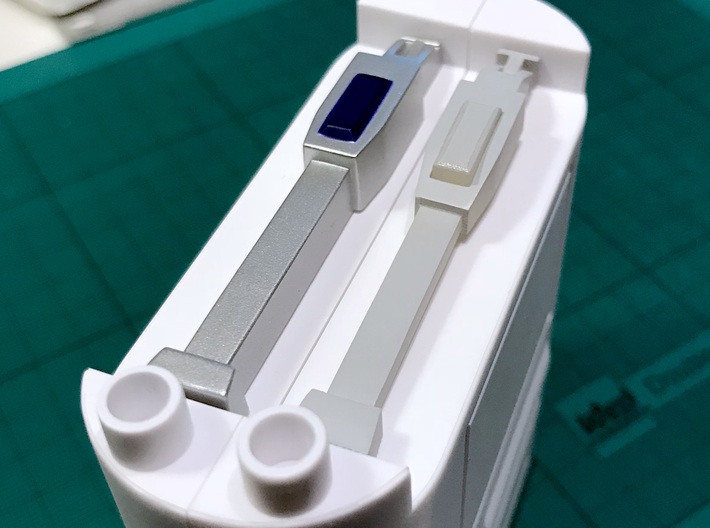
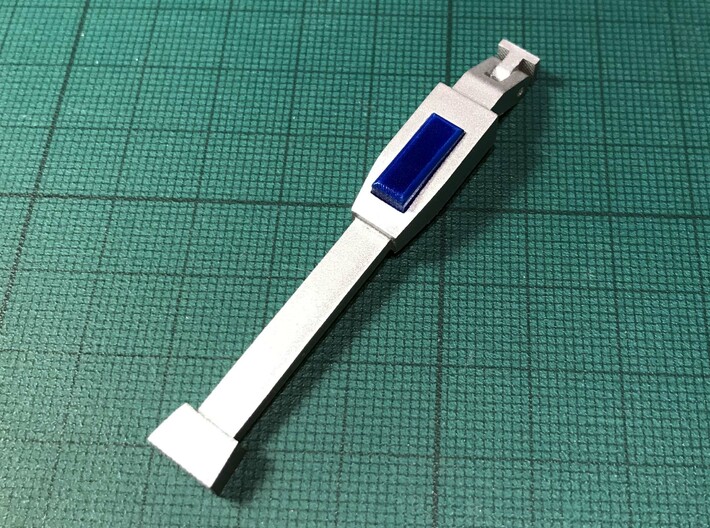
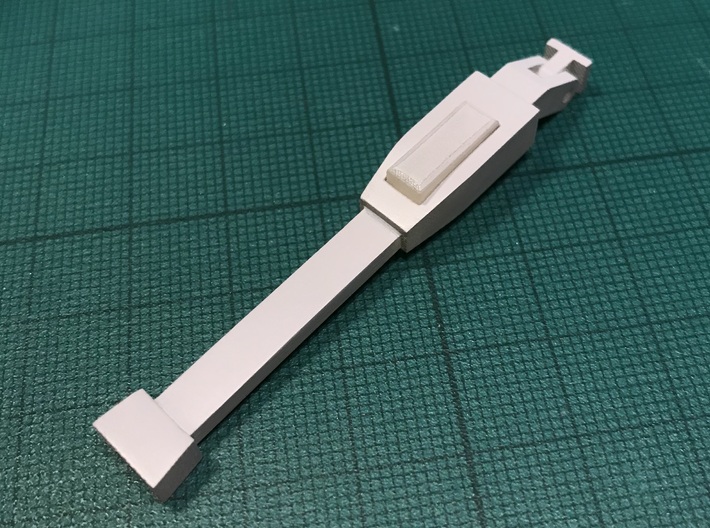
These are designed to resemble as much as possible the original clips used in the sequel (ie: the Force Awakens and later) movie droids, right down to the deep angled gap at the back of the parts and the rounded corners to the blue buttons. (the De Ago ones are flat and flush against the battery box, which is wrong)
They're made in two pieces - the "harness" itself, and the small bit that should be painted blue. I made them two parts for ease of painting. The simulated hinge section is built into the print, and looks quite convincing, but isn't movable since I don't think there's any point.
Painting.
Anyway. You'll just need to sand these up lightly to eliminate print artefacts, paint them simulated dull aluminium using your paint of choice, and glue them in. Be sure to cut off the sprues on the back of the small blue pieces and sand them flat.
Note that in ANH/Episode IV the blue pieces were entirely blue on most droids. However, in ESB/Episode V the blue bits were blue on the outer rectangular surface, and the angled sides were bare aluminium. In the sequels they were all blue.
Installation.
The pieces are designed to be glued in place. They're not designed to be screwed down because 3D-printed acrylic plastic tends to crack from pressure when a screw goes into it, unlike styrene and ABS. However, if you're concerned about the strength of the glue and the clips being knocked out of place, I've added two small holes at the end of each piece. You then drill corresponding holes in the battery pack, and put 0.5mm brass rod into the holes to strengthen the joins.
They should fit quite tightly, and may need a bit of sanding at the sides, so that they fit as snugly as possible against the "battery" casing. You'll also have to fill in the holes in the De Ago plastic where its screws went in.
Which plastic?
This product is available in the both "detail" plastic types, but to be honest there's no point going for the "smoothest" option for something of this size. The "smooth" detail plastic is probably the best choice.
The De Ago components look movie-accurate if you don't have your glasses on. They actually just look like lumps of injection-moulded plastic, because they are. They certainly don't look like they actually do anything. So here are some more accurate replacements!
The different versions
The harnesses are one of the details which varied from movie to movie, as I've documented in detail elsewhere. The variants are:
- The original angled ANH versions. These had square corners to the blue buttons. There is evidence that these ones had angled top pieces which fit into rectangular holes that were cut into the upper inside surface of the battery boxes.
- ANH separate piece versions. The original movie harnesses had working hinges at the top. If you want a working hinge version, so you can mount the harness at slightly different angles, you'll want this variant. The hinges and hinge pins are separate pieces, so you can make the top piece movable. Just be very careful applying glue so you don't glue the whole thing together!
- ANH flat-top versions. However, since not everyone agrees that that the ANH harnesses had top pieces that fit into holes, I've also made a version with a flat hinge top, as seen on the ESB droids.
- The ESB versions. These also had square corners to the blue buttons, and had flat hinge tops.
- The sequel versions. These were modelled after the Astromech club spec, and had rounded corners to the blue buttons and long deep hinge recesses.
- A version inspired by the club spec. These have squared-off blue buttons and deep hinge recesses. They are not like those seen in any film, but because people like them I've made a version that looks like them. Note that they do not use any data produced by the club itself.
Screen-accurate.
These are designed to resemble as much as possible the original clips used in the sequel (ie: the Force Awakens and later) movie droids, right down to the deep angled gap at the back of the parts and the rounded corners to the blue buttons. (the De Ago ones are flat and flush against the battery box, which is wrong)
They're made in two pieces - the "harness" itself, and the small bit that should be painted blue. I made them two parts for ease of painting. The simulated hinge section is built into the print, and looks quite convincing, but isn't movable since I don't think there's any point.
Painting.
Anyway. You'll just need to sand these up lightly to eliminate print artefacts, paint them simulated dull aluminium using your paint of choice, and glue them in. Be sure to cut off the sprues on the back of the small blue pieces and sand them flat.
Note that in ANH/Episode IV the blue pieces were entirely blue on most droids. However, in ESB/Episode V the blue bits were blue on the outer rectangular surface, and the angled sides were bare aluminium. In the sequels they were all blue.
Installation.
The pieces are designed to be glued in place. They're not designed to be screwed down because 3D-printed acrylic plastic tends to crack from pressure when a screw goes into it, unlike styrene and ABS. However, if you're concerned about the strength of the glue and the clips being knocked out of place, I've added two small holes at the end of each piece. You then drill corresponding holes in the battery pack, and put 0.5mm brass rod into the holes to strengthen the joins.
They should fit quite tightly, and may need a bit of sanding at the sides, so that they fit as snugly as possible against the "battery" casing. You'll also have to fill in the holes in the De Ago plastic where its screws went in.
Which plastic?
This product is available in the both "detail" plastic types, but to be honest there's no point going for the "smoothest" option for something of this size. The "smooth" detail plastic is probably the best choice.
Details
What's in the box:
R2 Battery Harnesses Sequels

Dimensions:
Success Rate:
First To try.
What's this?
Rating:
Mature audiences only.


