Tan Fine Detail Plastic


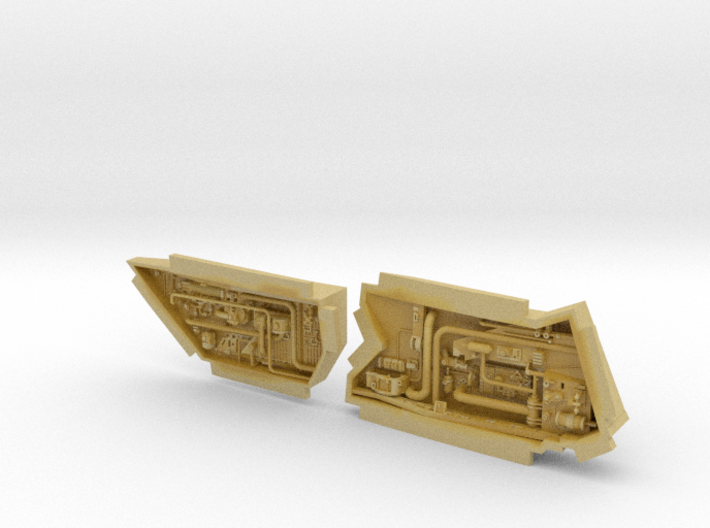
Perfect Grade Falcon 1:72 ESB pits, purist version
Made by
Print With Shapeways
 Choose Your Material
 Choose your color and finish
$39.45
Have a question about this product?
contact the designerYou must be logged in and verified to contact the designer.
Product Description
Convert your 1977-style Bandai "Perfect Grade" Falcon to a 1980-style Falcon with these superdetailed parts! This is the “purist” version, which contains only documented components.
Why are these replacement maintenance pits needed?
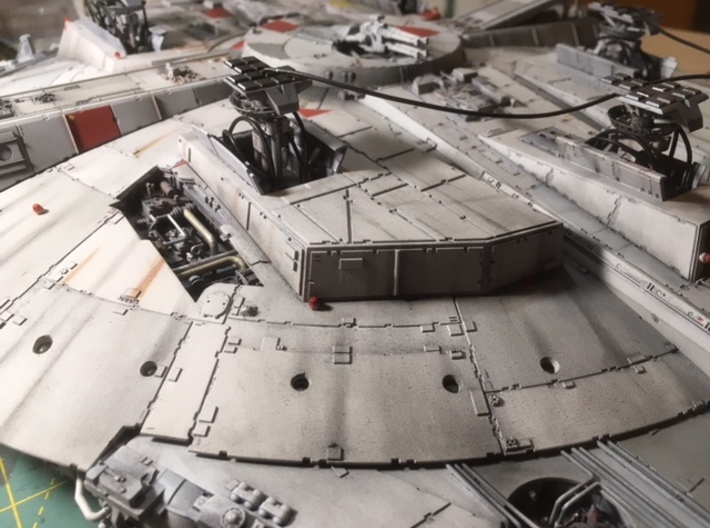
As every Falcon aficionado knows, the ship gained two extra landing gear legs between Episode IV (ANH 1977) and Episode V (ESB 1980). The reason was practical and related to filmmaking - the physical set needed the extra legs to stand up properly - and was never explained narratively in the movie.
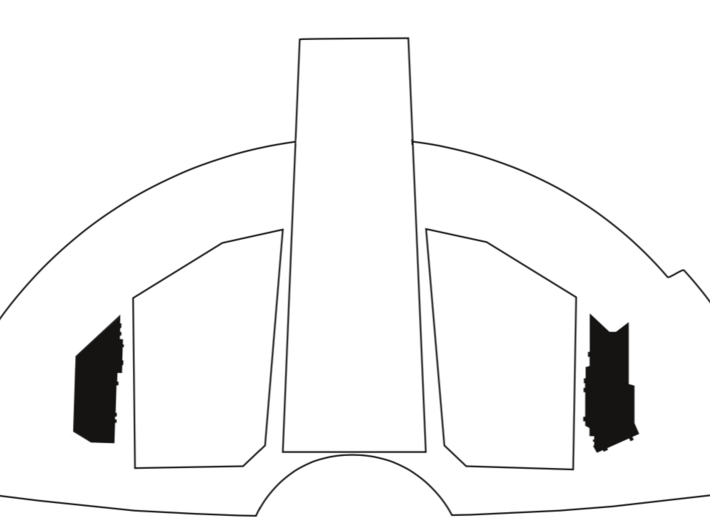
The extra legs meant two extra boxes were added to enclose them on the saucer underside. And that meant that the open maintenance pits on the underside of the hull had to be narrowed and moved over towards the edge.
Bandai’s “Perfect Grade” 1:72 Falcon kit is modelled after the five foot Falcon model constructed for the first movie (later retroactively named Episode IV). Accordingly the kit has three legs and not five legs. Which means some special modifications are required if you want it to look like an Episode V or VI ship.
Fortunately for Episode V fans, fellow designer 308bits has created a beautiful set of landing gear legs and landing gear boxes for you to mod your model. And you’re currently viewing the replacement underside maintenance pits or wells I’ve designed to match!
Getting the pits right.
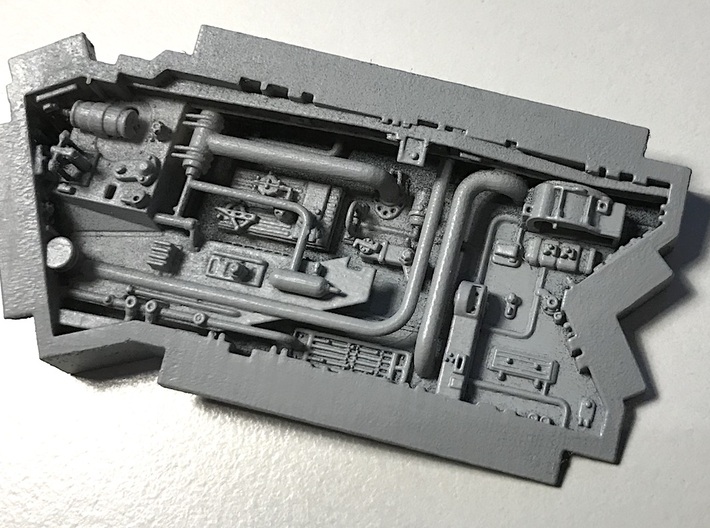
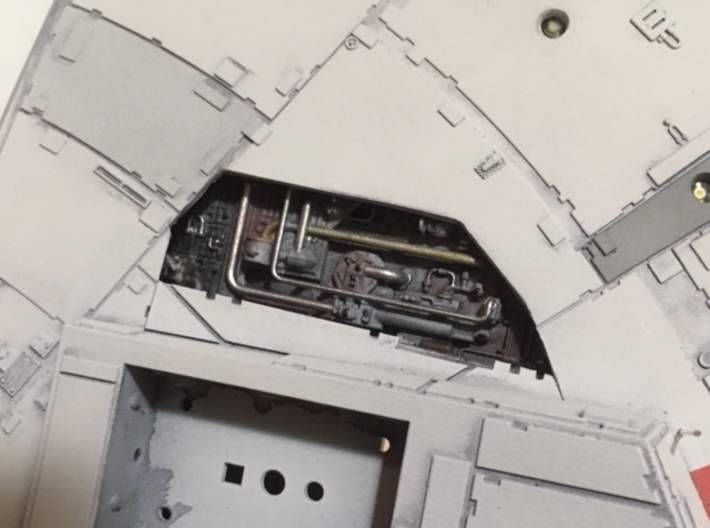
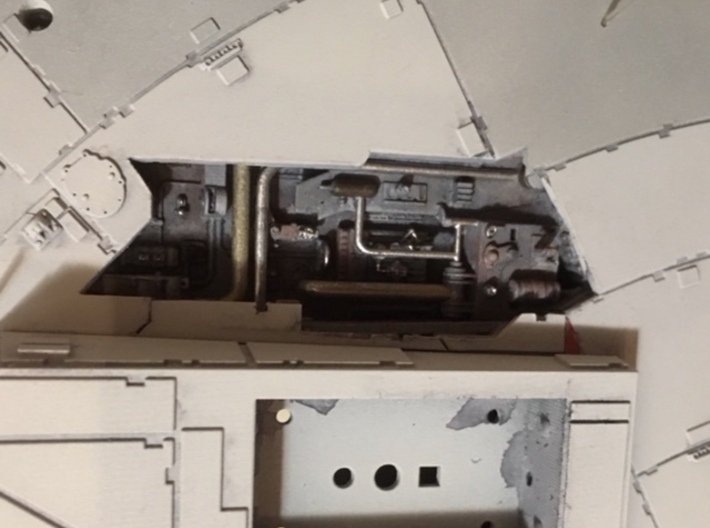
These models have been crafted to resemble the actual pits on the five foot model as they exist today. But it is a tricky problem, because of insufficient photographic documentation. For more information on why it's not straightforward to build replicas of these pits, check out:
Millennium Falcon Notes, the five foot pits
In fact, there have never been any commercial kit models of the ESB-era five foot Falcon. Just the ANH-era five footer and the ESB-era 32 incher. So modifying the Bandai PG Falcon with these parts is the closest you can currently get without scratchbuilding!
“Purist” version versus the “busy” version
Anyway. These two pits are as accurate as I’ve been able to make them, given the information publicly available at this time. However, there are certain areas – mainly the side and end walls – for which I have no photographs at all. So as a designer I either leave these areas blank, or make stuff up.
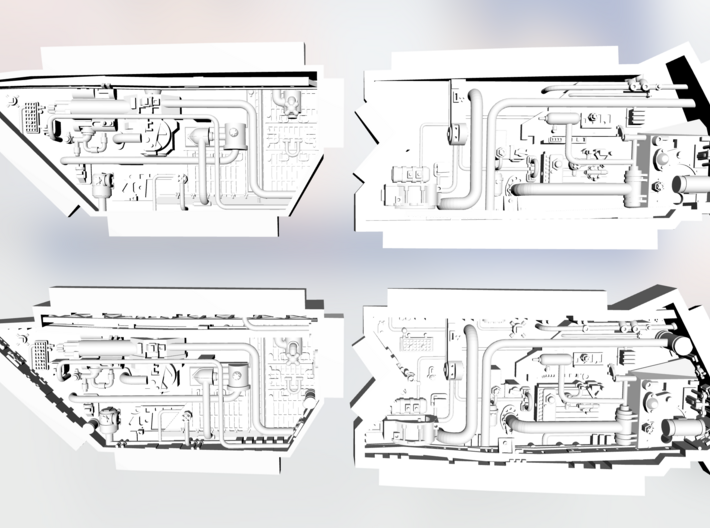
This version of the pits leaves unknown areas completely blank. Which is why I call this the “purist” version. (to see the pit details better, try clicking the "3D" button next to the image at the top of this page)
However, the original ANH pits were a lot more crowded, and this version feels a bit empty in places. So if you prefer a bit more greeblage I've made a second version of these pits, which I call the "busy" version. That version contains a bunch of additional detailing, based on other parts of the Falcon model, to fill in the empty spots.
Which version is better? Well, that's up to you!
Installation
Installation isn't conceptually difficult, but will be fiddly. You'll need to start by removing all posts and clips from the interior of the saucer in the area required. This will take some snipping, cutting, and sanding. Once you've decided the size and positioning of your two pits, carefully mark them and cut them out. I would probably make them a bit undersized so you have some wiggle room if you make a mistake. You'll also need to thin the material at that point, the way Bandai did, to make the armour plating thin and to scale.
Then simply glue the pits onto the saucer interior with epoxy or superglue. The pits have flanges all the way around to give more surface area for the glue.
You will then need to cut a narrow piece of styrene to fit between the pits and the new landing gear boxes, matching the gap.
The pipes sometimes require additional supports which aren't present on the actual model. This is a compromise for printability and strength, since acrylic 3D-printed plastic is quite brittle. Also note that the vertical three-post greebly at the deep end of the port-side box is supposed to stick out of the pit slightly, but just below the level of the outer armour plate.
Acknowledgements
Many thanks to Jay Machado, John Stuart, Gort and the RPF kit part team, t2sides and eagle1 of the RPF, and Lee Malone for sharing the research they’ve done in this area. Also thanks to Fantastic Plastic, Vfxguy, and others who have made their photos of the original model online as a valuable community resource. Your generosity is much appreciated!
And if anyone out there has straight-on photos of the ESB-era five footer underside, please let me know.
Not for beginners
This modification is not for novice model builders. It's going to take a lot of work to get it right. In addition, there are some really tiny and fragile parts to these maintenance pits - particularly the pipes. Acrylic for 3D printing is less flexible and more brittle than the styrene used for the Bandai parts. Be aware!
Why are these replacement maintenance pits needed?
As every Falcon aficionado knows, the ship gained two extra landing gear legs between Episode IV (ANH 1977) and Episode V (ESB 1980). The reason was practical and related to filmmaking - the physical set needed the extra legs to stand up properly - and was never explained narratively in the movie.
The extra legs meant two extra boxes were added to enclose them on the saucer underside. And that meant that the open maintenance pits on the underside of the hull had to be narrowed and moved over towards the edge.
Bandai’s “Perfect Grade” 1:72 Falcon kit is modelled after the five foot Falcon model constructed for the first movie (later retroactively named Episode IV). Accordingly the kit has three legs and not five legs. Which means some special modifications are required if you want it to look like an Episode V or VI ship.
Fortunately for Episode V fans, fellow designer 308bits has created a beautiful set of landing gear legs and landing gear boxes for you to mod your model. And you’re currently viewing the replacement underside maintenance pits or wells I’ve designed to match!
Getting the pits right.
These models have been crafted to resemble the actual pits on the five foot model as they exist today. But it is a tricky problem, because of insufficient photographic documentation. For more information on why it's not straightforward to build replicas of these pits, check out:
Millennium Falcon Notes, the five foot pits
In fact, there have never been any commercial kit models of the ESB-era five foot Falcon. Just the ANH-era five footer and the ESB-era 32 incher. So modifying the Bandai PG Falcon with these parts is the closest you can currently get without scratchbuilding!
“Purist” version versus the “busy” version
Anyway. These two pits are as accurate as I’ve been able to make them, given the information publicly available at this time. However, there are certain areas – mainly the side and end walls – for which I have no photographs at all. So as a designer I either leave these areas blank, or make stuff up.
This version of the pits leaves unknown areas completely blank. Which is why I call this the “purist” version. (to see the pit details better, try clicking the "3D" button next to the image at the top of this page)
However, the original ANH pits were a lot more crowded, and this version feels a bit empty in places. So if you prefer a bit more greeblage I've made a second version of these pits, which I call the "busy" version. That version contains a bunch of additional detailing, based on other parts of the Falcon model, to fill in the empty spots.
Which version is better? Well, that's up to you!
Installation
Installation isn't conceptually difficult, but will be fiddly. You'll need to start by removing all posts and clips from the interior of the saucer in the area required. This will take some snipping, cutting, and sanding. Once you've decided the size and positioning of your two pits, carefully mark them and cut them out. I would probably make them a bit undersized so you have some wiggle room if you make a mistake. You'll also need to thin the material at that point, the way Bandai did, to make the armour plating thin and to scale.
Then simply glue the pits onto the saucer interior with epoxy or superglue. The pits have flanges all the way around to give more surface area for the glue.
You will then need to cut a narrow piece of styrene to fit between the pits and the new landing gear boxes, matching the gap.
The pipes sometimes require additional supports which aren't present on the actual model. This is a compromise for printability and strength, since acrylic 3D-printed plastic is quite brittle. Also note that the vertical three-post greebly at the deep end of the port-side box is supposed to stick out of the pit slightly, but just below the level of the outer armour plate.
Acknowledgements
Many thanks to Jay Machado, John Stuart, Gort and the RPF kit part team, t2sides and eagle1 of the RPF, and Lee Malone for sharing the research they’ve done in this area. Also thanks to Fantastic Plastic, Vfxguy, and others who have made their photos of the original model online as a valuable community resource. Your generosity is much appreciated!
And if anyone out there has straight-on photos of the ESB-era five footer underside, please let me know.
Not for beginners
This modification is not for novice model builders. It's going to take a lot of work to get it right. In addition, there are some really tiny and fragile parts to these maintenance pits - particularly the pipes. Acrylic for 3D printing is less flexible and more brittle than the styrene used for the Bandai parts. Be aware!
Details
What's in the box:
Perfect Grade Falcon 1:72 ESB pits, purist

Dimensions:
Success Rate:
First To try.
What's this?
Rating:
Mature audiences only.


