Clear Ultra Fine Detail Plastic


Moebius EVA Pod - Camera Cone
Made by
Print With Shapeways
 Choose Your Material
 Choose your color and finish
$11.00
Have a question about this product?
contact the designerYou must be logged in and verified to contact the designer.
Product Description
This is a detail piece - a replacement camera cone for the Moebius 1:8 EVA Pod kit.
It's also available combined with a replacement door handle at some savings. Or, if you prefer a more screen-accurate look, there's a version of this cone with the correct fluted cylinder in my set of camera dishes.
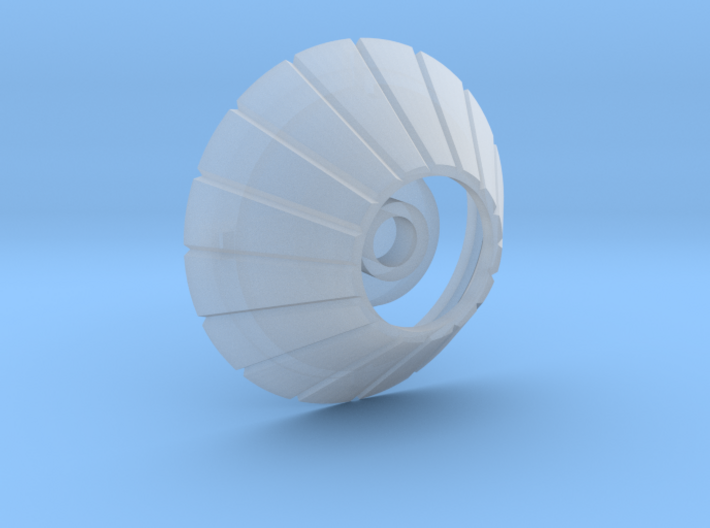
Camera Cone
The pod’s upper sphere has four objects marked on the blueprint as “cameras”. Three are recessed, and one sticks out at the tip of a cone. The idea behind these cameras (and the two on the lower sphere at the back) is to permit the pilot to look around the vehicle via the viewscreens. Personally the design seems odd - I would think that slightly raised fisheye lenses would have provided better coverage - but there you go. It appears, incidentally, that the protruding cone was probably done that way to provide clearance for the door.
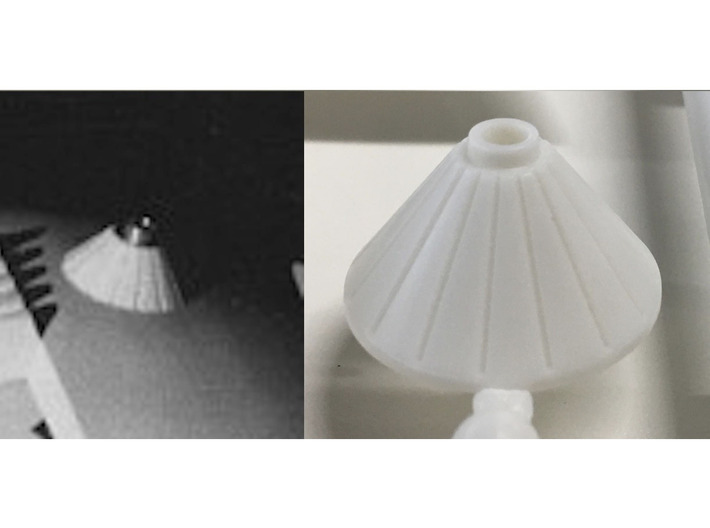
The cone as modelled by Moebius looks too pointy. The original movie cone was flatter, and the ring surrounding the camera tube was wider.
Accordingly this is a glue-on replacement cone, made as two parts for ease of painting, for the Moebius part. It’s hard to know precisely what the exact dimensions should be, as there is little surviving blueprint evidence documenting the sizes of the movie cones. But this cone looks more accurate to me than the Moebius part.
Now, there is one error in this replacement part, and that is that the actual movie metal cylinder at the very top of the cone, where the lens is recessed, had fluted sides. I didn't add the fluting to this version of the cone. Because then you'd have to replace all the other camera cylinders on the pod for consistency, since Moebius didn't add the correct fluting either. However, if you want the full screen-accurate set, I've also made that!
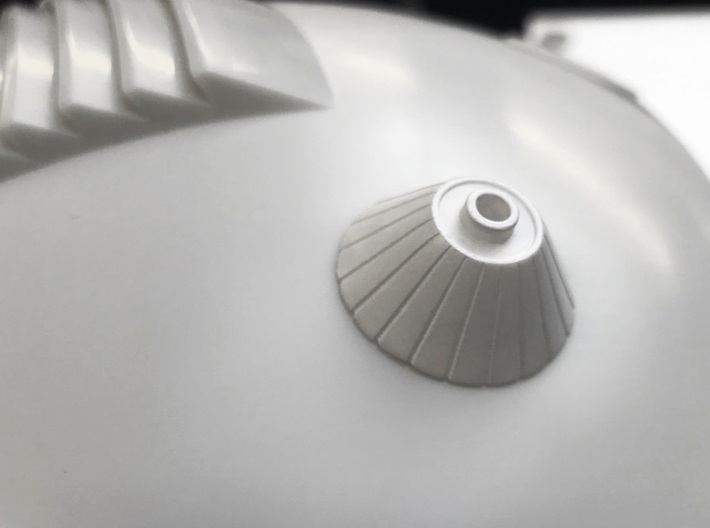
Ridges
The 3D print will unavoidably have a little visible ridging caused by the print process. This can be eliminated with some gentle sanding with extra-fine sandpaper.
Paint
The bulk of the cone should white, like most of the pod. The projecting tube and the ring around its base should be shiny chrome silver. Accordingly I made the metal parts a separate piece.
Extra detail
Since the metal tubes were supposed to contain cameras, an extra fun detail is to put a small drop of clear epoxy or similar resin into the tube to simulate a lens.
It's also available combined with a replacement door handle at some savings. Or, if you prefer a more screen-accurate look, there's a version of this cone with the correct fluted cylinder in my set of camera dishes.
Camera Cone
The pod’s upper sphere has four objects marked on the blueprint as “cameras”. Three are recessed, and one sticks out at the tip of a cone. The idea behind these cameras (and the two on the lower sphere at the back) is to permit the pilot to look around the vehicle via the viewscreens. Personally the design seems odd - I would think that slightly raised fisheye lenses would have provided better coverage - but there you go. It appears, incidentally, that the protruding cone was probably done that way to provide clearance for the door.
The cone as modelled by Moebius looks too pointy. The original movie cone was flatter, and the ring surrounding the camera tube was wider.
Accordingly this is a glue-on replacement cone, made as two parts for ease of painting, for the Moebius part. It’s hard to know precisely what the exact dimensions should be, as there is little surviving blueprint evidence documenting the sizes of the movie cones. But this cone looks more accurate to me than the Moebius part.
Now, there is one error in this replacement part, and that is that the actual movie metal cylinder at the very top of the cone, where the lens is recessed, had fluted sides. I didn't add the fluting to this version of the cone. Because then you'd have to replace all the other camera cylinders on the pod for consistency, since Moebius didn't add the correct fluting either. However, if you want the full screen-accurate set, I've also made that!
Ridges
The 3D print will unavoidably have a little visible ridging caused by the print process. This can be eliminated with some gentle sanding with extra-fine sandpaper.
Paint
The bulk of the cone should white, like most of the pod. The projecting tube and the ring around its base should be shiny chrome silver. Accordingly I made the metal parts a separate piece.
Extra detail
Since the metal tubes were supposed to contain cameras, an extra fun detail is to put a small drop of clear epoxy or similar resin into the tube to simulate a lens.
Details
What's in the box:
EVA Pod Cone

Dimensions:
Success Rate:
First To try.
What's this?
Rating:
Mature audiences only.


