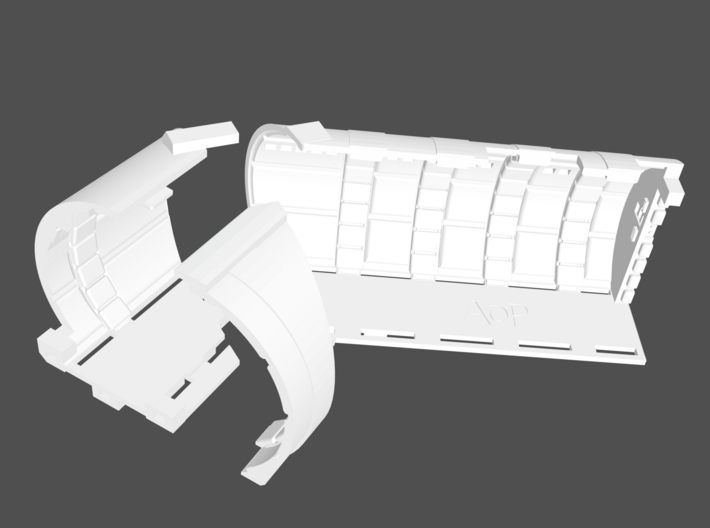
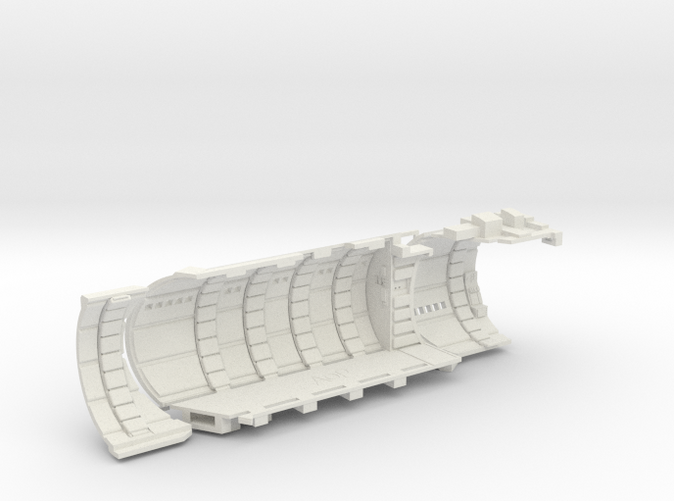
The parts and how they go together


Perfect Grade Falcon 1:72 Corridor Only, Version C
Made by
Print With Shapeways
 Choose Your Material
 Choose your color and finish
$34.68
Have a question about this product?
contact the designerYou must be logged in and verified to contact the designer.
Product Description
Take your Bandai Perfect Grade Falcon cockpit detailing to new levels with this interior corridor!
During all of episode IV the Falcon’s cockpit door was wide open, providing a view of the corridor behind. The cockpit door was introduced in episode V.
Unfortunately the cockpit supplied with the PG Falcon kit has a closed door. Plus the PG interior is of an episode V design: the episode IV cockpit was actually shorter and had fewer greeblies encrusting its surface. Given how period-accurate the exterior of the PG Falcon is, this seems an odd choice.
So here’s what you need to add an internal corridor. And if that's not enough, these parts were developed in partnership with the master brass etchers at Paragrafix. They're fully compatible with their highly accurate and detailed cockpit interior. In fact, the Paragrafix kit includes a corridor floor designed to fit. Awesome!
This is corridor version C: Paragrafix-compatible, lower-quality "versatile" printing, long, with NO wall sconces.
Cockpit Corridor Version A:
This is a fairly long corridor component, printed using the "detail" process. It runs all the way back to the doorframe where the cockpit corridor joins in the internal round corridor. Combine Paragrafix's cockpit interior and this corridor for the ultimate in Falcon realism! Lightable wall sconces are included.
Short Corridor Version B:
This is a short corridor, also printed as "detail" plastic. It doesn't look as good as A if you peer down the corridor, but it's a bit cheaper. Sconces are included.
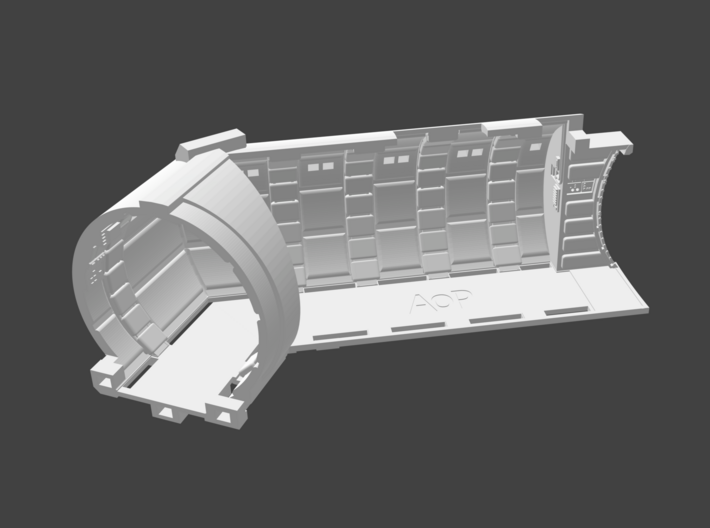
Cockpit Corridor Version C:
This is also a long Paragrafix-compatible corridor, except it's intended to be printed using the "versatile" process instead. This means it's cheaper but is of lower quality - it will have a sugarcube-like texture. The wall sconces are not included with version C.
Corridor Sconces Only:
These are the sconces for version C. They must be bought separately, and printed using the "detail" process.
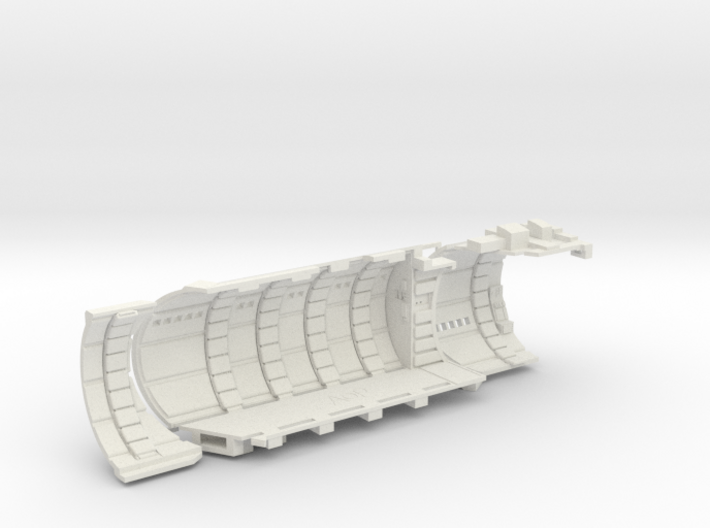
Installation.
- Adding the corridor will require cutting out all the internal brackets and frames from the Bandai corridor tube.
- I recommend snipping small pieces with a sprue cutter, nibbling away at the brackets. Carefully slice back the final protruding bits with a sharp knife (offset or rounded blades are good - pointy ones aren’t), and then use coarse sandpaper to smooth down the cockpit tube interior.
- The corridor is supplied in three parts to keep the pricing down. You'll need to snip off the sprues with sprue cutters, and file off any protruding bits. I would probably paint everything prior to assembly, keeping paint off the areas that contact when they're glued together.
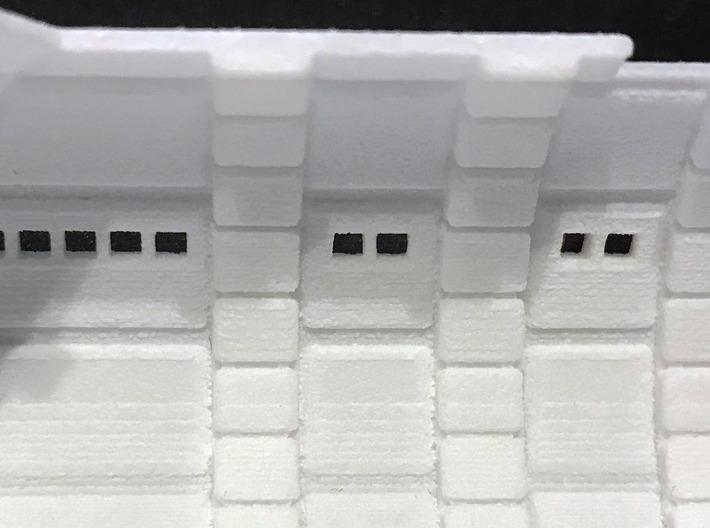
The wall lights.
- The wall light frames are square with round central details, just as they appeared in episode IV. The round sconces came with episode V.
- Despite their miniature size, the sconces can actually be lit! Each sconce comes in two parts - the outer square section and the internal detail (the base of a Coughtrie industrial lamp in the original movies).
- Clean and varnish the square section, coat the cylindrical detail with light-blocking black paint, and you’re ready to add lighting. If light causes the tip of the cylindrical detail to glow you can fill the hole in the square part from behind. Use paint or a bit of wire dipped in black epoxy, for example.
- Don’t cut the square sconce parts off the thin sprues - they’re meant to make it easier to install.
- I’ve included extra sconce parts in case of breakage. The pieces are tiny and delicate!
- Note that the square part of each sconce has an angled back. One way up is correct; the other is upside-down!
- The episode IV wall lights were pale green, not pale blue as in episode V. To get this look, sandwich a thin piece of pale green lighting gel (the type used for flash photography and stage lighting) between the light and the sconce.
- If you choose not to light the sconces, paint the squares dark grey.
- The film’s lit areas had a grid of square recesses, but it isn’t possible to 3D print details as small as this.
Adding lighting.
- The whole tunnel tube will need to be light blocked. Layers of black or silver paint work, but personally I think gluing sheets of thin foil to the bare plastic is easier.
- I recommend using an Age of Plastic LED micropanel (of course) to illuminate the sconces. These are thin and easily glued to the back of the sconces.
- Without micropanels you could light the sconces from below.
- For the underfloor lighting, micropanels are a bit expensive. You could easily glue thin diffuser material to the underside of the brass fret, then put rows of small LEDs (SMD LEDs or 1.8mm axial LEDs) underneath.
- The episode IV lights were lit quite unevenly - some were brighter than others. So it's arguably screen-accurate to have inconsistent lighting!
Screen-accurate details.
- A behind the scenes photo shows that the outer short side of the corridor (on the left when you peer through the cockpit door) had five wall lamps. But the only time you see it in the actual film was when the stormtroopers march out, and mysteriously only two sconces had actual fixtures in them. For total accuracy I’ve supplied an optional part with two working sconces (for the right) and three blank ones (for the left) to be painted a medium grey.
- In keeping with the theme of invisible accuracy I’ve included the Episode IV wall console on the far starboard side for fun. You can’t see this area once the corridor is installed.
- The long wall cushions are arranged the way they were in episode IV - which is to say, not aligned to the ring cushions. By contrast the long horizontal cushions in episode V, and in every other film featuring the Falcon, were aligned to every two ring cushions.
- The wall panels around the door at the far end of the corridor are never fully shown in Episode IV. So this area features a blend of Episode IV and V features. The end wall has a couple of lightable panels - just add a fibre optics for lights.
- Is the geometry screen-accurate? No, actually. There are two reasons for this. First, the full-sized sets for the movie wouldn't have fit inside the model ship if it were scaled-down. There are differences of geometry and form between them. So right away you've got to compromise by adapting the look of the full-sized set to fit the model interior. And second, this corridor has been designed to accommodate lighting for the sconces and underfloor areas. The sconces in particular require some clearance.
The floor.
- The floor has a recess that perfectly matches the ultra-detailed and high-resolution floor etching from Paragrafix. Paint up the floor piece and drop it in!
- The floor is equipped with openings so you can light the edges of the Paragrafix corridor floor, just like in the movies. Just install LED lighting beneath the floor. Awesome.
Corridor - long or short?
- The corridor is available in two lengths.
- The long corridor, versions A and C, resembles the film’s corridor when viewed from the cockpit, though it’s actually foreshortened somewhat. As a result the wall at the end of the corridor is partly visible.
- The short corridor, version B, is considerably truncated to save a little money. You will want to trim back the brass Paragrafix part, or else let it protrude out. You may also want to put a black panel or simulated door behind the doorway area to conceal the interior of the saucer.
Which plastic type?
- The corridor can be printed using either the resin-based “detail” process (A and B) or the powder-based “versatile” process (version C).
- I recommend the “smoother” detail option since it’s cheaper. “Smoothest” doesn’t offer a huge quality improvement in this case and costs a lot.
- The “versatile” process is used for corridor version C. It’s the cheapest of the three, but has a sugarcube-like texture and highly visible print lines in the curves. I don’t honestly recommend “versatile” unless you’re on a really tight budget.
- The version C sconces are available separately since they must be printed using “detail” plastic. They’re too small to be printed using the coarser “versatile” process.
Paragrafix Compatibility.
- In addition to the Paragrafix floor piece fitting in, the bottom of the corridor has three rectangular sockets at the front. These fit the corresponding posts on the Paragrafix cockpit tub component.
Painting.
- The corridors had wall cushions that were a cracked dirty cream in ANH; semi-shiny like vinyl.
- The floors were glossy dark grey. The pipework and exposed metal supports and so on between cushions were a dark metallic grey and black.
- I would probably paint the three corridor pieces prior to assembly. Glue the bits together and touch up.
- It’s easiest to install the brass floor panel when the two back pieces of the corridor are glued together, but before the small side piece is glued in. The metal tucks under some plastic parts - be really careful not to bend the corners when installing.
During all of episode IV the Falcon’s cockpit door was wide open, providing a view of the corridor behind. The cockpit door was introduced in episode V.
Unfortunately the cockpit supplied with the PG Falcon kit has a closed door. Plus the PG interior is of an episode V design: the episode IV cockpit was actually shorter and had fewer greeblies encrusting its surface. Given how period-accurate the exterior of the PG Falcon is, this seems an odd choice.
So here’s what you need to add an internal corridor. And if that's not enough, these parts were developed in partnership with the master brass etchers at Paragrafix. They're fully compatible with their highly accurate and detailed cockpit interior. In fact, the Paragrafix kit includes a corridor floor designed to fit. Awesome!
This is corridor version C: Paragrafix-compatible, lower-quality "versatile" printing, long, with NO wall sconces.
Cockpit Corridor Version A:
This is a fairly long corridor component, printed using the "detail" process. It runs all the way back to the doorframe where the cockpit corridor joins in the internal round corridor. Combine Paragrafix's cockpit interior and this corridor for the ultimate in Falcon realism! Lightable wall sconces are included.
Short Corridor Version B:
This is a short corridor, also printed as "detail" plastic. It doesn't look as good as A if you peer down the corridor, but it's a bit cheaper. Sconces are included.
Cockpit Corridor Version C:
This is also a long Paragrafix-compatible corridor, except it's intended to be printed using the "versatile" process instead. This means it's cheaper but is of lower quality - it will have a sugarcube-like texture. The wall sconces are not included with version C.
Corridor Sconces Only:
These are the sconces for version C. They must be bought separately, and printed using the "detail" process.
Installation.
- Adding the corridor will require cutting out all the internal brackets and frames from the Bandai corridor tube.
- I recommend snipping small pieces with a sprue cutter, nibbling away at the brackets. Carefully slice back the final protruding bits with a sharp knife (offset or rounded blades are good - pointy ones aren’t), and then use coarse sandpaper to smooth down the cockpit tube interior.
- The corridor is supplied in three parts to keep the pricing down. You'll need to snip off the sprues with sprue cutters, and file off any protruding bits. I would probably paint everything prior to assembly, keeping paint off the areas that contact when they're glued together.
The wall lights.
- The wall light frames are square with round central details, just as they appeared in episode IV. The round sconces came with episode V.
- Despite their miniature size, the sconces can actually be lit! Each sconce comes in two parts - the outer square section and the internal detail (the base of a Coughtrie industrial lamp in the original movies).
- Clean and varnish the square section, coat the cylindrical detail with light-blocking black paint, and you’re ready to add lighting. If light causes the tip of the cylindrical detail to glow you can fill the hole in the square part from behind. Use paint or a bit of wire dipped in black epoxy, for example.
- Don’t cut the square sconce parts off the thin sprues - they’re meant to make it easier to install.
- I’ve included extra sconce parts in case of breakage. The pieces are tiny and delicate!
- Note that the square part of each sconce has an angled back. One way up is correct; the other is upside-down!
- The episode IV wall lights were pale green, not pale blue as in episode V. To get this look, sandwich a thin piece of pale green lighting gel (the type used for flash photography and stage lighting) between the light and the sconce.
- If you choose not to light the sconces, paint the squares dark grey.
- The film’s lit areas had a grid of square recesses, but it isn’t possible to 3D print details as small as this.
Adding lighting.
- The whole tunnel tube will need to be light blocked. Layers of black or silver paint work, but personally I think gluing sheets of thin foil to the bare plastic is easier.
- I recommend using an Age of Plastic LED micropanel (of course) to illuminate the sconces. These are thin and easily glued to the back of the sconces.
- Without micropanels you could light the sconces from below.
- For the underfloor lighting, micropanels are a bit expensive. You could easily glue thin diffuser material to the underside of the brass fret, then put rows of small LEDs (SMD LEDs or 1.8mm axial LEDs) underneath.
- The episode IV lights were lit quite unevenly - some were brighter than others. So it's arguably screen-accurate to have inconsistent lighting!
Screen-accurate details.
- A behind the scenes photo shows that the outer short side of the corridor (on the left when you peer through the cockpit door) had five wall lamps. But the only time you see it in the actual film was when the stormtroopers march out, and mysteriously only two sconces had actual fixtures in them. For total accuracy I’ve supplied an optional part with two working sconces (for the right) and three blank ones (for the left) to be painted a medium grey.
- In keeping with the theme of invisible accuracy I’ve included the Episode IV wall console on the far starboard side for fun. You can’t see this area once the corridor is installed.
- The long wall cushions are arranged the way they were in episode IV - which is to say, not aligned to the ring cushions. By contrast the long horizontal cushions in episode V, and in every other film featuring the Falcon, were aligned to every two ring cushions.
- The wall panels around the door at the far end of the corridor are never fully shown in Episode IV. So this area features a blend of Episode IV and V features. The end wall has a couple of lightable panels - just add a fibre optics for lights.
- Is the geometry screen-accurate? No, actually. There are two reasons for this. First, the full-sized sets for the movie wouldn't have fit inside the model ship if it were scaled-down. There are differences of geometry and form between them. So right away you've got to compromise by adapting the look of the full-sized set to fit the model interior. And second, this corridor has been designed to accommodate lighting for the sconces and underfloor areas. The sconces in particular require some clearance.
The floor.
- The floor has a recess that perfectly matches the ultra-detailed and high-resolution floor etching from Paragrafix. Paint up the floor piece and drop it in!
- The floor is equipped with openings so you can light the edges of the Paragrafix corridor floor, just like in the movies. Just install LED lighting beneath the floor. Awesome.
Corridor - long or short?
- The corridor is available in two lengths.
- The long corridor, versions A and C, resembles the film’s corridor when viewed from the cockpit, though it’s actually foreshortened somewhat. As a result the wall at the end of the corridor is partly visible.
- The short corridor, version B, is considerably truncated to save a little money. You will want to trim back the brass Paragrafix part, or else let it protrude out. You may also want to put a black panel or simulated door behind the doorway area to conceal the interior of the saucer.
Which plastic type?
- The corridor can be printed using either the resin-based “detail” process (A and B) or the powder-based “versatile” process (version C).
- I recommend the “smoother” detail option since it’s cheaper. “Smoothest” doesn’t offer a huge quality improvement in this case and costs a lot.
- The “versatile” process is used for corridor version C. It’s the cheapest of the three, but has a sugarcube-like texture and highly visible print lines in the curves. I don’t honestly recommend “versatile” unless you’re on a really tight budget.
- The version C sconces are available separately since they must be printed using “detail” plastic. They’re too small to be printed using the coarser “versatile” process.
Paragrafix Compatibility.
- In addition to the Paragrafix floor piece fitting in, the bottom of the corridor has three rectangular sockets at the front. These fit the corresponding posts on the Paragrafix cockpit tub component.
Painting.
- The corridors had wall cushions that were a cracked dirty cream in ANH; semi-shiny like vinyl.
- The floors were glossy dark grey. The pipework and exposed metal supports and so on between cushions were a dark metallic grey and black.
- I would probably paint the three corridor pieces prior to assembly. Glue the bits together and touch up.
- It’s easiest to install the brass floor panel when the two back pieces of the corridor are glued together, but before the small side piece is glued in. The metal tucks under some plastic parts - be really careful not to bend the corners when installing.
Details
What's in the box:
PG Falcon Corridor C
Dimensions:
Success Rate:
First To try.
What's this?
Rating:
Mature audiences only.


