Tan Fine Detail Plastic


Falcon Basic Set, 1:350
Made by
Print With Shapeways
 Choose Your Material
 Choose your color and finish
$15.21
Have a question about this product?
contact the designerYou must be logged in and verified to contact the designer.
Product Description
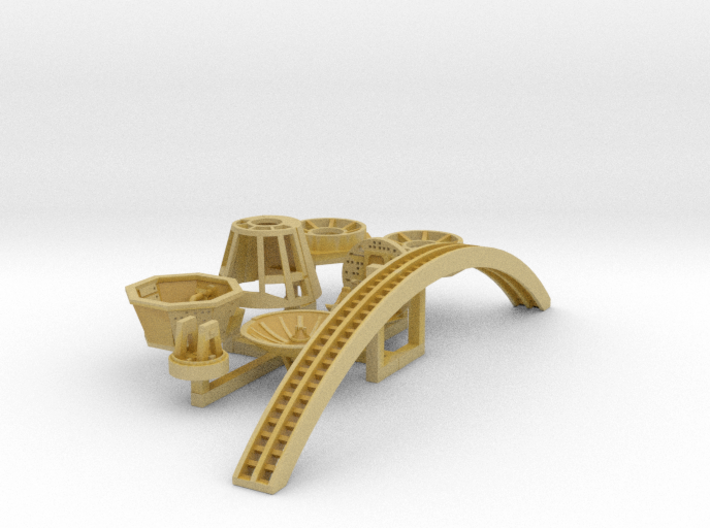
Bandai 1:350 Falcon. Set 4: a Basic Set.
I've made a pretty complete collection of superdetailing parts for the Bandai 1:350 Vehicle 006 model kit. But not everyone is going to want all the stuff I've designed. So this is a highly reduced set. It basically lets you make a somewhat more detailed mini Falcon, intended to be viewed from the top. But it doesn't include everything to turn the default TFA parts into the correct OT look.
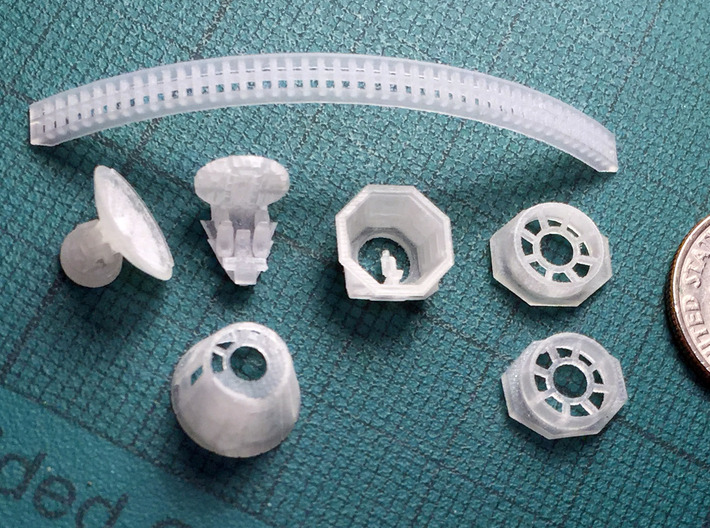
It includes the cockpit cone, the gunport windows, the radar dish, the engine grille, the dish mount, the cockpit interior, and one gunport interior.
Cockpit cone.
This is a direct replacement, and gives you a nice open look. Though it will take some cutting and filing to fit (what they call "fettling" in the UK), and will need epoxy or superglue/ACC. Because of the way 3D printing works, you will probably want to fill the stairstep lines and sand them carefully.
The window bars have been thickened compared to the prototype to make them a bit sturdier and printable. The subtle scalloping on the front surface is present, but hard to see because of the print resolution problem. It's easy to fix that with a flat file.
No provisions are made for glazing since the original ILM models lacked glazing, model glass always looks unconvincing, adding "glass" will emphasize how thick the bars are, and finally glazing makes it harder to see a lovingly detailed interior.
Gunport windows.
The solid gunport windows are tricky to replace since the prototype ones have such slender bars. I had to make thicker bars to get something printable, which does unfortunately limit views of the interior. No glazing, as above. The windows are designed to sit flush with the surface, unlike the incorrectly sunken Bandai ones. You will need to carefully drill out the existing solid windows to fit these ones. It's hard to get the hole perfectly round, so this may require a bit of putty to fill any gaps.
Dish.
Here's a replacement radar dish, since the Bandai one is a bit overscaled and unconvincing. It's made in two parts so you can glue it together at whatever angle works for you. I suppose in theory you could drill tiny holes and add wires and make it adjustable, but it wouldn't be easy.
Engine grilles.
I've made three different engine grilles, but this set has only the wider grid. It is a bit closer to the TFA version of the engine, but it's less fragile than the finely spaced grid version.
Cockpit interior.
I've built the boat-like internal section which fits neatly into the matching cockpit cone that I've built. The "boat" contains a reasonably accurate Falcon dashboard console, two pilots' chairs, and two navigator chairs. Attached to the back of the boat is the circular backwall.
All four seats and the dashboard have additional bracing at the base. This isn't screen-accurate at all, but does mean that the seats are very slightly tougher to break off. An earlier draft of this model had seat posts that were as close as possible to scale, but that meant that the seats snapped off at the brush of a finger. Oh well. The rear seat armrests are also much larger than they should be simply because my test prints kept failing when they had closer-to-scale armrests.
The dash console has a number of small holes for 0.25mm fibre optic. It also has a hollow on the underside for lighting - there's just enough space for a very small (eg: 0402) wired SMD LED. You'd need to feed the wires through the underside of the boat, and out. Unfortunately there's no easy way to illuminate the projecting wings of the dash console. You could glue an 0201 SMD LED (0.65 x 0.35 x 0.2mm!) under there if you really wanted, with conductive paint to power it. But that's pretty microscopic kind of stuff there.
Cockpit backwall.
The backwall will require a lot of cutting of the original kit to fit. The Bandai cockpit tube contains a lot of junk that'll need to be removed. There are covers over the ends and internal tubes to hold the halves together. The backwall has four horizontal openings to simulate the backlit white plastic strips (glue translucent material behind them or into them), and a bunch of tiny square holes for light positions. The model doesn't have any surface detailing, mostly since you can't actually see it at all once it's installed, and also because the design was more to be backlit.
The lights aren't screen-accurate, but they can't be since they'd be unprintably small if they were. These large (relative to the prototype) lights are very much a compromise after a lot of test prints.
They'll probably be filled with 3D printing support wax when you receive the product. Run hot water over the part and gently poke an ultrafine wire through the holes to clean them up. Dabs of clear yellow, red, and blue paint will let the holes light up in the proper colours.
The door is set permanently closed, because otherwise it'd be hard to arrange for lighting to work. I did not include the side shelf or the interior cockpit sidewalls. This is because they'd be hard to see and easily broken. And, in the case of the sidewalls, very difficult to illuminate properly. The interior of the cockpit tube is fairly thick plastic in the Bandai kit, so it'd also have to be cut or filed back to make room. As it is, paint the interior black and you'll be good. People will be astounded that a cockpit so small has detail anyway!
Gunbay interiors.
It's probably pretty pointless, adding a gunbay interior! First, it's insanely small. And second, the bars on the gunbay windows had to be pretty big to make them reliably printable. But hey - if we're going for a completist approach, then let's go all out! To save money this set has only one gunbay, and also lacks the connecting tunnel.
The gunbay is equipped with a gunner seat, and the octagonal walls have holes for lights
Please read the following if you're interested in these items.
These are accurizing components, not refined commercial products. They won't easily snap together like a plastic kit.
They're parts for the serious, yet fun-loving, hobbyist who wants to build a more accurate model. If you don't want to trim, sand, and glue - then these aren't the parts you're looking for!
Many of the the prints are delicate, easily broken, and so minuscule they push the limits of today's printing technology. The detail visible in the digital previews can't always appear in the final product - it's limited to the resolution of 3D printers. 16 microns may sound tiny, but the print lines are still visible.
To sum up, I made these parts for my own use. I've put them here for anyone else wants them, since I think they're pretty useful. But they're NOT for the inexperienced, the rushed, or those with unrealistic expectations of today's 3D printing!
I've made a pretty complete collection of superdetailing parts for the Bandai 1:350 Vehicle 006 model kit. But not everyone is going to want all the stuff I've designed. So this is a highly reduced set. It basically lets you make a somewhat more detailed mini Falcon, intended to be viewed from the top. But it doesn't include everything to turn the default TFA parts into the correct OT look.
It includes the cockpit cone, the gunport windows, the radar dish, the engine grille, the dish mount, the cockpit interior, and one gunport interior.
Cockpit cone.
This is a direct replacement, and gives you a nice open look. Though it will take some cutting and filing to fit (what they call "fettling" in the UK), and will need epoxy or superglue/ACC. Because of the way 3D printing works, you will probably want to fill the stairstep lines and sand them carefully.
The window bars have been thickened compared to the prototype to make them a bit sturdier and printable. The subtle scalloping on the front surface is present, but hard to see because of the print resolution problem. It's easy to fix that with a flat file.
No provisions are made for glazing since the original ILM models lacked glazing, model glass always looks unconvincing, adding "glass" will emphasize how thick the bars are, and finally glazing makes it harder to see a lovingly detailed interior.
Gunport windows.
The solid gunport windows are tricky to replace since the prototype ones have such slender bars. I had to make thicker bars to get something printable, which does unfortunately limit views of the interior. No glazing, as above. The windows are designed to sit flush with the surface, unlike the incorrectly sunken Bandai ones. You will need to carefully drill out the existing solid windows to fit these ones. It's hard to get the hole perfectly round, so this may require a bit of putty to fill any gaps.
Dish.
Here's a replacement radar dish, since the Bandai one is a bit overscaled and unconvincing. It's made in two parts so you can glue it together at whatever angle works for you. I suppose in theory you could drill tiny holes and add wires and make it adjustable, but it wouldn't be easy.
Engine grilles.
I've made three different engine grilles, but this set has only the wider grid. It is a bit closer to the TFA version of the engine, but it's less fragile than the finely spaced grid version.
Cockpit interior.
I've built the boat-like internal section which fits neatly into the matching cockpit cone that I've built. The "boat" contains a reasonably accurate Falcon dashboard console, two pilots' chairs, and two navigator chairs. Attached to the back of the boat is the circular backwall.
All four seats and the dashboard have additional bracing at the base. This isn't screen-accurate at all, but does mean that the seats are very slightly tougher to break off. An earlier draft of this model had seat posts that were as close as possible to scale, but that meant that the seats snapped off at the brush of a finger. Oh well. The rear seat armrests are also much larger than they should be simply because my test prints kept failing when they had closer-to-scale armrests.
The dash console has a number of small holes for 0.25mm fibre optic. It also has a hollow on the underside for lighting - there's just enough space for a very small (eg: 0402) wired SMD LED. You'd need to feed the wires through the underside of the boat, and out. Unfortunately there's no easy way to illuminate the projecting wings of the dash console. You could glue an 0201 SMD LED (0.65 x 0.35 x 0.2mm!) under there if you really wanted, with conductive paint to power it. But that's pretty microscopic kind of stuff there.
Cockpit backwall.
The backwall will require a lot of cutting of the original kit to fit. The Bandai cockpit tube contains a lot of junk that'll need to be removed. There are covers over the ends and internal tubes to hold the halves together. The backwall has four horizontal openings to simulate the backlit white plastic strips (glue translucent material behind them or into them), and a bunch of tiny square holes for light positions. The model doesn't have any surface detailing, mostly since you can't actually see it at all once it's installed, and also because the design was more to be backlit.
The lights aren't screen-accurate, but they can't be since they'd be unprintably small if they were. These large (relative to the prototype) lights are very much a compromise after a lot of test prints.
They'll probably be filled with 3D printing support wax when you receive the product. Run hot water over the part and gently poke an ultrafine wire through the holes to clean them up. Dabs of clear yellow, red, and blue paint will let the holes light up in the proper colours.
The door is set permanently closed, because otherwise it'd be hard to arrange for lighting to work. I did not include the side shelf or the interior cockpit sidewalls. This is because they'd be hard to see and easily broken. And, in the case of the sidewalls, very difficult to illuminate properly. The interior of the cockpit tube is fairly thick plastic in the Bandai kit, so it'd also have to be cut or filed back to make room. As it is, paint the interior black and you'll be good. People will be astounded that a cockpit so small has detail anyway!
Gunbay interiors.
It's probably pretty pointless, adding a gunbay interior! First, it's insanely small. And second, the bars on the gunbay windows had to be pretty big to make them reliably printable. But hey - if we're going for a completist approach, then let's go all out! To save money this set has only one gunbay, and also lacks the connecting tunnel.
The gunbay is equipped with a gunner seat, and the octagonal walls have holes for lights
Please read the following if you're interested in these items.
These are accurizing components, not refined commercial products. They won't easily snap together like a plastic kit.
They're parts for the serious, yet fun-loving, hobbyist who wants to build a more accurate model. If you don't want to trim, sand, and glue - then these aren't the parts you're looking for!
Many of the the prints are delicate, easily broken, and so minuscule they push the limits of today's printing technology. The detail visible in the digital previews can't always appear in the final product - it's limited to the resolution of 3D printers. 16 microns may sound tiny, but the print lines are still visible.
To sum up, I made these parts for my own use. I've put them here for anyone else wants them, since I think they're pretty useful. But they're NOT for the inexperienced, the rushed, or those with unrealistic expectations of today's 3D printing!
Details
What's in the box:
Falcon 1:350 Basic Set

Dimensions:
Success Rate:
First To try.
What's this?
Rating:
Mature audiences only.


