Clear Ultra Fine Detail Plastic


Space fighter cockpit, interior, pilot, 1:144
Made by
Print With Shapeways
 Choose Your Material
 Choose your color and finish
$11.00
Have a question about this product?
contact the designerYou must be logged in and verified to contact the designer.
Product Description
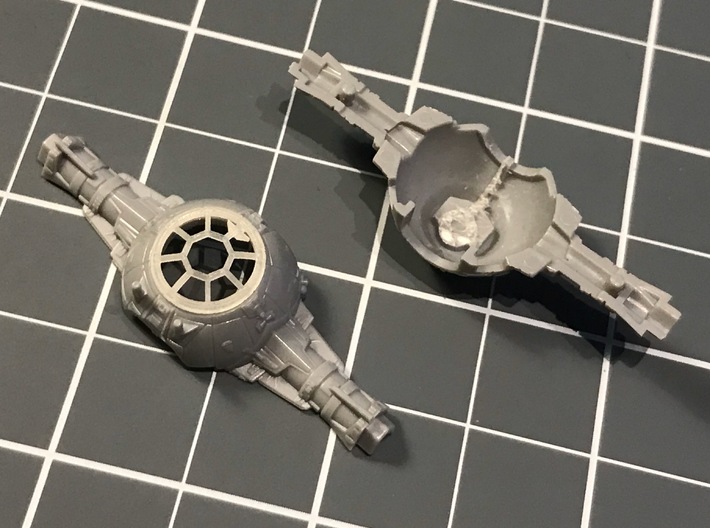
So you've got the amazing Bandai Vehicle Kit 007, which includes a miniature Dark Lord spacefighter, plus a hexagonal-wing ship for his disposable colleague. The detail on the ships is amazing. Beautiful stuff! But - the cockpit and hatch windows are solid! And there are no interiors. Drat!
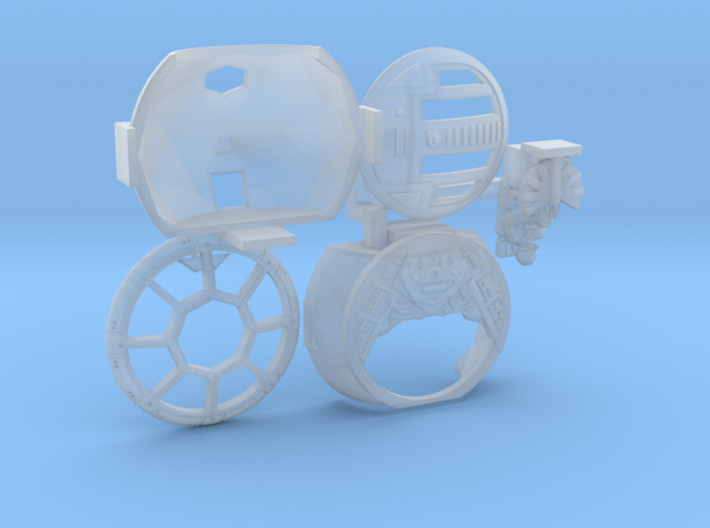
You could spend forever carefully cutting out the window openings with a sharp knife, or you could buy this superdetailing set. This includes a replacement octagonal front window frame, a replacement top hatch with windows, an interior, and a pilot! Woo.
Though if you'd prefer the Dark Lord instead I've got that version as well. Or a combined two-ship version.
Installation
You'll obviously have to cut out the internal bracing on the model, and also some of the plastic around the window holes. This is slow and fiddly work, and requires an extremely sharp knife and a good magnifier. Take your time - it's best to cut off too little than too much. Cut and test the fit iteratively.
Be sure to clean the printed parts extremely thoroughly before installing them! There tends to be a lot of residual wax and oil left on the parts. I recommend flowing hot water, and using a fine brush to gently but persistently rub the parts to clean everything off. Be super careful - these are insanely delicate parts!
I'd also use a sprue cutter to snip the sprues. Put the blades at the base of each part, pushing up against the flat edges. Don't use a scissor-type or shearing sprue cutter. Always use a flush cutter where the blades meet and touch. The side-shearing blades tend to crack the brittle 3D printed plastic.
Interior
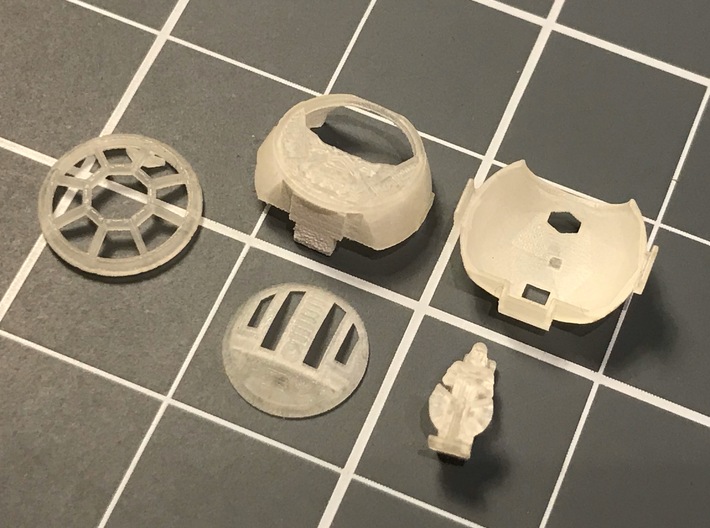
The cockpit interior for this set is sort of a squashed sphere. The reason why the rear half is so flattened is because you can't really tell from the outside that it isn't round, and the squashed shape allows for more clearance at the back side of the sphere. This means that there's space for wiring and LEDs if you want to illuminate the cockpit.
That's also why there's a hole in the back wall at the base, plus an open area under the seat. You can easily run a tiny 0401 SMD LED in there for creepy red backlighting of the interior. Or, for more realistic lighting, you can glue the LEDs on the front interior at the top, either side. Just don't make the LEDs too bright, as the cockpit shouldn't look like a glowing red explosion is happening in there.
The interior can be installed by putting a blob of thick glue, such as epoxy, on the interior of the craft, and carefully allowing the interior to settle as it hardens. It's not designed to fit precisely against the interior, since the fit of that would depend on how much material you cut out first. Accordingly this whole process is kind of fiddly!
The inner surfaces should have red stripes on the triangular internal panels. You could implement this by scratching fine lines in a black-painted interior, then shining red light onto the outside surface of the walls.
Pilot
This particular set includes a disposable black-suited Imperial pilot. I've also made a Dark Lord version of this set if you want one of those. There's a hole that can accommodate a 0.25mm fibre optic in the back. If you want to illuminate the buttons on the chest box, run a fibre through, then scrape off a tiny amount of paint on the box button. Note that you'll have to put a ton of light-blocking paint on the figure first. I recommend a coat of silver paint, since the metal particles in the paint block light pretty well. I don't think the movie pilots actually had illuminated chest boxes, but whatever. It's optional!
Note that the pilot figure's chair is not meant to be glued into the recess at the bottom of the front half of the interior. The back of the interior, with its protruding tab, fits into the opening at the bottom. And the pilot figure fits on top of that. (ie: the pilot's feet are flush with the floor)
Finally, remember that the pilot and seat are incredibly tiny and thus incredibly easily broken parts! Treat them with immense care.
Hatch and Windowframe
This set includes replacement hatch and windowframe parts. They're fully open, allowing visibility into the interior. The bars are slightly oversized for printability.
These weren't designed to install window glass, because that blocks the view of the interior. You could probably install really thin flexible plastic in there if you want, but it's tricky fiddly work.
You could spend forever carefully cutting out the window openings with a sharp knife, or you could buy this superdetailing set. This includes a replacement octagonal front window frame, a replacement top hatch with windows, an interior, and a pilot! Woo.
Though if you'd prefer the Dark Lord instead I've got that version as well. Or a combined two-ship version.
Installation
You'll obviously have to cut out the internal bracing on the model, and also some of the plastic around the window holes. This is slow and fiddly work, and requires an extremely sharp knife and a good magnifier. Take your time - it's best to cut off too little than too much. Cut and test the fit iteratively.
Be sure to clean the printed parts extremely thoroughly before installing them! There tends to be a lot of residual wax and oil left on the parts. I recommend flowing hot water, and using a fine brush to gently but persistently rub the parts to clean everything off. Be super careful - these are insanely delicate parts!
I'd also use a sprue cutter to snip the sprues. Put the blades at the base of each part, pushing up against the flat edges. Don't use a scissor-type or shearing sprue cutter. Always use a flush cutter where the blades meet and touch. The side-shearing blades tend to crack the brittle 3D printed plastic.
Interior
The cockpit interior for this set is sort of a squashed sphere. The reason why the rear half is so flattened is because you can't really tell from the outside that it isn't round, and the squashed shape allows for more clearance at the back side of the sphere. This means that there's space for wiring and LEDs if you want to illuminate the cockpit.
That's also why there's a hole in the back wall at the base, plus an open area under the seat. You can easily run a tiny 0401 SMD LED in there for creepy red backlighting of the interior. Or, for more realistic lighting, you can glue the LEDs on the front interior at the top, either side. Just don't make the LEDs too bright, as the cockpit shouldn't look like a glowing red explosion is happening in there.
The interior can be installed by putting a blob of thick glue, such as epoxy, on the interior of the craft, and carefully allowing the interior to settle as it hardens. It's not designed to fit precisely against the interior, since the fit of that would depend on how much material you cut out first. Accordingly this whole process is kind of fiddly!
The inner surfaces should have red stripes on the triangular internal panels. You could implement this by scratching fine lines in a black-painted interior, then shining red light onto the outside surface of the walls.
Pilot
This particular set includes a disposable black-suited Imperial pilot. I've also made a Dark Lord version of this set if you want one of those. There's a hole that can accommodate a 0.25mm fibre optic in the back. If you want to illuminate the buttons on the chest box, run a fibre through, then scrape off a tiny amount of paint on the box button. Note that you'll have to put a ton of light-blocking paint on the figure first. I recommend a coat of silver paint, since the metal particles in the paint block light pretty well. I don't think the movie pilots actually had illuminated chest boxes, but whatever. It's optional!
Note that the pilot figure's chair is not meant to be glued into the recess at the bottom of the front half of the interior. The back of the interior, with its protruding tab, fits into the opening at the bottom. And the pilot figure fits on top of that. (ie: the pilot's feet are flush with the floor)
Finally, remember that the pilot and seat are incredibly tiny and thus incredibly easily broken parts! Treat them with immense care.
Hatch and Windowframe
This set includes replacement hatch and windowframe parts. They're fully open, allowing visibility into the interior. The bars are slightly oversized for printability.
These weren't designed to install window glass, because that blocks the view of the interior. You could probably install really thin flexible plastic in there if you want, but it's tricky fiddly work.
Details
What's in the box:
TIE fighter cockpit, pilot, 1:144

Dimensions:
Success Rate:
First To try.
What's this?
Rating:
Mature audiences only.


