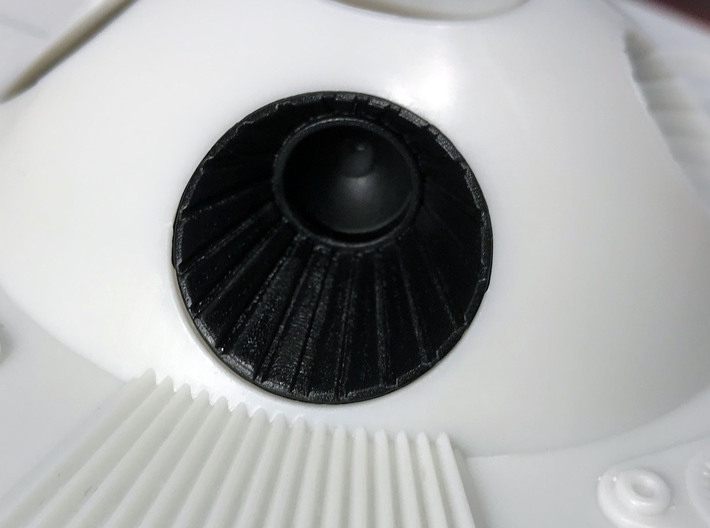
Looks something like a real rocket thruster! Cone interior sanded smooth; sorry about the awful paint job on the Moebius part


Moebius EVA Pod Thrusters Only
Made by
Print With Shapeways
 Choose Your Material
 Choose your color and finish
$18.90
Have a question about this product?
contact the designerYou must be logged in and verified to contact the designer.
Product Description
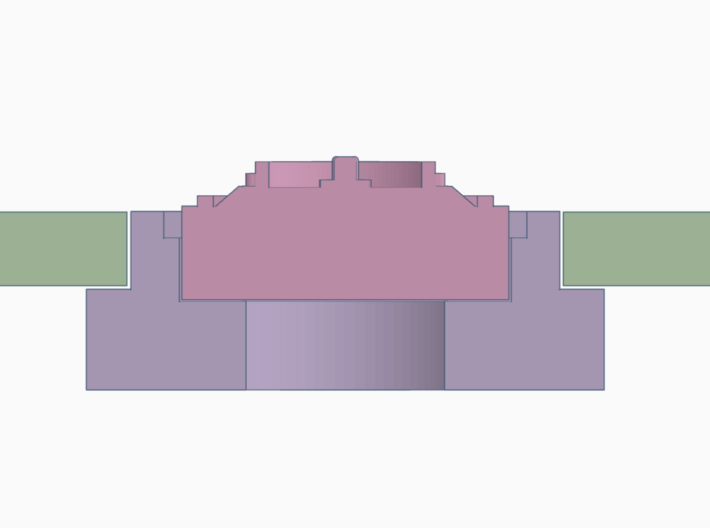
The “earmuffs” are the two truncated cones on either side of the EVA pod design. They're never explained in the film, but presumably the earmuffs contain navigational rocket thrusters and fuel tanks and so on.
The Moebius EVA pod kit has some minor inaccuracies to the earmuff details - relative to their appearance in the film - that this product aims to fix.
I've made three types of replacement parts for the earmuffs: the thrusters, the port deflector detail, and the teardrops. This particular set includes the thrusters and deflector detail ONLY. There is a separate complete version if you want the teardrops as well. They're all as accurate as I can make them, based on first-hand research at the Kubrick Archives, plus evaluation of 4K film scans.
The thrusters
The rocket thrusters definitely seem to be for directional use, like the RCS (reaction control system) engines on the Apollo vehicles and other spacecraft. The main ones on the EVA pod are five black recessed cones at the centre of the earmuff. Each cone is angled out, except the middle one, and has a bunch of radial grooves. They're quite big relative to the pod, so it's presumed they're used for translation (ie: moving the pod around) and not simply rotating the pod on its axis.
Replacement RCS thrusters
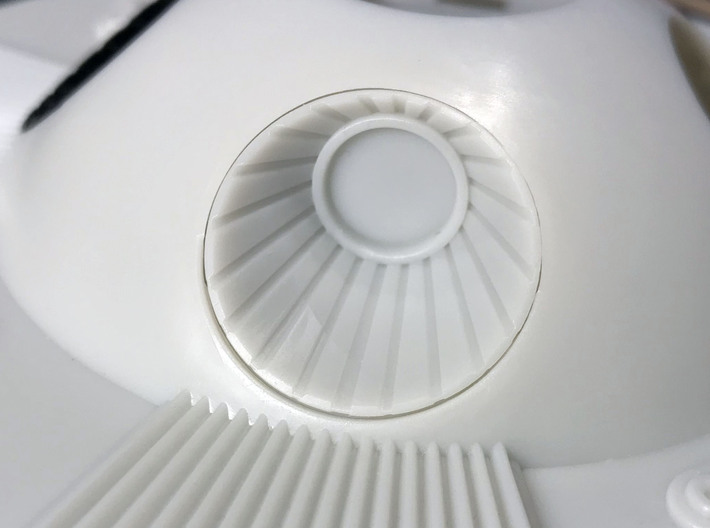
The Moebius parts have flat internal surfaces, surrounded by raised rings, on the inside of the thruster cones. This doesn’t make sense. How are rocket engines supposed to be used for expelling gas when they have seamless flat inner surfaces rather than combustion chambers or nozzles?
By contrast the full sized pod bay sets from the film had cylindrical recesses, possibly tapered, inside these cones. The 13” miniature definitely had tapered internal cones.
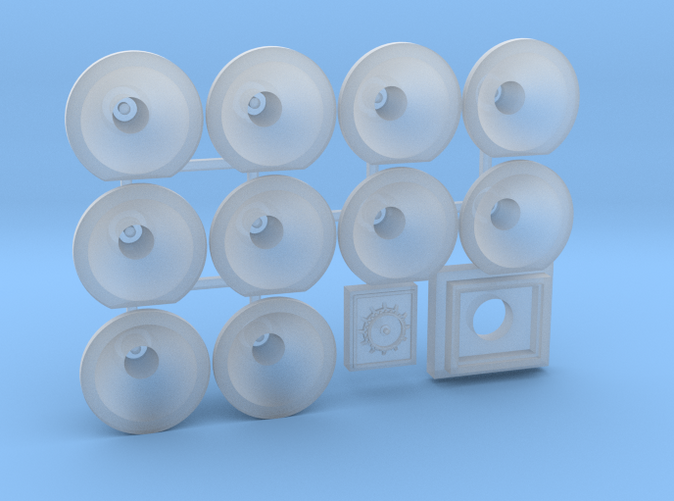
Accordingly I’ve made these little conical details to fit inside the Moebius cones (they don't replace them but go inside them). The cones taper down to narrower cones with a small protruding bit to resemble a nozzle. This latter isn’t on either set or model, but hopefully makes the engine look like it should work.
I designed the parts to retain the ring at the base of the Moebius cone (the raised ring around the flat area), simply because it’s a huge pain to cut that out neatly. By contrast it’s quite simple to drill out the flat base of the Moebius parts and glue these replacements in place. Two of the cones are for the middle thrusters, and have circular backs. The rest of the cones are for the angled thrusters, and have notches on the back to clear the Moebius parts.
Port deflector detail
Each outer thruster has a corresponding black wedge shape on the flat surface of the earmuff, which looks like a deflector surface for the rocket jets. Most of these surfaces have radial grooves, except for one at the port side top, which is flat with a small rectangular detail.
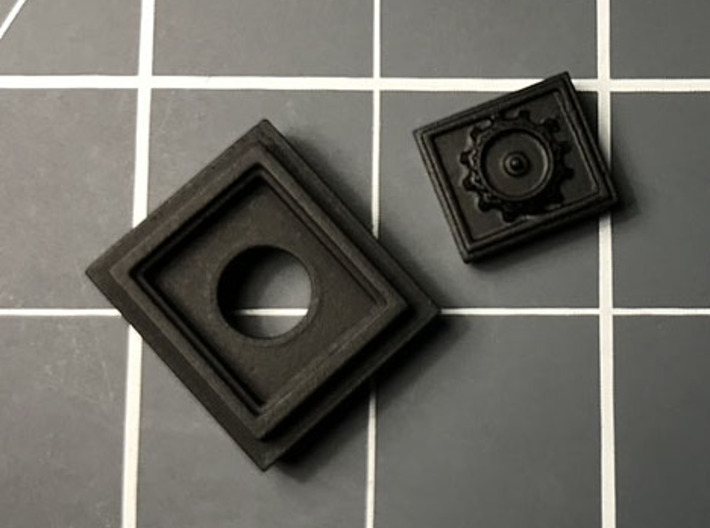
This detail is represented on the Moebius model by a raised, slightly wonky, rectangle, with a raised cylindrical ring in the middle. This is an approximation of what was actually on the full-sized pods. They had small detail components taken from a model railway kit - specifically the Airfix OO gauge travelling crane.
This replacement part has details modelled fairly accurately after the original Airfix part. At least as accurately as can be printable. Note that the actual rectangle appears to have been taller vertically (ie: portrait orientation) rather than taller horizontally (landscape orientation), the way Moebius has it.
Installing the port deflector detail.
My initial testing showed that installing a rectangle with a sunken line around it was tricky, since you have to cut a perfectly rectangular hole in the surface of the deflector. The Moebius material is fairly thick, and I found it awkward to cut precisely. So I've come up with two different ways of installing this detail.
Method A: Easier, less accurate way.
The first way is to cut a hole and simply glue in the smaller rectangle detail. This is not screen accurate, since you won't have the shallow trough or groove running around the rectangle.
To do this, simply cut a hole 7.5mm wide and 9mm tall. The hole is taller than wide, and is centre-aligned in the middle of the wedge-shaped portside deflector.
Then glue in the rectangular detail. Push it up slightly so it's a little bit raised above the surface.
Method B: More accurate way.
The second method uses both parts of the rectangular detail, and gives you the accurate sunken line around the edge of the rectangle.
First, cut a hole exactly 10mm wide by 11.5mm tall. The hole is taller than wide, and is centre-aligned in the middle of the wedge-shaped portside deflector.
Second, fit the open frame component behind the deflector, so that the thin edges extend up into your newly cut hole.
Third, carefully putty any gaps between your hole and the edges of the frame. Then sand it all flat. The idea is to get a perfect recessed hole, with sharp and precise edges.
Fourth, glue the centre rectangular detail inside the frame.
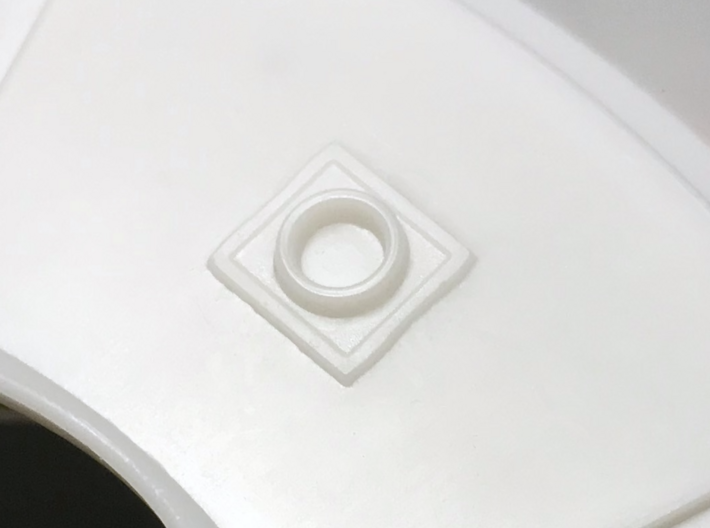
The result will be a rectangular detail that's basically flush with the deflector - just slightly raised. This detail will have a rectangular slot running around it that's perfectly sharp and crisp. Beautiful!
Sprue cutting
All the parts are joined together to form a single sprue. This saves you money, since Shapeways charge by the part. Just snip each part off using a sprue cutter. To avoid damage make sure it’s of the flush cut type and NOT of the side-shearing type. The blades must not slide past each other - the sharp edges of the blade should touch. Side-shear cutters tend to split acrylic plastic.
Please read the following if you're interested in this item.
These accurizing parts are not mass-market commercial products. I made them for my own use, and have put them here in case they're of interest to someone else. Possibly you, since you’re reading this.
These are components for the serious model maker who wants to build a more accurate miniature. They require finishing. If you don't want to trim, file, sand, and glue, then these aren't the parts you're looking for!
The parts are tiny, and easily broken. They push the limits of today's 3D printers. The detail in the digital previews is all there, but it won't always be visible at the miniscule sizes that this scale requires!
The Moebius EVA pod kit has some minor inaccuracies to the earmuff details - relative to their appearance in the film - that this product aims to fix.
I've made three types of replacement parts for the earmuffs: the thrusters, the port deflector detail, and the teardrops. This particular set includes the thrusters and deflector detail ONLY. There is a separate complete version if you want the teardrops as well. They're all as accurate as I can make them, based on first-hand research at the Kubrick Archives, plus evaluation of 4K film scans.
The thrusters
The rocket thrusters definitely seem to be for directional use, like the RCS (reaction control system) engines on the Apollo vehicles and other spacecraft. The main ones on the EVA pod are five black recessed cones at the centre of the earmuff. Each cone is angled out, except the middle one, and has a bunch of radial grooves. They're quite big relative to the pod, so it's presumed they're used for translation (ie: moving the pod around) and not simply rotating the pod on its axis.
Replacement RCS thrusters
The Moebius parts have flat internal surfaces, surrounded by raised rings, on the inside of the thruster cones. This doesn’t make sense. How are rocket engines supposed to be used for expelling gas when they have seamless flat inner surfaces rather than combustion chambers or nozzles?
By contrast the full sized pod bay sets from the film had cylindrical recesses, possibly tapered, inside these cones. The 13” miniature definitely had tapered internal cones.
Accordingly I’ve made these little conical details to fit inside the Moebius cones (they don't replace them but go inside them). The cones taper down to narrower cones with a small protruding bit to resemble a nozzle. This latter isn’t on either set or model, but hopefully makes the engine look like it should work.
I designed the parts to retain the ring at the base of the Moebius cone (the raised ring around the flat area), simply because it’s a huge pain to cut that out neatly. By contrast it’s quite simple to drill out the flat base of the Moebius parts and glue these replacements in place. Two of the cones are for the middle thrusters, and have circular backs. The rest of the cones are for the angled thrusters, and have notches on the back to clear the Moebius parts.
Port deflector detail
Each outer thruster has a corresponding black wedge shape on the flat surface of the earmuff, which looks like a deflector surface for the rocket jets. Most of these surfaces have radial grooves, except for one at the port side top, which is flat with a small rectangular detail.
This detail is represented on the Moebius model by a raised, slightly wonky, rectangle, with a raised cylindrical ring in the middle. This is an approximation of what was actually on the full-sized pods. They had small detail components taken from a model railway kit - specifically the Airfix OO gauge travelling crane.
This replacement part has details modelled fairly accurately after the original Airfix part. At least as accurately as can be printable. Note that the actual rectangle appears to have been taller vertically (ie: portrait orientation) rather than taller horizontally (landscape orientation), the way Moebius has it.
Installing the port deflector detail.
My initial testing showed that installing a rectangle with a sunken line around it was tricky, since you have to cut a perfectly rectangular hole in the surface of the deflector. The Moebius material is fairly thick, and I found it awkward to cut precisely. So I've come up with two different ways of installing this detail.
Method A: Easier, less accurate way.
The first way is to cut a hole and simply glue in the smaller rectangle detail. This is not screen accurate, since you won't have the shallow trough or groove running around the rectangle.
To do this, simply cut a hole 7.5mm wide and 9mm tall. The hole is taller than wide, and is centre-aligned in the middle of the wedge-shaped portside deflector.
Then glue in the rectangular detail. Push it up slightly so it's a little bit raised above the surface.
Method B: More accurate way.
The second method uses both parts of the rectangular detail, and gives you the accurate sunken line around the edge of the rectangle.
First, cut a hole exactly 10mm wide by 11.5mm tall. The hole is taller than wide, and is centre-aligned in the middle of the wedge-shaped portside deflector.
Second, fit the open frame component behind the deflector, so that the thin edges extend up into your newly cut hole.
Third, carefully putty any gaps between your hole and the edges of the frame. Then sand it all flat. The idea is to get a perfect recessed hole, with sharp and precise edges.
Fourth, glue the centre rectangular detail inside the frame.
The result will be a rectangular detail that's basically flush with the deflector - just slightly raised. This detail will have a rectangular slot running around it that's perfectly sharp and crisp. Beautiful!
Sprue cutting
All the parts are joined together to form a single sprue. This saves you money, since Shapeways charge by the part. Just snip each part off using a sprue cutter. To avoid damage make sure it’s of the flush cut type and NOT of the side-shearing type. The blades must not slide past each other - the sharp edges of the blade should touch. Side-shear cutters tend to split acrylic plastic.
Please read the following if you're interested in this item.
These accurizing parts are not mass-market commercial products. I made them for my own use, and have put them here in case they're of interest to someone else. Possibly you, since you’re reading this.
These are components for the serious model maker who wants to build a more accurate miniature. They require finishing. If you don't want to trim, file, sand, and glue, then these aren't the parts you're looking for!
The parts are tiny, and easily broken. They push the limits of today's 3D printers. The detail in the digital previews is all there, but it won't always be visible at the miniscule sizes that this scale requires!
Details
What's in the box:
Moebius Thrusters
Dimensions:
Success Rate:
First To try.
What's this?
Rating:
Mature audiences only.


