
Clear Ultra Fine Detail Plastic


De Ago Falcon Navigation Console and Chair
Made by
Print With Shapeways
 Choose Your Material
 Choose your color and finish
$36.00
Have a question about this product?
contact the designerYou must be logged in and verified to contact the designer.
Product Description
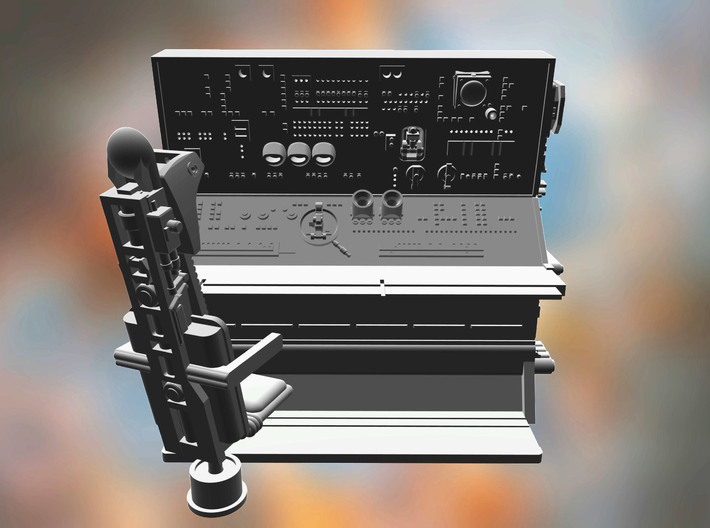
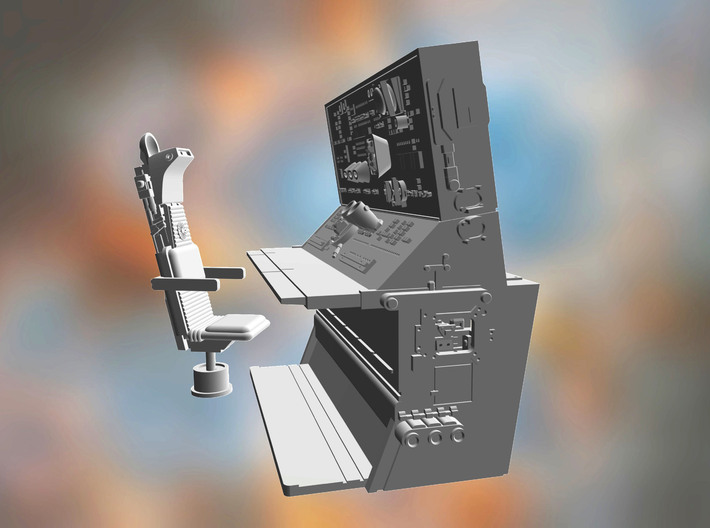
Here's a replacement for the De Agostini version of the navigation console/technical station that appears in the Falcon's hold. The original kit part is pretty crude - the size, proportions, and shape don't match the movies, and of course neither do most of the details. Plus this one includes a correctly proportioned nav chair and is optimized for the awesome Doublefire hold set.
Other people have made replacement parts as well, but I wasn't satisfied with any of them owing to various accuracy problems.
Now I've included a lot of blahblah in these notes. Feel free to ignore the writeup - you can just paint the thing and glue it in. But I've put this extensive information for folks wanting accuracy!
Why this console is awesome.
Four console versions
I've made four separate versions of this console.
Tan or clear?
If you want a basic console, then the "tan fine detail" plastic is a bit cheaper. However, if you want to illuminate the backlit buttons on the control panels then you will need to buy the "clear fine detail" version, since it's made of transparent plastic.
Cutting the parts
To save money I've sprued all the pieces together. Since "fine detail" plastic is really brittle you have to be careful when cutting the pieces apart. Use a very fine sprue cutter/nipper tool, and hold the flat edge of the tool against the part you want to keep. Then you can snip off the sprue without damaging anything.
Do NOT snap the sprues off by hand, because doing so often leaves a little dent or divot in the surface of the print, which can be a pain to fix. And be sure to use the kind of sprue cutters that have two blades that touch at the same spot. Avoid the side-swipe or scissors type of cutters (eg: many Xuron models) since the sideways motion twists and can damage the parts.
Note that the chair part in particular is REALLY FRAGILE. Especially the two armrests. Take extreme caution when cutting the chair off its sprue, when painting it, and when installing it.
That's why, of course, there's the crazy-looking cage of sprues built around the chair. That was put there to improve its chances in shipping. I would remove the chair from the cage first by snipping the support sprue on the underside of the chair, and then remove the cage from the console assembly. Note that the chair is in two parts - the main chair and the base. (see below)
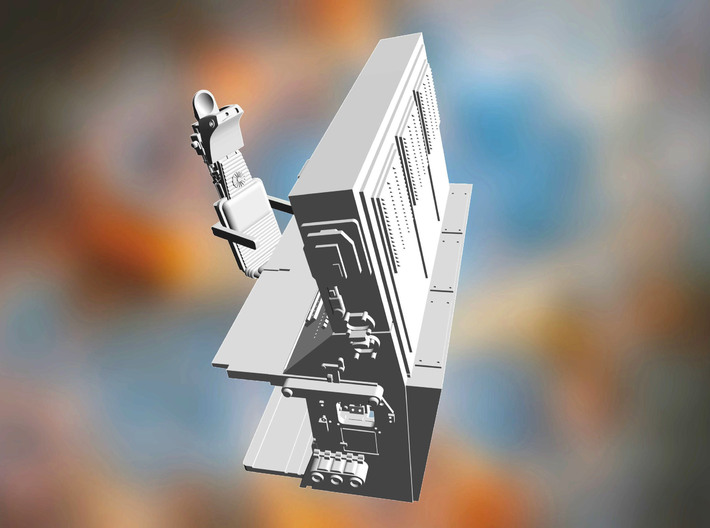
The console side (the wedge)
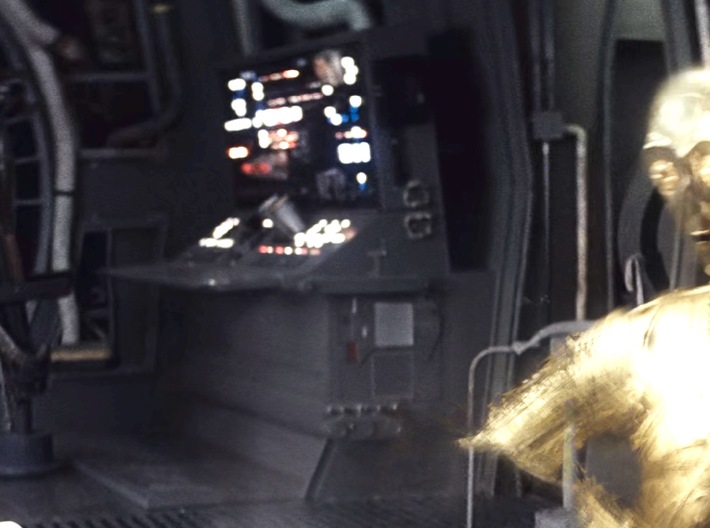
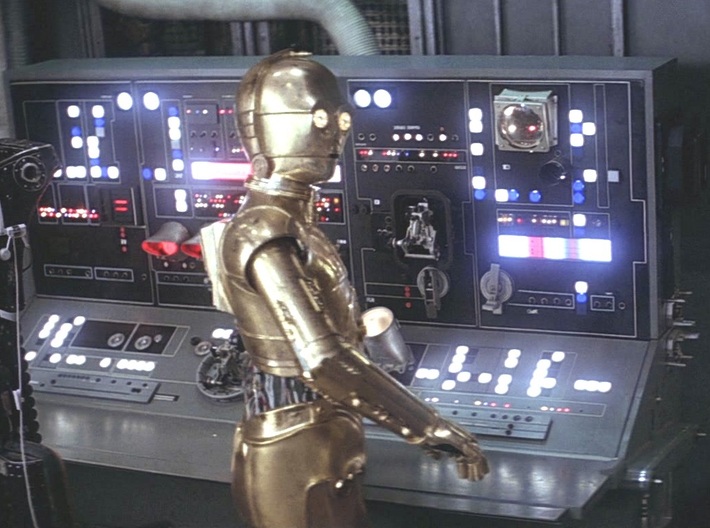
Everyone gets the side profile of this console wrong. The actual console was built for Episode IV, and when it was reused for Episode V it got new detail parts plus a kind of wedge-shaped panel between it and the wall.
However, I don't blame other people for getting the side wrong, since there are no clear photos of this area from Ep V, and it's not very visible in the film. In fact, only one scene actually shows the side - and the console is in shadow and obscured by Chewbacca and C-3PO. I've included a multi-frame composite of the console from the movie in the images above.
Anyway. I've tried to match the Episode V console as closely as possible, including the wedge thing. Unfortunately we don't know if it was a simple thin panel, or if the wedge bit had a top horizontal surface.
Since leaving it open makes lighting the panel difficult I've given the wedge a top plate. I've also made some simple ventilation grille details for the back panel to make it less boring. If you dislike those vents just replace the panel with a piece of styrene sheet. The angle of the panel is designed to match the angle of the wall in the Doublefire set, which means it does differ slightly from the original movie wall angle.
Note that the back panel isn't flush - I made it stick slightly out in order to provide a bit more clearance internally for lighting. And, as noted before, if you dislike this whole wedge thing I make a version of the console without the wedge.
No lines
The actual console prop had control panels adorned with white pinstriping tape, outlining a series of rectangles. Many other console models try to emulate this by putting raised lines on the surface of the panels. You're then supposed to paint the raised lines white.
I didn’t do this, because it’s impossible to make the raised lines thin enough to be to scale. The result looks rather toylike in my opinion. I only reproduced details on the panels which physically stick out (with one exception - the white square on the side of the console beneath the R2-D2 access door).
If there’s demand I could probably make a version of this console with raised lines, but I don’t plan on doing so at the moment.
Lighting
Lighting this console model accurately is a complicated proposition, owing to its small size. There are three basic types of lighting in the original movie's console.
1) Illuminated squares in blue and white. These are presumably supposed to be pushbuttons, though they were just acrylic plastic squares in the actual set. They didn't flash, though some were not lit.
2) Greebly details. The three spout-shaped thingies, the two tall cylinder thingies, and the circular lens object contained lights internally.
3) The blinky lights. The panels had rows of small round instrument lights, some of which would flash slowly. The Episode V version, anyway - the Episode IV version had tons of unconvincing and fast blinky lights that flashed away in groups like cheap Christmas lights.
Modelling the lights
As noted, lighting is tricky because there isn't much room inside the console. There are two basic methods for illuminating the three types of source lights - backlighting and fibres.
Backlight
For the square buttons and the greebly details you need a backlight. One easy way to do this is to use an opal white acrylic piece cut to size and edge-lit by warm white LEDs. This will illuminate any clear or open areas in the panels. You could use white acrylic plastic sold as light diffusing material. 1.5mm thick fits well. 2mm offers better light transmission but does make it a bit more difficult to route fibre optics.
Naturally for this backlight business to work you MUST buy this print in clear detail plastic. Tan is opaque and not lightable. But obviously you don't want the whole thing to glow light a light bulb, so you need to light-block it. Here are the steps:
Fibre optics
For the tiny blinky lights you need 0.25mm plastic fibre optics. For many projects you can lens the fibres. (this means taking a piece of fibre and holding it briefly to a flame or other heat source to melt it over, mushrooming its tip into a lens) However, in this case the holes are really tightly spaced, and there won't be enough room for a lensed fibre unless the lens is really tiny.
Once you've cut the fibres sharply you then fit the bundles of fibre through the rows of tiny holes. Note that the holes are not straight - I designed them with a slight downwards internal bend to encourage the fibres downwards.
The console is very thin with limited clearance, so you have to be careful to get the fibres in place without bending and breaking them. Prebending gently will help. Glue the fibres from the back with white glue or similar. NEVER use superglue, since it destroys plastic fibre optics.
Another thing to note is that if you've painted the interior with thick paint you'll need to use a needle or pin to pierce a hole from the front, and then feed the fibre through, again from the front. Or you could paint the exterior, fit the fibres, then paint the interior.
The big complication to using fibres involves backlighting if you're doing it. If you used a piece of acrylic plastic to backlight the square buttons you'll need to drill a bunch of holes into it so that the fibres can go through. I recommend making large holes so that there's lots of wiggle room for the fibre. You can use a 2mm drill bit, for example.
Note: use a handheld pin vice/vise to drill out the acrylic. Never use a motor tool or similar powered drill, because you'll probably crack the plastic! Acrylic does not like to be drilled, even with specific plastic drill bits.
Feed the fibres through the back of the console to LEDs. There's space on the other side of the wall.
A popular approach is to feed the fibres into bundles which go into brass tubes or shrinkwrap tubing that serve as LED holders. You can then selectively break out individual fibres and have those go to a blinking LED. I'd go easy on the blinking, though. A lot of folks seem to go for a multicolour superfast flashing disco look, but I think that looks pretty bad. Just a handful of fibres blinking slowly (eg: a 0.5 Hz self-flashing LED is great) looks so much better, with the rest glowing steadily. The lights were white, blue, and red.
Finally, and this is probably obvious, but these fibre optic lights are way oversized compared to the original movie set's tiny lights. There's no way the holes could be printed, and the fibres would be unmanageably small! As it is, 0.25mm fibres are pretty fiddly to work with.
Greebly lighting
The square viewer thing with a lens also has holes for fibre optics. This is because the actual lens had a handful of small lights - mostly red with one or two white - behind it. To simulate the look I've made a kind of collar assembly with a bunch of tiny holes in it. This accommodates six 0.25mm fibres which can be lit appropriately. The collar is glued to the back of the post that extends out from the lens. To make the lens look more lensy be sure to polish it and apply some gloss clearcoat or varnish.
The other illuminated greeblies - the three spout thingies and the two tubes - have small clear plastic inserts that you can add to simplify the lighting if you wish. The spout lights were red and the tubes were white on the left and red/orange on the right. Sometimes, anyway. In other scenes they were both red. And in Episode IV the spouts were white and the tubes were blue.
The two wide backlit strips were white with red areas. I made these separate inserts as well for ease of painting. You can paint the red areas with clear red paint quite easily. The actual movie props had white opal plastic strips with tiny numbers and marks on them in black, and the red rectangles were backlit from behind (ie: they were solid white when the lights were off).
Doublefire extras
This set includes two small pieces for addressing minor issues if you want to use this console with the Doublefire hold set. The reason why they're needed is because the Doublefire model was designed with the 308bits nav console in mind, and they have different dimensions.
Specifically the two small pieces are:
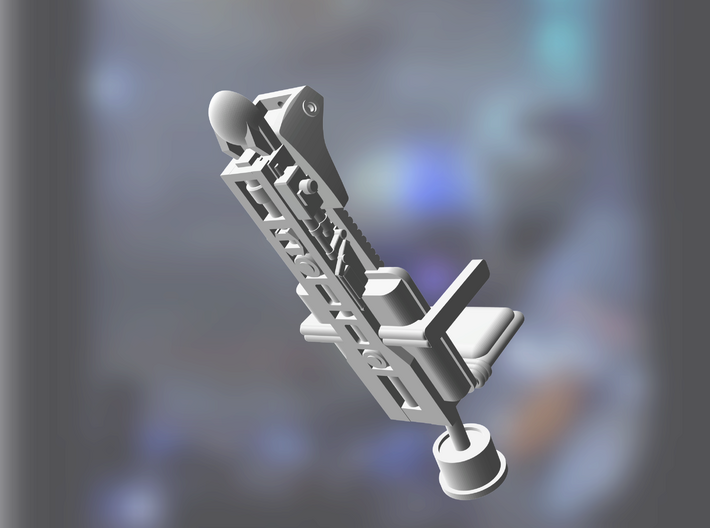
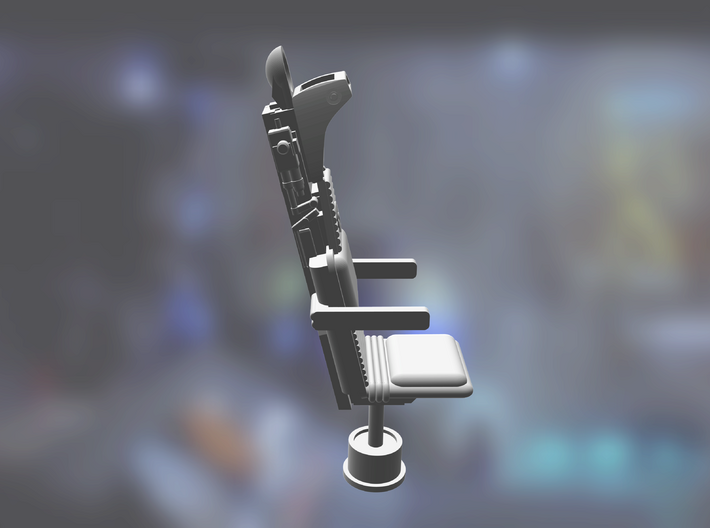
The chair - some assembly required
The console chair includes the white plastic dish that sticks up above the headrest, which a lot of other models are missing. (the cockpit back chairs don't have the dish, but the nav console chair does) I also did not model the Racal Amplivox RA-150 headset that can be seen hanging off the side of the chair, because it's not possible to 3D print it at the correct size. You could make one from wire or something.
The chair is not complete, since it needs a 1.2mm (3/64" in the US) diameter brass rod that's 9.5mm long. This is because the main support post for the chair, if it were 3D printed, would be both insanely fragile and overscale. To get the diameter right you need the metal rod.
The base also has a recess that can accommodate a 2mm diameter 1mm thick rare earth magnet. So you can attach the chair to the floor either by having a longer brass rod that extends down through the base and into a hole drilled into the floor, or you can stick a magnet in the base. A second magnet beneath the floor will then hold the chair neatly in place, but it's easily removable.
But, again, remember that the armrests in particular are REALLY FRAGILE.
Thanks to Joshua Maruska for publishing his nav chair model. Although this product contains no data from that model, and was built from scratch, his excellent research was a really useful resource!
Please read the following if you're interested in these items.
These accurizing parts are not mass-market commercial products. I made them for my own use, and have put them here in case they're of interest to someone else. Possibly you, since you’re reading this.
These are components for the serious model maker who wants to build a more accurate miniature. They require finishing. If you don't want to trim, file, sand, and glue, then these aren't the parts you're looking for!
The parts are tiny, and easily broken. They push the limits of today's 3D printers. The detail in the digital previews is all there, but it won't always be visible at the miniscule sizes that this scale requires!
Other people have made replacement parts as well, but I wasn't satisfied with any of them owing to various accuracy problems.
Now I've included a lot of blahblah in these notes. Feel free to ignore the writeup - you can just paint the thing and glue it in. But I've put this extensive information for folks wanting accuracy!
Why this console is awesome.
- It's as screen-accurate to the Episode V version of the console as possible. (the Episode IV version had numerous detail differences)
- It's based on tons of research, of both 4K screen grabs of the original movie and behind the scenes photos. It's not perfect since we have no blueprints or high-rez photos, but it's pretty close.
- I’ve included all kinds of tiny details, even replicating obscure things like the fact that the notches in the desktop surface weren’t positioned symmetrically, or that the square viewer thing with a lens had a fold-out strut on the left side but not the right.
- It's designed to match the dimensions of the superb Doublefire hold model. Most other hold parts by other people are not as accurate. If you want a console that isn't, I have one here.
- It's not the same shape or size as the De Ago console, which is mostly great since the De Ago one is so bad. Unfortunately that means it isn't compatible with the etched brass control panels made by Paragrafix for the De Ago part.
- It's designed to be fully illuminated if you wish, which looks great but is fiddly work owing to its small size. See the lighting section below.
- In a couple of scenes - eg: when our heroes rush off to grab oxygen masks - the sort of foot tray thing on the floor is not present. Accordingly I've made the tray a separate component. You can leave it off or include it.
- I've included the little open hatch on the side where R2-D2 reaches in and saves the day.
- Not only did I model the open hatch, but I've made a little block of details to fit inside it. This piece can be lit to reveal the interior. Alternatively, if you want your console to have a closed hatch you can turn the detail block around 180° and put it in place as a closed door.
- This version has two extra pieces for the Doublefire hold set. More information below.
- I've added extra details - panels and vents - around the back just so it doesn't look blank.
- I've supplied a cute little mini toolbox that you can glue on the back ledge if you want. It isn't in the film, but it's something fun to fill out that space.
- I've also included a bunch of small parts to simplify lighting and painting of the top control panel. Requires printing in clear plastic.
- In Episode IV the console had piles of junk on it - a folder, a drinking cup, bottle-type thingies. Maybe Han is trying to impress Leia and be slightly less of a slob, since in Episode V the console is devoid of crap. This is an Ep V console, and so it does not include this junk.
- Note another obscure detail most people probably haven't noticed - the Ep IV desk surface has blue and white control panel buttons on it. The Ep V desk, which this model represents, is bare and shiny grey.
- This version includes the nav chair that Han coolly slumps in. I have a separate chairless version if you prefer that.
Four console versions
I've made four separate versions of this console.
- One has all the cool details and features, but has no nav chair. (Doublefire optimized)
- There's this one, which has everything plus the nav chair. (Doublefire optimized)
- One is the full console plus chair, but no back wedge. (not Doublefire optimized)
- To save a tiny bit of money there's one with most of the cool features omitted.
Tan or clear?
If you want a basic console, then the "tan fine detail" plastic is a bit cheaper. However, if you want to illuminate the backlit buttons on the control panels then you will need to buy the "clear fine detail" version, since it's made of transparent plastic.
Cutting the parts
To save money I've sprued all the pieces together. Since "fine detail" plastic is really brittle you have to be careful when cutting the pieces apart. Use a very fine sprue cutter/nipper tool, and hold the flat edge of the tool against the part you want to keep. Then you can snip off the sprue without damaging anything.
Do NOT snap the sprues off by hand, because doing so often leaves a little dent or divot in the surface of the print, which can be a pain to fix. And be sure to use the kind of sprue cutters that have two blades that touch at the same spot. Avoid the side-swipe or scissors type of cutters (eg: many Xuron models) since the sideways motion twists and can damage the parts.
Note that the chair part in particular is REALLY FRAGILE. Especially the two armrests. Take extreme caution when cutting the chair off its sprue, when painting it, and when installing it.
That's why, of course, there's the crazy-looking cage of sprues built around the chair. That was put there to improve its chances in shipping. I would remove the chair from the cage first by snipping the support sprue on the underside of the chair, and then remove the cage from the console assembly. Note that the chair is in two parts - the main chair and the base. (see below)
The console side (the wedge)
Everyone gets the side profile of this console wrong. The actual console was built for Episode IV, and when it was reused for Episode V it got new detail parts plus a kind of wedge-shaped panel between it and the wall.
However, I don't blame other people for getting the side wrong, since there are no clear photos of this area from Ep V, and it's not very visible in the film. In fact, only one scene actually shows the side - and the console is in shadow and obscured by Chewbacca and C-3PO. I've included a multi-frame composite of the console from the movie in the images above.
Anyway. I've tried to match the Episode V console as closely as possible, including the wedge thing. Unfortunately we don't know if it was a simple thin panel, or if the wedge bit had a top horizontal surface.
Since leaving it open makes lighting the panel difficult I've given the wedge a top plate. I've also made some simple ventilation grille details for the back panel to make it less boring. If you dislike those vents just replace the panel with a piece of styrene sheet. The angle of the panel is designed to match the angle of the wall in the Doublefire set, which means it does differ slightly from the original movie wall angle.
Note that the back panel isn't flush - I made it stick slightly out in order to provide a bit more clearance internally for lighting. And, as noted before, if you dislike this whole wedge thing I make a version of the console without the wedge.
No lines
The actual console prop had control panels adorned with white pinstriping tape, outlining a series of rectangles. Many other console models try to emulate this by putting raised lines on the surface of the panels. You're then supposed to paint the raised lines white.
I didn’t do this, because it’s impossible to make the raised lines thin enough to be to scale. The result looks rather toylike in my opinion. I only reproduced details on the panels which physically stick out (with one exception - the white square on the side of the console beneath the R2-D2 access door).
If there’s demand I could probably make a version of this console with raised lines, but I don’t plan on doing so at the moment.
Lighting
Lighting this console model accurately is a complicated proposition, owing to its small size. There are three basic types of lighting in the original movie's console.
1) Illuminated squares in blue and white. These are presumably supposed to be pushbuttons, though they were just acrylic plastic squares in the actual set. They didn't flash, though some were not lit.
2) Greebly details. The three spout-shaped thingies, the two tall cylinder thingies, and the circular lens object contained lights internally.
3) The blinky lights. The panels had rows of small round instrument lights, some of which would flash slowly. The Episode V version, anyway - the Episode IV version had tons of unconvincing and fast blinky lights that flashed away in groups like cheap Christmas lights.
Modelling the lights
As noted, lighting is tricky because there isn't much room inside the console. There are two basic methods for illuminating the three types of source lights - backlighting and fibres.
Backlight
For the square buttons and the greebly details you need a backlight. One easy way to do this is to use an opal white acrylic piece cut to size and edge-lit by warm white LEDs. This will illuminate any clear or open areas in the panels. You could use white acrylic plastic sold as light diffusing material. 1.5mm thick fits well. 2mm offers better light transmission but does make it a bit more difficult to route fibre optics.
Naturally for this backlight business to work you MUST buy this print in clear detail plastic. Tan is opaque and not lightable. But obviously you don't want the whole thing to glow light a light bulb, so you need to light-block it. Here are the steps:
- Paint the whole thing using opaque paint. The key is to block the light, but the paint can't be too thick since you don't want to obscure details. Multiple thin coats are good. Sparkly metallic silver paint works well as an undercoat, since the metal particles block light. The outside of the console should be painted a medium grey, except the top panel which should be black.
- Paint the interior with thick light-blocking paint. You don't have to worry about obscuring details here obviously, so thick gloopy paint like Tulip brand fabric paint is good.
- Once it's all painted up, test the light blocking using a flashlight/electric torch in a dark room. Check corners especially, and look for any unwanted light glowing through.
- Next, carefully use the edge of a sharp knife blade to scrape paint off parts that should be illuminated - the square buttons, basically. I like to use an offset blade like an X-Acto #16. Side-scraping action will easily remove paint without gouging the surface. Note that the interior has raised areas to facilitate the removal of paint. These raised areas are rectangular blocks which match which square should be lit and which should not.
- Lightly sand the freshly exposed areas with extremely fine sandpaper - 1000 grit or higher. This will make the clear plastic look a bit cloudy, which is what you want. The original buttons were translucent white and blue acrylic plastic. White paint probably won't look very good unless it's a thin wash.
- Don't clear-coat the white buttons, because doing so will make them transparent.
- Paint the blue buttons using a superfine brush and clear blue acrylic paint, such as Tamiya X-23.
- Take the clear insert pieces and put them into appropriate places from the back of the upper panel. These inserts let you illuminate the larger circular lights, the two rectangular backlit strips, and the greebly interiors.
- Put a bright interior backlight inside the console, making sure there's enough clearance to fit the back panel in place.
Fibre optics
For the tiny blinky lights you need 0.25mm plastic fibre optics. For many projects you can lens the fibres. (this means taking a piece of fibre and holding it briefly to a flame or other heat source to melt it over, mushrooming its tip into a lens) However, in this case the holes are really tightly spaced, and there won't be enough room for a lensed fibre unless the lens is really tiny.
Once you've cut the fibres sharply you then fit the bundles of fibre through the rows of tiny holes. Note that the holes are not straight - I designed them with a slight downwards internal bend to encourage the fibres downwards.
The console is very thin with limited clearance, so you have to be careful to get the fibres in place without bending and breaking them. Prebending gently will help. Glue the fibres from the back with white glue or similar. NEVER use superglue, since it destroys plastic fibre optics.
Another thing to note is that if you've painted the interior with thick paint you'll need to use a needle or pin to pierce a hole from the front, and then feed the fibre through, again from the front. Or you could paint the exterior, fit the fibres, then paint the interior.
The big complication to using fibres involves backlighting if you're doing it. If you used a piece of acrylic plastic to backlight the square buttons you'll need to drill a bunch of holes into it so that the fibres can go through. I recommend making large holes so that there's lots of wiggle room for the fibre. You can use a 2mm drill bit, for example.
Note: use a handheld pin vice/vise to drill out the acrylic. Never use a motor tool or similar powered drill, because you'll probably crack the plastic! Acrylic does not like to be drilled, even with specific plastic drill bits.
Feed the fibres through the back of the console to LEDs. There's space on the other side of the wall.
A popular approach is to feed the fibres into bundles which go into brass tubes or shrinkwrap tubing that serve as LED holders. You can then selectively break out individual fibres and have those go to a blinking LED. I'd go easy on the blinking, though. A lot of folks seem to go for a multicolour superfast flashing disco look, but I think that looks pretty bad. Just a handful of fibres blinking slowly (eg: a 0.5 Hz self-flashing LED is great) looks so much better, with the rest glowing steadily. The lights were white, blue, and red.
Finally, and this is probably obvious, but these fibre optic lights are way oversized compared to the original movie set's tiny lights. There's no way the holes could be printed, and the fibres would be unmanageably small! As it is, 0.25mm fibres are pretty fiddly to work with.
Greebly lighting
The square viewer thing with a lens also has holes for fibre optics. This is because the actual lens had a handful of small lights - mostly red with one or two white - behind it. To simulate the look I've made a kind of collar assembly with a bunch of tiny holes in it. This accommodates six 0.25mm fibres which can be lit appropriately. The collar is glued to the back of the post that extends out from the lens. To make the lens look more lensy be sure to polish it and apply some gloss clearcoat or varnish.
The other illuminated greeblies - the three spout thingies and the two tubes - have small clear plastic inserts that you can add to simplify the lighting if you wish. The spout lights were red and the tubes were white on the left and red/orange on the right. Sometimes, anyway. In other scenes they were both red. And in Episode IV the spouts were white and the tubes were blue.
The two wide backlit strips were white with red areas. I made these separate inserts as well for ease of painting. You can paint the red areas with clear red paint quite easily. The actual movie props had white opal plastic strips with tiny numbers and marks on them in black, and the red rectangles were backlit from behind (ie: they were solid white when the lights were off).
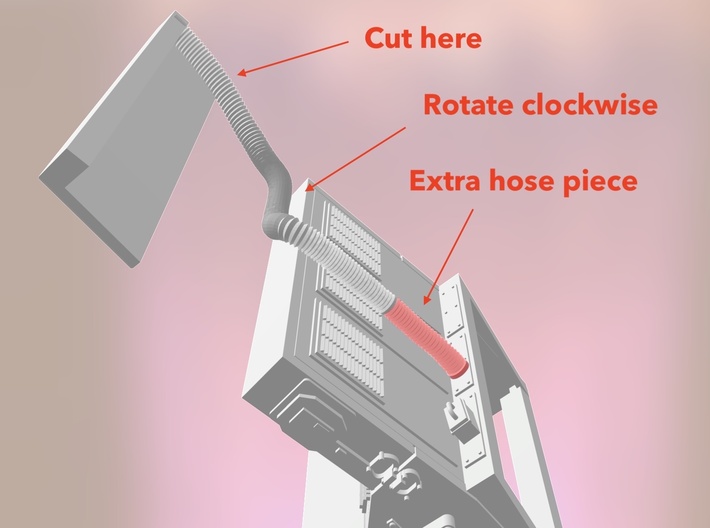
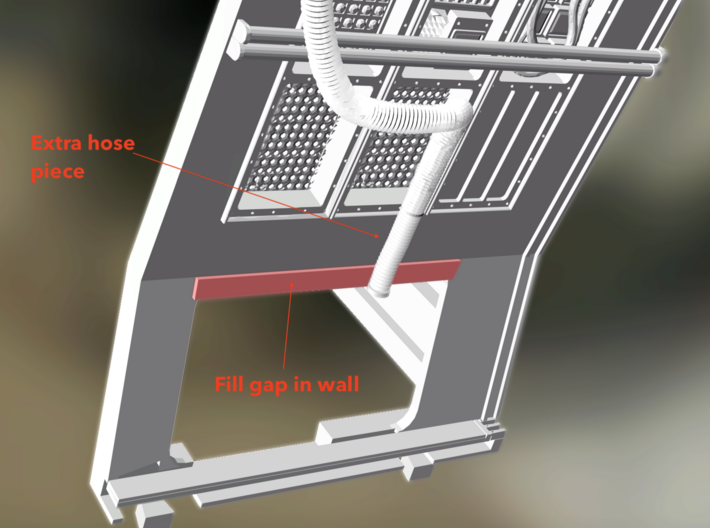
Doublefire extras
This set includes two small pieces for addressing minor issues if you want to use this console with the Doublefire hold set. The reason why they're needed is because the Doublefire model was designed with the 308bits nav console in mind, and they have different dimensions.
Specifically the two small pieces are:
- a thin rectangular strip to fill the gap in the wall just behind the nav console.
- an extension to the hose that goes behind the console. To use this piece you will need to saw the existing hose off the vertical panel component. Use a fine razor saw or something like that. Then you will need to rotate the part inwards slightly (clockwise when looking down from above). It's probably easiest to drill tiny holes into the ends of the hose part with a pin vise and a 0.6mm drill bit, such as a micro carbide bit. Then you can use 0.5mm wire to join the hose parts together. The extension for the hose has a triangular arrow on the bottom which points towards the wall and away from the console - useful for correct orientation. The result is a hose which looks like it feeds into the back of the console rather than into a wall recess.
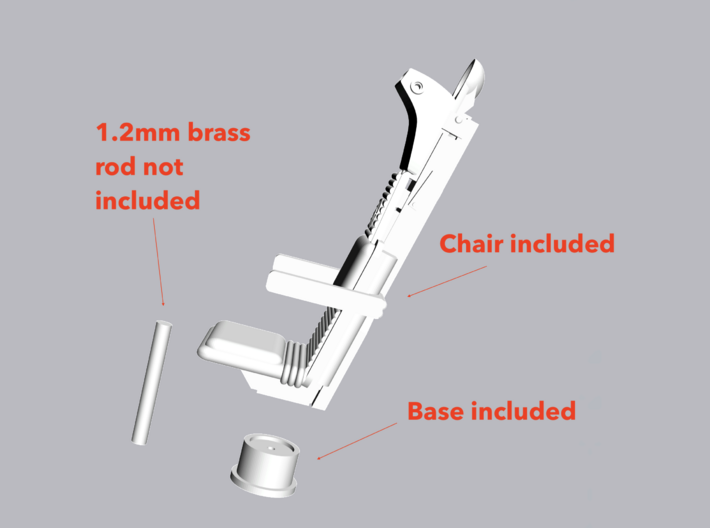
The chair - some assembly required
The console chair includes the white plastic dish that sticks up above the headrest, which a lot of other models are missing. (the cockpit back chairs don't have the dish, but the nav console chair does) I also did not model the Racal Amplivox RA-150 headset that can be seen hanging off the side of the chair, because it's not possible to 3D print it at the correct size. You could make one from wire or something.
The chair is not complete, since it needs a 1.2mm (3/64" in the US) diameter brass rod that's 9.5mm long. This is because the main support post for the chair, if it were 3D printed, would be both insanely fragile and overscale. To get the diameter right you need the metal rod.
The base also has a recess that can accommodate a 2mm diameter 1mm thick rare earth magnet. So you can attach the chair to the floor either by having a longer brass rod that extends down through the base and into a hole drilled into the floor, or you can stick a magnet in the base. A second magnet beneath the floor will then hold the chair neatly in place, but it's easily removable.
But, again, remember that the armrests in particular are REALLY FRAGILE.
Thanks to Joshua Maruska for publishing his nav chair model. Although this product contains no data from that model, and was built from scratch, his excellent research was a really useful resource!
Please read the following if you're interested in these items.
These accurizing parts are not mass-market commercial products. I made them for my own use, and have put them here in case they're of interest to someone else. Possibly you, since you’re reading this.
These are components for the serious model maker who wants to build a more accurate miniature. They require finishing. If you don't want to trim, file, sand, and glue, then these aren't the parts you're looking for!
The parts are tiny, and easily broken. They push the limits of today's 3D printers. The detail in the digital previews is all there, but it won't always be visible at the miniscule sizes that this scale requires!
Details
What's in the box:
Falcon ESB Nav Console and Chair
Dimensions:
Success Rate:
First To try.
What's this?
Rating:
Mature audiences only.


