Clear Ultra Fine Detail Plastic


Moebius EVA Pod Arms, Version 2F
Made by
Print With Shapeways
 Choose Your Material
 Choose your color and finish
$115.90
Have a question about this product?
contact the designerYou must be logged in and verified to contact the designer.
Product Description
The EVA pod’s manipulator arms are a key part of the vehicle’s design, being especially memorable in the film’s space murder scene. They’re also used as a visual framing element in some scenes in the pod bay interior. Here are some superdetailed parts for improving your Moebius EVA pod kit!
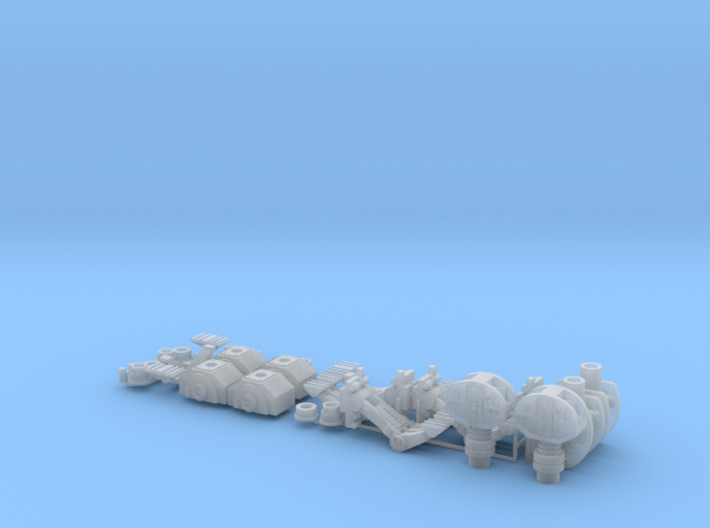
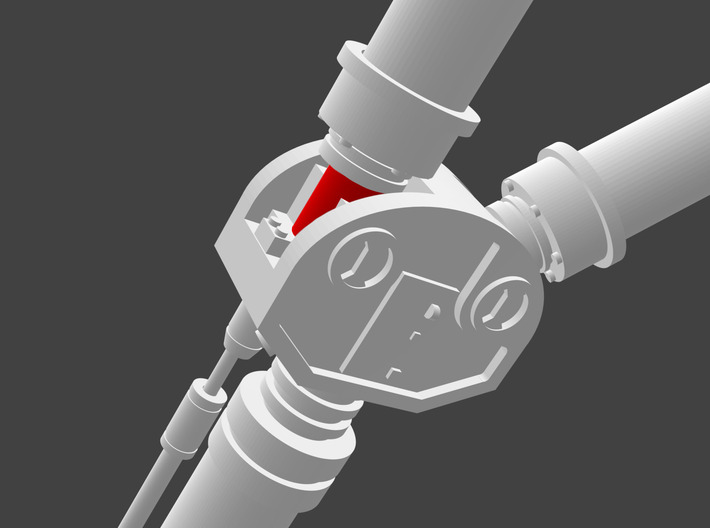
This is version 2F - full arms, stowed position, adjustable thumbs, short beams, greeblies. see the full description below.
The Moebius kit arms and why to replace them.
The kit parts supplied by Moebius aren't terrible, but are simplified in nature. Many of the finer details are missing or are rudimentary. They also suffer from aspects of the injection moulding process. The arms and boxes have noticeable draft (ie: the sides of the boxes are not parallel but taper out) and sanding and puttying is required to fill seams and gaps.
Accuracy.
Until relatively recently most model makers only had low-rez publicity shots in books, and DVD/BluRay screen grabs to base their work. I was able to take advantage of unpublished high-rez shots from the Kubrick Archives and the new 4K UHD discs. Therefore these parts contain accurate details that nobody has really modelled correctly before.
I can’t say with certainty that they’re the most accurate models of the pod arms ever made, but they might be!
Replacement pod arms choices.
Because different people have different priorities and budgets I have made a number of designs for improving your Moebius pod bay arms. There are many variants to give everybody a wide choice, but it's admittedly kind of confusing. Please double-check before purchasing a set!
Just fingers?
To save money I've made fingers-only parts that fit into the existing Moebius parts. They don't give you the whole updated look, and don’t address the problems with the tubes and boxes, but they're something.
Whole arms?
Alternatively you can replace the whole pair of arms with these accurized parts. The arms require metal tubing and rods. I didn't 3D-print the cylinders since metal gives you improved strength and appearance.
Full or short arm beams?
The EVA pod arms had metal beams, rectangular in cross section, which slid into the pod. I have made models of these, but they're kind of expensive to 3D print because of Shapeways' pricing. Also, because Shapeways parts tend to have a slight corrugated texture, you'll have to sand down the surfaces to make them look good. There are two 4mm holes running through the beams, partly to lower the print cost and partly so you can run metal tubing through if you wish.
An alternative is to get the short arm version. This lacks the beams but has rectangular sockets to accommodate them, and so saves you a little money. You then just saw off the Moebius "metal beam" parts, glue them together, putty over the seams, and use those instead. You'll need to fill the hole with putty prior to painting, of course. You will also need to cut a notch off at the top of the "beam" so it goes as far as possible into the box.
The short beam box also has a 1mm vertical hole in the middle. The idea is so you can drill a matching hole in the Moebius "metal beam", and run a 14mm long, 1mm diameter metal rod through both pieces. This will pin the "beam" in place and make the whole thing a bit sturdier.
Hands open version, or closed version?
Most of the time the pod manipulator hands had closed fingers. These were seen on pods resting in the bay flying through space.
But during the murderous attack sequence the hands were, of course, wide open. I have made both versions, with the open version designed to resemble the finger positions seen in the attack sequence.
Adjustable thumb version.
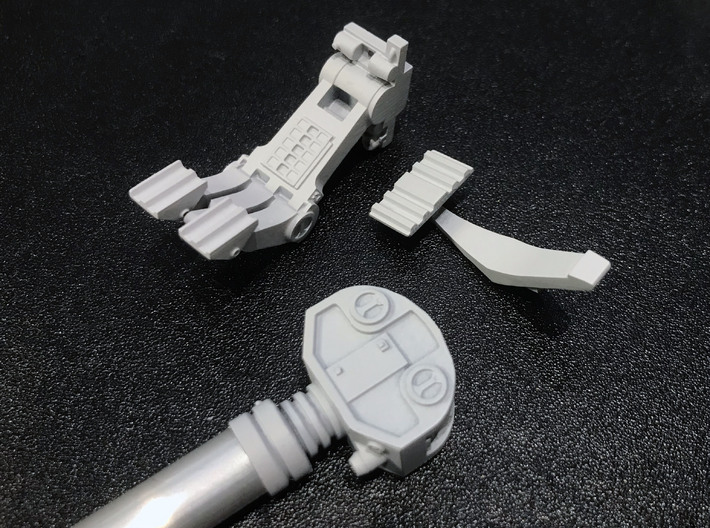
In addition to the closed and open hands, I have a third version with a separate “thumb” for each hand. This can be glued in at different angles, so you can have subtly different thumb positions, thus revealing the grooved fingerpads, which looks cool. The thumb cannot be articulated - it has to be glued in position.
The separate thumb version requires a 17-18mm length of 1mm dia aluminium wire on the side. Or you could use brass wire and paint it silver to match the original props, but aluminium wire is cheaper and looks more convincingly metallic than paint.
Finger pads.
The arms seen during the Frank murder scene and during the airlock door opening scene have clear serrated details on the fingertips. These are tapered (not parallel sided) boxes which interlock. I have fully replicated these details, though when the fingers are closed they're obviously not visible except a sort of zig-zag at the top.
No separate fingers/fingerpads/etc
Why haven't I made a version with completely separate fingers, thumbs, and adjustable fingerpads? Basically because separate components means for a weaker overall structure, it's hard to engineer separate and reliable moveable parts at this size, it costs more to print, and I don't think there's a ton of demand.
Greeblies or no?
There are no shots showing the insides of the hand boxes. They were seemingly just painted black in there. However as models they looked a bit bland so I cobbled together a few cylinders and things to make it look like there are mechanisms in there. If you dislike these (hard to see anyway) conjectured greeblies I have made a purist version which lacks them.
Stowed or extended?
Most of the time the arms were pointing up, with the hands stowed. They were like that in the pod bay and when flying through space. However, when HAL was attacking Poole, and when Bowman was retrieving Poole’s body, the arms were extended out. I’ll make extended arms at some point.
3D printing issues.
Because these fingers and arms must be printed using the Shapeways "detail" process, there will be some artefacts. Specifically there will be some light corrugation on flat surfaces. These can be removed by careful and light filing with a flat file. Rough areas should be lightly scraped with the flat edge of a sharp blade. Taking the time to clean up the parts before priming will make a big difference!
Specific metal part lengths for each pair of arms.
Lower arm:
2x 25mm 8mm tube
2x 42mm 4mm tube
2x 9mm 1mm rod
2x 24mm 1.5mm rod
Upper arms:
4x 28mm 6mm tube
4x 49mm 4mm tube
Hands:
4x 8mm 1mm rod
Pins for short boxes
2x 14mm 1mm rod
The Versions.
Version 1: Fingers only
The "fingers only" versions simply fit inside the Moebius-supplied hand boxes. The cheapest option.
IMPORTANT NOTE: these "fingers" versions are not entirely compatible with the full sets. This is because the Moebius hand box has a thick wall, whereas my version of the hand box has a thinner wall. The bottom of the box also differs.
Version 1A: Fingers only, closed fingers, greeblies:
Replacement “fingers”. Closed, and thus are in the normal position. This version includes conjectured greeblies.
Version 1B: Fingers only, closed fingers, no greeblies:
Same as above but no internal greeblies.
Version 1C: Fingers only, open fingers, greeblies:
These are fingers set to the open position - perfect for murdering an astronaut. They're modelled after the attack stance in the film, of course.
Version 1D: Adjustable thumb, greeblies
Fingers only. More expensive, as the parts have to be separate to be printable. You can adjust the thumb position relative to the fingers, and glue them down. This is not an articulated product.
Version 2: Full arms in stowed position.
These include complete replacement arms in the usual hands-up position. The full arm versions require metal tubes of different sizes.
Version 2A: Stowed arms, closed fingers, long beams, greeblies
This "long" version includes a 3D-printed representation of the long rectangular metal bars. Greeblies are included.
Version 2B: Stowed arms, closed fingers, short beams, greeblies
Same as above, but the bottom-most boxes have a hollow slot. You'll have to cut off the plastic pieces that make up each metal bar, and glue those inside the boxes. This means a bit of work cleaning up the seams and whatnot on the Moebius parts, but saves a little money.
Version 2C: Stowed arms, closed fingers, long beams, separate fingers/hand box, greeblies
Same as 2A with long beams, but the fingers and the hand boxes are separate components.
Version 2D: Stowed arms, closed fingers, short beams, separate fingers/hand box, greeblies
Same as 2B with short beams, but the fingers and the hand boxes are separate components.
Version 2E: Stowed arms, long beams, adjustable thumbs, greeblies
Same as 2A, only the thumbs can be positioned before being glued down.
Version 2F: Stowed arms, short beams, adjustable thumbs, greeblies
Same as 2B, only the thumbs can be positioned before being glued down.
Other versions may be forthcoming if there’s enough interest.
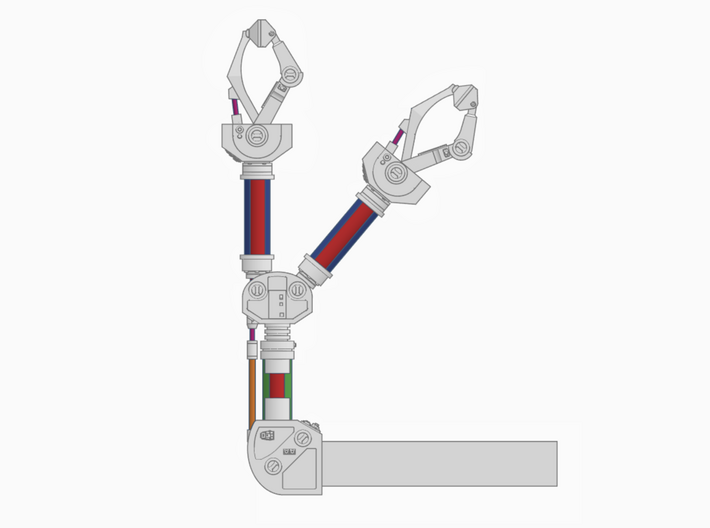
Full arms: the metal tubing
The full arms were designed around metal tubing for strength and good looks.
8mm tube: green. Main lower arm. Outer dia 8mm, inner dia 7mm.
6mm tube: blue. Upper two arms. OD 6mm, ID 5mm.
4mm tube: red. Interior bracing for the three arms.
1.5mm rod: orange.
1mm rod: magenta. Exposed aluminium.
- The 6mm and 8mm tubes must have 0.45-.5mm thick walls. 1mm walls won’t fit.
- Aluminium tubes are lighter, and usually cheaper, than brass so I’d probably go for them.
- Metric tube sizes are less common in the US than elsewhere. K&S is one maker. Online auction sites sell them too.
- The 1mm and 1.5mm rods could be anything. But the 1mm segments should be bare metal, so it’s easier to use aluminium.
- I strongly recommend dry fitting everything carefully before gluing things permanently.
- Certain pieces must be assembled in a particular order. Nothing bizarre - you obviously can’t install the 4mm inner tubes before the 6mm outer tubes, for example. I would glue the lower tubes to the lower plastic pieces, then lower the middle pieces down on top of the tubes.
- The 4mm tubes could be rods, but it would add weight.
- The 4mm tubes strengthen the arms. A bit of epoxy between the nested tubes will help.
- The lower 4mm tubes are entirely concealed by the 8mm tubes, and are there for strength.
- The upper two 4mm tubes have short visible sections.
- The top bit, where the 4mm tube enters the hand box, should have a tiny 0.5mm visible sliver of tube. The 4mm tube is also visible on the outer edges of the bottom.
- The raw tube ends will be concealed by the plastic components, and so don’t have to be perfect. But burrs should be removed so the tubes will fit cleanly.
- All pipes to be painted white except for the 1mm metal rods, which should be bare aluminium or silver-painted.
- Don’t paint up the tubing before assembly since the tolerances are quite tight.
- The long beams can accommodate a pair of 4mm tubes for extra strength. Optional.
Other issues of note.
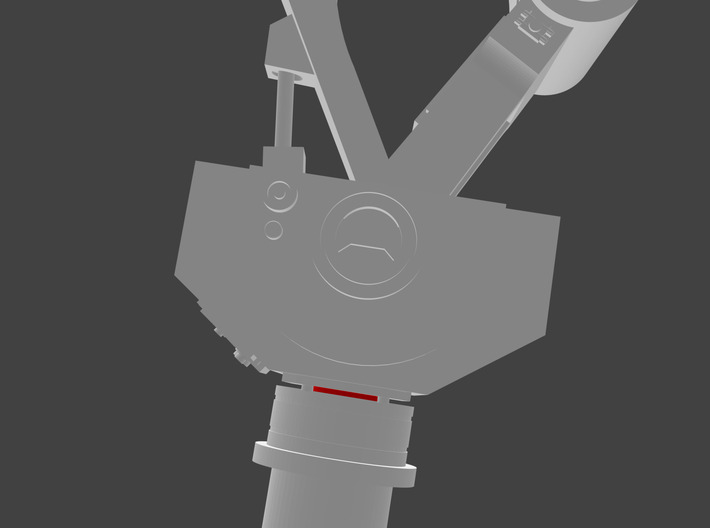
Ring details.
There are a number of rings on the arms which correspond to pivot points. These have black-painted recessed handgrip areas. Moebius and others have modelled these rings as raised. They weren’t - they were flush with the surface. However they had fine circular recesses running around their perimeter. Sadly these recesses are too small to 3D print accurately so I’ve had to make the rings raised as well.
One rarely modelled aspect of the arms is the series of dots adorning the rings. Unfortunately even the high-rez photos don’t reveal if the dots are black paint or stickers, or if they were recessed areas. There were also red triangles pointing like arrows on one side. I test-modelled these as recesses but again, they don’t print very well, so I in the end I left these out. But if you want to print some homemade decals up, these would be a good candidate.
This is version 2F - full arms, stowed position, adjustable thumbs, short beams, greeblies. see the full description below.
The Moebius kit arms and why to replace them.
The kit parts supplied by Moebius aren't terrible, but are simplified in nature. Many of the finer details are missing or are rudimentary. They also suffer from aspects of the injection moulding process. The arms and boxes have noticeable draft (ie: the sides of the boxes are not parallel but taper out) and sanding and puttying is required to fill seams and gaps.
Accuracy.
Until relatively recently most model makers only had low-rez publicity shots in books, and DVD/BluRay screen grabs to base their work. I was able to take advantage of unpublished high-rez shots from the Kubrick Archives and the new 4K UHD discs. Therefore these parts contain accurate details that nobody has really modelled correctly before.
I can’t say with certainty that they’re the most accurate models of the pod arms ever made, but they might be!
Replacement pod arms choices.
Because different people have different priorities and budgets I have made a number of designs for improving your Moebius pod bay arms. There are many variants to give everybody a wide choice, but it's admittedly kind of confusing. Please double-check before purchasing a set!
Just fingers?
To save money I've made fingers-only parts that fit into the existing Moebius parts. They don't give you the whole updated look, and don’t address the problems with the tubes and boxes, but they're something.
Whole arms?
Alternatively you can replace the whole pair of arms with these accurized parts. The arms require metal tubing and rods. I didn't 3D-print the cylinders since metal gives you improved strength and appearance.
Full or short arm beams?
The EVA pod arms had metal beams, rectangular in cross section, which slid into the pod. I have made models of these, but they're kind of expensive to 3D print because of Shapeways' pricing. Also, because Shapeways parts tend to have a slight corrugated texture, you'll have to sand down the surfaces to make them look good. There are two 4mm holes running through the beams, partly to lower the print cost and partly so you can run metal tubing through if you wish.
An alternative is to get the short arm version. This lacks the beams but has rectangular sockets to accommodate them, and so saves you a little money. You then just saw off the Moebius "metal beam" parts, glue them together, putty over the seams, and use those instead. You'll need to fill the hole with putty prior to painting, of course. You will also need to cut a notch off at the top of the "beam" so it goes as far as possible into the box.
The short beam box also has a 1mm vertical hole in the middle. The idea is so you can drill a matching hole in the Moebius "metal beam", and run a 14mm long, 1mm diameter metal rod through both pieces. This will pin the "beam" in place and make the whole thing a bit sturdier.
Hands open version, or closed version?
Most of the time the pod manipulator hands had closed fingers. These were seen on pods resting in the bay flying through space.
But during the murderous attack sequence the hands were, of course, wide open. I have made both versions, with the open version designed to resemble the finger positions seen in the attack sequence.
Adjustable thumb version.
In addition to the closed and open hands, I have a third version with a separate “thumb” for each hand. This can be glued in at different angles, so you can have subtly different thumb positions, thus revealing the grooved fingerpads, which looks cool. The thumb cannot be articulated - it has to be glued in position.
The separate thumb version requires a 17-18mm length of 1mm dia aluminium wire on the side. Or you could use brass wire and paint it silver to match the original props, but aluminium wire is cheaper and looks more convincingly metallic than paint.
Finger pads.
The arms seen during the Frank murder scene and during the airlock door opening scene have clear serrated details on the fingertips. These are tapered (not parallel sided) boxes which interlock. I have fully replicated these details, though when the fingers are closed they're obviously not visible except a sort of zig-zag at the top.
No separate fingers/fingerpads/etc
Why haven't I made a version with completely separate fingers, thumbs, and adjustable fingerpads? Basically because separate components means for a weaker overall structure, it's hard to engineer separate and reliable moveable parts at this size, it costs more to print, and I don't think there's a ton of demand.
Greeblies or no?
There are no shots showing the insides of the hand boxes. They were seemingly just painted black in there. However as models they looked a bit bland so I cobbled together a few cylinders and things to make it look like there are mechanisms in there. If you dislike these (hard to see anyway) conjectured greeblies I have made a purist version which lacks them.
Stowed or extended?
Most of the time the arms were pointing up, with the hands stowed. They were like that in the pod bay and when flying through space. However, when HAL was attacking Poole, and when Bowman was retrieving Poole’s body, the arms were extended out. I’ll make extended arms at some point.
3D printing issues.
Because these fingers and arms must be printed using the Shapeways "detail" process, there will be some artefacts. Specifically there will be some light corrugation on flat surfaces. These can be removed by careful and light filing with a flat file. Rough areas should be lightly scraped with the flat edge of a sharp blade. Taking the time to clean up the parts before priming will make a big difference!
Specific metal part lengths for each pair of arms.
Lower arm:
2x 25mm 8mm tube
2x 42mm 4mm tube
2x 9mm 1mm rod
2x 24mm 1.5mm rod
Upper arms:
4x 28mm 6mm tube
4x 49mm 4mm tube
Hands:
4x 8mm 1mm rod
Pins for short boxes
2x 14mm 1mm rod
The Versions.
Version 1: Fingers only
The "fingers only" versions simply fit inside the Moebius-supplied hand boxes. The cheapest option.
IMPORTANT NOTE: these "fingers" versions are not entirely compatible with the full sets. This is because the Moebius hand box has a thick wall, whereas my version of the hand box has a thinner wall. The bottom of the box also differs.
Version 1A: Fingers only, closed fingers, greeblies:
Replacement “fingers”. Closed, and thus are in the normal position. This version includes conjectured greeblies.
Version 1B: Fingers only, closed fingers, no greeblies:
Same as above but no internal greeblies.
Version 1C: Fingers only, open fingers, greeblies:
These are fingers set to the open position - perfect for murdering an astronaut. They're modelled after the attack stance in the film, of course.
Version 1D: Adjustable thumb, greeblies
Fingers only. More expensive, as the parts have to be separate to be printable. You can adjust the thumb position relative to the fingers, and glue them down. This is not an articulated product.
Version 2: Full arms in stowed position.
These include complete replacement arms in the usual hands-up position. The full arm versions require metal tubes of different sizes.
Version 2A: Stowed arms, closed fingers, long beams, greeblies
This "long" version includes a 3D-printed representation of the long rectangular metal bars. Greeblies are included.
Version 2B: Stowed arms, closed fingers, short beams, greeblies
Same as above, but the bottom-most boxes have a hollow slot. You'll have to cut off the plastic pieces that make up each metal bar, and glue those inside the boxes. This means a bit of work cleaning up the seams and whatnot on the Moebius parts, but saves a little money.
Version 2C: Stowed arms, closed fingers, long beams, separate fingers/hand box, greeblies
Same as 2A with long beams, but the fingers and the hand boxes are separate components.
Version 2D: Stowed arms, closed fingers, short beams, separate fingers/hand box, greeblies
Same as 2B with short beams, but the fingers and the hand boxes are separate components.
Version 2E: Stowed arms, long beams, adjustable thumbs, greeblies
Same as 2A, only the thumbs can be positioned before being glued down.
Version 2F: Stowed arms, short beams, adjustable thumbs, greeblies
Same as 2B, only the thumbs can be positioned before being glued down.
Other versions may be forthcoming if there’s enough interest.
Full arms: the metal tubing
The full arms were designed around metal tubing for strength and good looks.
8mm tube: green. Main lower arm. Outer dia 8mm, inner dia 7mm.
6mm tube: blue. Upper two arms. OD 6mm, ID 5mm.
4mm tube: red. Interior bracing for the three arms.
1.5mm rod: orange.
1mm rod: magenta. Exposed aluminium.
- The 6mm and 8mm tubes must have 0.45-.5mm thick walls. 1mm walls won’t fit.
- Aluminium tubes are lighter, and usually cheaper, than brass so I’d probably go for them.
- Metric tube sizes are less common in the US than elsewhere. K&S is one maker. Online auction sites sell them too.
- The 1mm and 1.5mm rods could be anything. But the 1mm segments should be bare metal, so it’s easier to use aluminium.
- I strongly recommend dry fitting everything carefully before gluing things permanently.
- Certain pieces must be assembled in a particular order. Nothing bizarre - you obviously can’t install the 4mm inner tubes before the 6mm outer tubes, for example. I would glue the lower tubes to the lower plastic pieces, then lower the middle pieces down on top of the tubes.
- The 4mm tubes could be rods, but it would add weight.
- The 4mm tubes strengthen the arms. A bit of epoxy between the nested tubes will help.
- The lower 4mm tubes are entirely concealed by the 8mm tubes, and are there for strength.
- The upper two 4mm tubes have short visible sections.
- The top bit, where the 4mm tube enters the hand box, should have a tiny 0.5mm visible sliver of tube. The 4mm tube is also visible on the outer edges of the bottom.
- The raw tube ends will be concealed by the plastic components, and so don’t have to be perfect. But burrs should be removed so the tubes will fit cleanly.
- All pipes to be painted white except for the 1mm metal rods, which should be bare aluminium or silver-painted.
- Don’t paint up the tubing before assembly since the tolerances are quite tight.
- The long beams can accommodate a pair of 4mm tubes for extra strength. Optional.
Other issues of note.
Ring details.
There are a number of rings on the arms which correspond to pivot points. These have black-painted recessed handgrip areas. Moebius and others have modelled these rings as raised. They weren’t - they were flush with the surface. However they had fine circular recesses running around their perimeter. Sadly these recesses are too small to 3D print accurately so I’ve had to make the rings raised as well.
One rarely modelled aspect of the arms is the series of dots adorning the rings. Unfortunately even the high-rez photos don’t reveal if the dots are black paint or stickers, or if they were recessed areas. There were also red triangles pointing like arrows on one side. I test-modelled these as recesses but again, they don’t print very well, so I in the end I left these out. But if you want to print some homemade decals up, these would be a good candidate.
Details
What's in the box:
Moebius Arms 2F

Dimensions:
Success Rate:
First To try.
What's this?
Rating:
Mature audiences only.


