Smooth Fine Detail Plastic


Docking Bay Partial, 1:72
Made by
Print With Shapeways
 Choose Your Material
 Choose your color and finish
$54.05
Have a question about this product?
contact the designerYou must be logged in and verified to contact the designer.
Product Description
These are some of the scenic accessories you need to make a diorama of Docking Bay 9 4. Recreate the audience's first sight of the Falcon in the first movie!
This is a partial set to save costs, and roughly reflects the props visible in the initial Docking Bay 9 4 scene. If you want to make a full set, with all of the props that were shown, check out my full 1:72 Docking Bay 9 4 product.
The parts are scaled to match 1:72 Falcon models, such as the old MPC/ERTL/AMT/Airfix kit from the 1970s (which is probably more like 1:68), the now-discontinued Fine Molds 1:72 kit, the Revell Master Series 1:72 kit (which is just the Fine Molds kit reboxed), or the awesome Bandai 1:72 Perfect Grade Falcon. Though to be totally accurate, the Fine Molds/Revell kit isn't correct for Docking Bay 9 4, since it has ESB-era Falcon details.
If your model is a 1:144 model, like the Bandai or Fine Molds Falcons, I have 1:144 versions of the Docking Bay Finally, if you're looking for parts for the teeny "Vehicle 006" Bandai Falcon, I have a 1:350 version as well.
Please read the following if you're interested in these items.
These accurizing parts are not mass-market commercial products. I made them for my own use, and have put them here in case they're of interest to someone else. Possibly you, since you’re reading this.
These are components for the serious model maker who wants to build a more accurate miniature. They require finishing. If you don't want to trim, file, sand, and glue, then these aren't the parts you're looking for!
The parts are tiny, and easily broken. They push the limits of today's 3D printers. The detail in the digital previews is all there, but it won't always be visible at the miniscule sizes that this scale requires!
What you get.
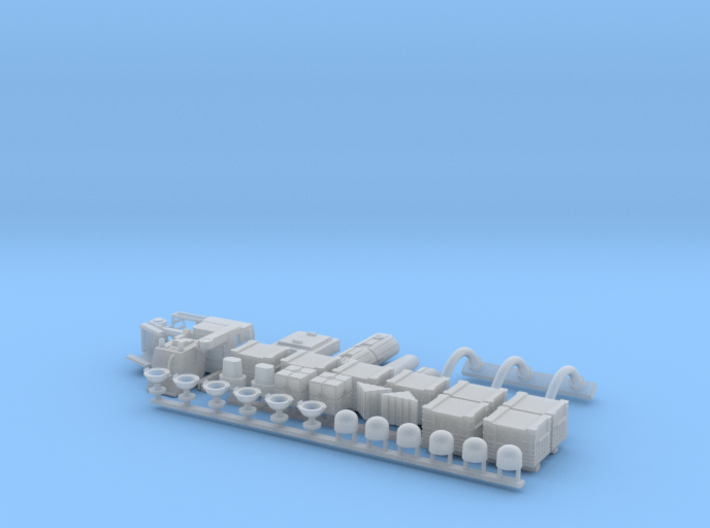
This excitingly fiddly set includes crates, ground lights, a forklift, and various greeblies. Illuminated parts have holes for optional fibre optics. Since no full blueprints or complete photos of Docking Bay 9 4 are known to be publicly available, the models are based on screen grabs and behind-the-scenes shots, so they aren't necessarily 100% accurate.
Crates.
What self-respecting spaceport would be without a fine selection of space crates? Docking Bay 9 4 has a number of crates lying around - cubes with circular patterns on each face, and bigger crates with rectangular grids.
Greeblies.
There are additional random greebly thingies scattered around the set, conveying an air of general mechanical decrepitude, and I've made models of many of them. However I've omitted a few that are too small or are difficult to make out in the screen shots. The greeblies include:
Forklift.
Did you notice the ordinary British-made red forklift (technically a "reach truck") in the docking bay? It's hidden in plain sight - just sitting quietly against the back wall, equipped with an enormous claw for lifting rolls of paper and other cylindrical objects. Since it appears in making-of shots, it was probably used to build the set in Elstree, England, back in 1976. And then it was just left there once the cameras started rolling.
Note that the safety bars and three support poles are extremely thin and extremely fragile! The poles are only 1mm in diameter. To keep the upper section of the cage printable and protected I've added two extra thin horizontal poles extending from the top of the forklift frame. These two poles aren't present on the actual prototype unit, and can be carefully removed with a fine razor saw and a needle file.
If you plan on having this model in a situation where any handling is required you'll probably want to cut these off, drill new holes, and replace the vertical poles with thin brass rod.
Ground lights.
Both episodes 4 and 5 feature these round lamps on the ground. They're actually US military runway lights from World War II - “Bartow” type D-1 beacons built by the Line Material Company of Pennsylvania; widely deployed in Britain to illuminate the runways of US airbases. Thirty years later some of these beacons were bought as surplus scrap by Roger Christian and the set decorating team, and became a minor footlight, er, footnote, in movie history.
I've designed the beacons in two halves so they can be lit. There's a recessed spot for an SMD LED - prewired white 0402 LEDs are ideal. Experiment with the correct location for the light to be positioned vertically inside the beacon for your satisfaction.
You'll need to prime and paint the lower half, and clear-coat the upper lit half to protect the acrylic resin. You may want to paint the interior of the LED cavity with some thick paint, such as fabric T-shirt paint, to avoid light leakage into the lower half of the beacon, as that looks really unconvincing.
Note that the hole running through the pole is pretty small, and will probably need to be thoroughly cleaned of support wax. This means running it under very hot water and gently poking a thin wire into the hole until you can scrape out the softened wax. This takes time.
What you don't get in this set.
No human or alien figures. No droids. All the props not seen in that initial opening scene. Building features, such as air intakes, pipes, and the SE cranes, are omitted. Finally I didn't include any hoses or cables since they're best made using fine wire.
Sprues
I'm afraid most of the parts are joined by fine sprues, because Shapeways now adds a surcharge for each part in a print. So the sprues save you a lot of money. But they're also a hassle to remove, and you have to be careful not to break anything. Sorry about that.
This is a partial set to save costs, and roughly reflects the props visible in the initial Docking Bay 9 4 scene. If you want to make a full set, with all of the props that were shown, check out my full 1:72 Docking Bay 9 4 product.
The parts are scaled to match 1:72 Falcon models, such as the old MPC/ERTL/AMT/Airfix kit from the 1970s (which is probably more like 1:68), the now-discontinued Fine Molds 1:72 kit, the Revell Master Series 1:72 kit (which is just the Fine Molds kit reboxed), or the awesome Bandai 1:72 Perfect Grade Falcon. Though to be totally accurate, the Fine Molds/Revell kit isn't correct for Docking Bay 9 4, since it has ESB-era Falcon details.
If your model is a 1:144 model, like the Bandai or Fine Molds Falcons, I have 1:144 versions of the Docking Bay Finally, if you're looking for parts for the teeny "Vehicle 006" Bandai Falcon, I have a 1:350 version as well.
Please read the following if you're interested in these items.
These accurizing parts are not mass-market commercial products. I made them for my own use, and have put them here in case they're of interest to someone else. Possibly you, since you’re reading this.
These are components for the serious model maker who wants to build a more accurate miniature. They require finishing. If you don't want to trim, file, sand, and glue, then these aren't the parts you're looking for!
The parts are tiny, and easily broken. They push the limits of today's 3D printers. The detail in the digital previews is all there, but it won't always be visible at the miniscule sizes that this scale requires!
What you get.
This excitingly fiddly set includes crates, ground lights, a forklift, and various greeblies. Illuminated parts have holes for optional fibre optics. Since no full blueprints or complete photos of Docking Bay 9 4 are known to be publicly available, the models are based on screen grabs and behind-the-scenes shots, so they aren't necessarily 100% accurate.
Crates.
What self-respecting spaceport would be without a fine selection of space crates? Docking Bay 9 4 has a number of crates lying around - cubes with circular patterns on each face, and bigger crates with rectangular grids.
Greeblies.
There are additional random greebly thingies scattered around the set, conveying an air of general mechanical decrepitude, and I've made models of many of them. However I've omitted a few that are too small or are difficult to make out in the screen shots. The greeblies include:
- The angular blue box - maybe some kind of power supply? - that sits beneath the Falcon. It has two red lights on the top - quite possibly German-built Hella 2RL rotating beacons with the motors turned off. I've added holes for running fibre optics to these lamps, though you may need to clean out the printing support wax from there. You'll also need to mask off the beacons before painting the body, and clear-coat instead of priming them. Finish off the lights with a little transparent red paint. Be really careful - the lights are insanely delicate and fragile! Behind-the-scenes photos show that this box has a kind of rectangular exhaust pipe thingie protruding from the top back, but it's too small to 3D print properly.
- A stacked barrel sort of object - the prop shown to the left of our heroes as they first enter the docking bay. This has holes for fibres for the green (left) and red (right) lights in the middle. There's also space for an SMD LED to be installed. Ideally you'll putty over the hole when that's done, though since these props are against a wall the gap isn't too noticeable.
- Pipes that stand near the walls.
- Finally there are low grey tapered cylinder things under the Falcon.
Forklift.
Did you notice the ordinary British-made red forklift (technically a "reach truck") in the docking bay? It's hidden in plain sight - just sitting quietly against the back wall, equipped with an enormous claw for lifting rolls of paper and other cylindrical objects. Since it appears in making-of shots, it was probably used to build the set in Elstree, England, back in 1976. And then it was just left there once the cameras started rolling.
Note that the safety bars and three support poles are extremely thin and extremely fragile! The poles are only 1mm in diameter. To keep the upper section of the cage printable and protected I've added two extra thin horizontal poles extending from the top of the forklift frame. These two poles aren't present on the actual prototype unit, and can be carefully removed with a fine razor saw and a needle file.
If you plan on having this model in a situation where any handling is required you'll probably want to cut these off, drill new holes, and replace the vertical poles with thin brass rod.
Ground lights.
Both episodes 4 and 5 feature these round lamps on the ground. They're actually US military runway lights from World War II - “Bartow” type D-1 beacons built by the Line Material Company of Pennsylvania; widely deployed in Britain to illuminate the runways of US airbases. Thirty years later some of these beacons were bought as surplus scrap by Roger Christian and the set decorating team, and became a minor footlight, er, footnote, in movie history.
I've designed the beacons in two halves so they can be lit. There's a recessed spot for an SMD LED - prewired white 0402 LEDs are ideal. Experiment with the correct location for the light to be positioned vertically inside the beacon for your satisfaction.
You'll need to prime and paint the lower half, and clear-coat the upper lit half to protect the acrylic resin. You may want to paint the interior of the LED cavity with some thick paint, such as fabric T-shirt paint, to avoid light leakage into the lower half of the beacon, as that looks really unconvincing.
Note that the hole running through the pole is pretty small, and will probably need to be thoroughly cleaned of support wax. This means running it under very hot water and gently poking a thin wire into the hole until you can scrape out the softened wax. This takes time.
What you don't get in this set.
No human or alien figures. No droids. All the props not seen in that initial opening scene. Building features, such as air intakes, pipes, and the SE cranes, are omitted. Finally I didn't include any hoses or cables since they're best made using fine wire.
Sprues
I'm afraid most of the parts are joined by fine sprues, because Shapeways now adds a surcharge for each part in a print. So the sprues save you a lot of money. But they're also a hassle to remove, and you have to be careful not to break anything. Sorry about that.
Details
What's in the box:
Docking Bay 94 Partial, 1:72

Dimensions:
Success Rate:
First To try.
What's this?
Rating:
Mature audiences only.


