Tan Fine Detail Plastic


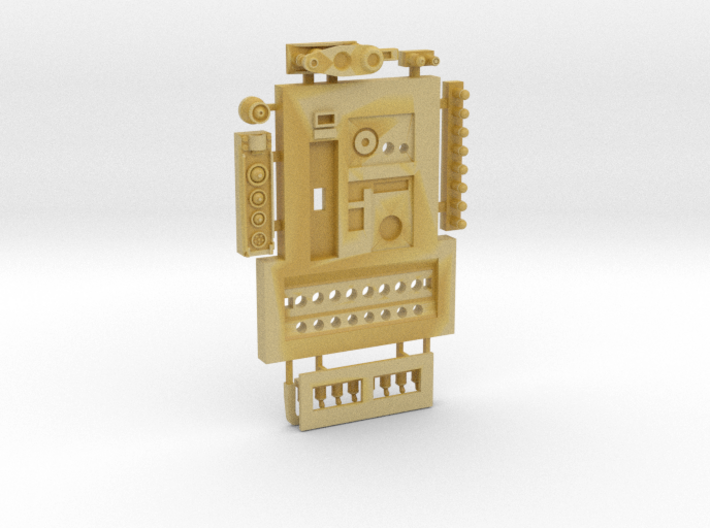
Moebius EVA Pod - Multi-part Back Panel
Made by
Print With Shapeways
 Choose Your Material
 Choose your color and finish
$17.18
Have a question about this product?
contact the designerYou must be logged in and verified to contact the designer.
Product Description
This is an add-on detail part for the Moebius Models 1:8 EVA Pod kit.
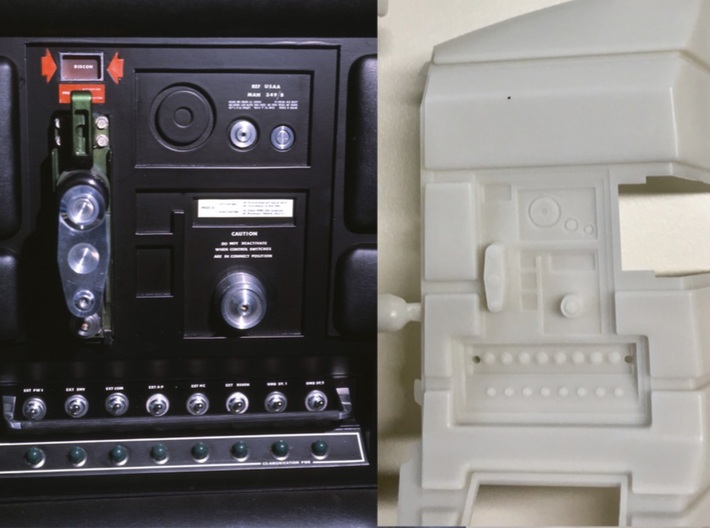
The rear of the pod interior seen in the film has a pair of panels on the vertical back wall. The starboard panel (left side when looking into the pod) is seen in closeup twice in the movie. It’s shown when Bowman turns off the interior microphones when trying to have a HAL-free conversation with Poole, during the lip reading scene. And it’s shown again when Bowman engages the explosive bolts to blow the back door open. So we have a pretty good view of the panel.
Unfortunately the Moebius panel is a bit inaccurate. It has the wrong proportions - it’s too narrow - and the details are sketchy. It's also difficult to light the row of buttons.
Versions
There are two versions of this panel.
Multi-piece panel
The version you're looking at now is a multi-part panel with a bunch of separate pieces. The parts are separate for ease of painting and lighting. Also the emergency cover over the explosive bolt button panel is removable, so you can glue it on or leave it off as you wish.
Single piece panel
The other version is a single printed piece that’s easy to drop in place once a hole has been cut. It has no separate pieces, and the "safety cover" is permanently in place over top of the "explosive bolt" release panel.
Proportions
This replacement part has the same incorrect proportions as the Moebius model. I considered making a more accurate sized part, but it’s a lot of work to rework Moebius' plastics for the back wall, so this version is simpler to install. You just have to cut out the existing panel to fit.
Additionally, the movie's detailed back panel was designed for the separate interior of the pod used for filming the cockpit scenes, and so it doesn't actually fit the proportions of the external pod properly anyway! So - incorrect proportions it is. If you'd prefer a panel with something approaching the correct proportions, let me know.
Panel colours
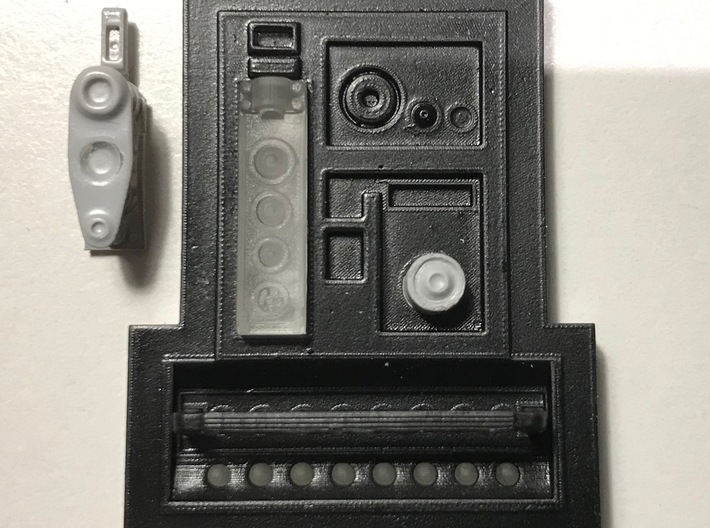
The panel as a whole should be painted satin black. The two recessed buttons in the upper right (to the right of the recessed large black circle) should be painted metallic silver. The raised rectangular ring around the light in the upper left corner should be painted metallic silver. The rectangle immediately beneath this light should be red with white text, though note it wasn't raised in the movie - I made it a raised part for ease of painting.
Lights
The row of green lights at the bottom of the panel is a separate piece. You can thus tint the buttons with clear green paint (Tamiya makes a clear green that's a bit pale but close enough) and light them easily from behind. You can also paint the chrome silver rings around each “bulb” with ease before installing them.
Switches
Above the lights is a row of toggle switches. Bowman flicks these off, one by one, during the lip-reading scene, so you could, if you wanted, put these in upside-down. Otherwise the toggles should point up.
An important fact about these switches - they are INSANELY FRAGILE. I made them as near to scale as I could, but even slightly large they’re still super easy to break. You'll need to paint them shiny silver, and then install them into the panel from the back. Make sure the paint on the sides of the switches isn't too thick, or you'll have problems with the fit.
Note one other rivet-counting detail. In the film the second and third switches are installed slightly higher than the others. (ie: they're not perfectly in line) I’ve replicated this error in the model. Wheee!
Protective bar
There’s a bar, sort of like a kitchen tea towel rail, in front of the switches to protect them from inadvertent damage from a spacesuited astronaut. (Apollo 11 should've had these - then the lunar lander's circuit breakers might have been better protected. There was a simple projecting bar, but it wasn't enough to protect one of the breakers from, well, getting broken. Fortunately Buzz Aldrin managed to jam a pen cap into the switch, which permitted the ascent motor to work properly)
I’ve modelled this bar, but it’s much thicker than it should be for scale, for printability. Also it protects the switches during shipping. Note that it must be glued in after the switches are in place. The bar has shiny chromed ends, and a black rubbery handle.
Back "explosive bolts" button bar
There's a box containing a set of buttons for triggering the explosive bolts for releasing the back door. In the film this was actually a repurposed PEC (personal equipment connector) from an actual Martin Baker ejection seat for a fighter plane. The round "buttons" are thus actually hose connectors, and not pushbuttons at all!
The box should be painted metallic (ie: anodized aluminium) green. The four bolts at the top of the box were flat silver, as were the two projecting rectangular tabs at the bottom of the frame. The bottom projecting post is also silver.
"Explosive bolts" safety cover
A safety cover was clipped over the box containing the buttons. This was the matching half of the PEC, with an apparently custom-made aluminium plate on the front. The "sled" portion of the PEC was anodized green, the projecting threaded tubes were shiny black, and the frontmost piece was bare metal.
For most of the film this cover was clipped over the box, but it's removable in case you want to model the pod in post door-blown-out condition. Note that in the film Bowman appears to stow the removed cover in the small box on top of the triangular storage area below his right elbow - it wasn't left to float randomly around the pod cockpit.
Silver post thingie
The silver post thingie on the middle right side is a separate part for ease of painting. It should be metallic silver. NOTE: I updated this component for version 2 of this model. See the bottom of this page.
Upper left light
The recessed light in the upper left-hand corner of the panel was red, and flashed only after the safety buttons were pressed to engage the explosive bolts. I've made a pair of holes behind this light, so you can insert a pair of fibre optics to illuminate it if you want. Though of course it wasn't lit for most of the movie.
Desprueing
Use sharp sprue cutters to cut off all the parts, holding the flat edge of the cutter against the part you want to keep (ie: the curved bit should face the sprue). The first bit to remove is the protective plate over top of the row of toggle switches. Snip that off by cutting the small posts holding it in place. Then you can cut off each piece from the main panel as required. Keep the sprues attached to the smaller bits as they're useful for holding the parts for painting purposes.
Note that the smaller parts are REALLY TINY AND FRAGILE so use extreme care. The acrylic plastic is quite brittle and easily broken!
Thanks to Scott Bouchard for providing some very useful photographs of a Martin Baker PEC device, so I could make this model as accurate as possible.
Release 2, 24 May 2019
I visited the Kubrick Archives and was able to review hundreds of photos in their collection. I found side views of the panel, and it became obvious that the silver post thingie was, in fact, partly conical and not a simple cylinder. Accordingly I've updated this model with a more accurate post.
Release 3, 4 May 2023
Corrected the shape of the toggle switches, and also made two recessed silvery details separate parts, for ease of painting.
The rear of the pod interior seen in the film has a pair of panels on the vertical back wall. The starboard panel (left side when looking into the pod) is seen in closeup twice in the movie. It’s shown when Bowman turns off the interior microphones when trying to have a HAL-free conversation with Poole, during the lip reading scene. And it’s shown again when Bowman engages the explosive bolts to blow the back door open. So we have a pretty good view of the panel.
Unfortunately the Moebius panel is a bit inaccurate. It has the wrong proportions - it’s too narrow - and the details are sketchy. It's also difficult to light the row of buttons.
Versions
There are two versions of this panel.
Multi-piece panel
The version you're looking at now is a multi-part panel with a bunch of separate pieces. The parts are separate for ease of painting and lighting. Also the emergency cover over the explosive bolt button panel is removable, so you can glue it on or leave it off as you wish.
Single piece panel
The other version is a single printed piece that’s easy to drop in place once a hole has been cut. It has no separate pieces, and the "safety cover" is permanently in place over top of the "explosive bolt" release panel.
Proportions
This replacement part has the same incorrect proportions as the Moebius model. I considered making a more accurate sized part, but it’s a lot of work to rework Moebius' plastics for the back wall, so this version is simpler to install. You just have to cut out the existing panel to fit.
Additionally, the movie's detailed back panel was designed for the separate interior of the pod used for filming the cockpit scenes, and so it doesn't actually fit the proportions of the external pod properly anyway! So - incorrect proportions it is. If you'd prefer a panel with something approaching the correct proportions, let me know.
Panel colours
The panel as a whole should be painted satin black. The two recessed buttons in the upper right (to the right of the recessed large black circle) should be painted metallic silver. The raised rectangular ring around the light in the upper left corner should be painted metallic silver. The rectangle immediately beneath this light should be red with white text, though note it wasn't raised in the movie - I made it a raised part for ease of painting.
Lights
The row of green lights at the bottom of the panel is a separate piece. You can thus tint the buttons with clear green paint (Tamiya makes a clear green that's a bit pale but close enough) and light them easily from behind. You can also paint the chrome silver rings around each “bulb” with ease before installing them.
Switches
Above the lights is a row of toggle switches. Bowman flicks these off, one by one, during the lip-reading scene, so you could, if you wanted, put these in upside-down. Otherwise the toggles should point up.
An important fact about these switches - they are INSANELY FRAGILE. I made them as near to scale as I could, but even slightly large they’re still super easy to break. You'll need to paint them shiny silver, and then install them into the panel from the back. Make sure the paint on the sides of the switches isn't too thick, or you'll have problems with the fit.
Note one other rivet-counting detail. In the film the second and third switches are installed slightly higher than the others. (ie: they're not perfectly in line) I’ve replicated this error in the model. Wheee!
Protective bar
There’s a bar, sort of like a kitchen tea towel rail, in front of the switches to protect them from inadvertent damage from a spacesuited astronaut. (Apollo 11 should've had these - then the lunar lander's circuit breakers might have been better protected. There was a simple projecting bar, but it wasn't enough to protect one of the breakers from, well, getting broken. Fortunately Buzz Aldrin managed to jam a pen cap into the switch, which permitted the ascent motor to work properly)
I’ve modelled this bar, but it’s much thicker than it should be for scale, for printability. Also it protects the switches during shipping. Note that it must be glued in after the switches are in place. The bar has shiny chromed ends, and a black rubbery handle.
Back "explosive bolts" button bar
There's a box containing a set of buttons for triggering the explosive bolts for releasing the back door. In the film this was actually a repurposed PEC (personal equipment connector) from an actual Martin Baker ejection seat for a fighter plane. The round "buttons" are thus actually hose connectors, and not pushbuttons at all!
The box should be painted metallic (ie: anodized aluminium) green. The four bolts at the top of the box were flat silver, as were the two projecting rectangular tabs at the bottom of the frame. The bottom projecting post is also silver.
"Explosive bolts" safety cover
A safety cover was clipped over the box containing the buttons. This was the matching half of the PEC, with an apparently custom-made aluminium plate on the front. The "sled" portion of the PEC was anodized green, the projecting threaded tubes were shiny black, and the frontmost piece was bare metal.
For most of the film this cover was clipped over the box, but it's removable in case you want to model the pod in post door-blown-out condition. Note that in the film Bowman appears to stow the removed cover in the small box on top of the triangular storage area below his right elbow - it wasn't left to float randomly around the pod cockpit.
Silver post thingie
The silver post thingie on the middle right side is a separate part for ease of painting. It should be metallic silver. NOTE: I updated this component for version 2 of this model. See the bottom of this page.
Upper left light
The recessed light in the upper left-hand corner of the panel was red, and flashed only after the safety buttons were pressed to engage the explosive bolts. I've made a pair of holes behind this light, so you can insert a pair of fibre optics to illuminate it if you want. Though of course it wasn't lit for most of the movie.
Desprueing
Use sharp sprue cutters to cut off all the parts, holding the flat edge of the cutter against the part you want to keep (ie: the curved bit should face the sprue). The first bit to remove is the protective plate over top of the row of toggle switches. Snip that off by cutting the small posts holding it in place. Then you can cut off each piece from the main panel as required. Keep the sprues attached to the smaller bits as they're useful for holding the parts for painting purposes.
Note that the smaller parts are REALLY TINY AND FRAGILE so use extreme care. The acrylic plastic is quite brittle and easily broken!
Thanks to Scott Bouchard for providing some very useful photographs of a Martin Baker PEC device, so I could make this model as accurate as possible.
Release 2, 24 May 2019
I visited the Kubrick Archives and was able to review hundreds of photos in their collection. I found side views of the panel, and it became obvious that the silver post thingie was, in fact, partly conical and not a simple cylinder. Accordingly I've updated this model with a more accurate post.
Release 3, 4 May 2023
Corrected the shape of the toggle switches, and also made two recessed silvery details separate parts, for ease of painting.
Details
What's in the box:
Explosive Bolts

Dimensions:
Success Rate:
First To try.
What's this?
Rating:
Mature audiences only.


