Clear Ultra Fine Detail Plastic


Rebellious Spaceship, 1:2700
Made by
Print With Shapeways
 Choose Your Material
 Choose your color and finish
$12.04
Have a question about this product?
contact the designerYou must be logged in and verified to contact the designer.
Product Description
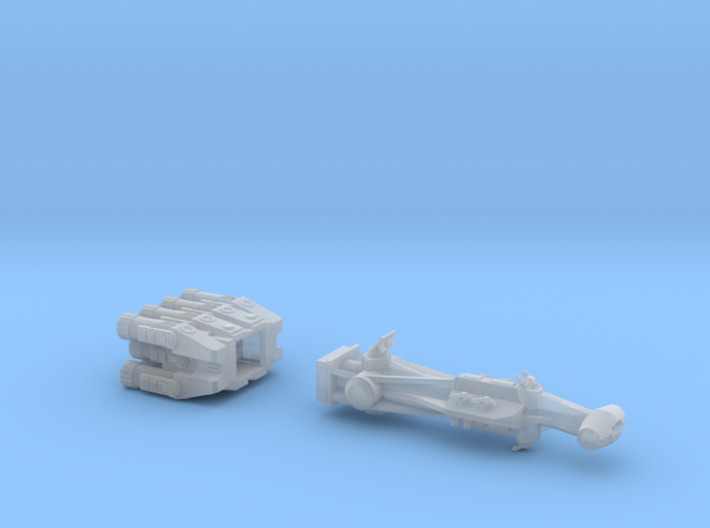
The Age of Plastic, destroyer add-on #1, lightable version
This is a model of the spacecraft with the honour of being the first vehicle to appear on-screen in the first film in the most lucrative space fantasy ever produced. Albeit a blockade runner that's attacked by, and subsequently sucked into, a destroyer in the film's memorable opening sequence.
It's reproduced here to the correct tiny size to match the Zvezda/Revell 1:2700 destroyer model kit. At least in theory. The lengths of the two vessels are somewhat debatable, so I've made this model about 47mm long. That fits into the Zvezda/Revell kit's bay with room to spare, guided by the scene in the movie. However, some references place the ship's length at 150 metres, which would scale down to 56mm at 1:2700.
Note that at this small a size, compromises to screen accuracy in terms of component thickness are unavoidable. Even with enlarged guns, fins, and other details, this is a really fragile and brittle model!
Please read the following if you're interested in these items.
These accurizing parts are not mass-market commercial products. I made them for my own use, and have put them here in case they're of interest to someone else. Possibly you, since you’re reading this.
These are components for the serious model maker who wants to build a more accurate miniature. They require finishing. If you don't want to trim, file, sand, and glue, then these aren't the parts you're looking for!
The parts are tiny, and easily broken. They push the limits of today's 3D printers. The detail in the digital previews is all there, but it won't always be visible at the miniscule sizes that this scale requires!
Which movie?
Now admittedly matching this ship to the Zvezda/Revell model isn't technically 100% screen accurate, since the latter is modelled after the destroyer design seen in episode 5 and not episode 4. But if you want to have the episode 5 grabbing this thing, why not? Alternatively I have super-tiny models of the bounty hunter ship for the ship's garbage chute.
Lighting
This model is printed in two halves which must be glued together with epoxy or superglue. The reason is so you can stick an LED or two inside to light the engines. But note that lighting is very challenging, owing to the tiny size of the model!
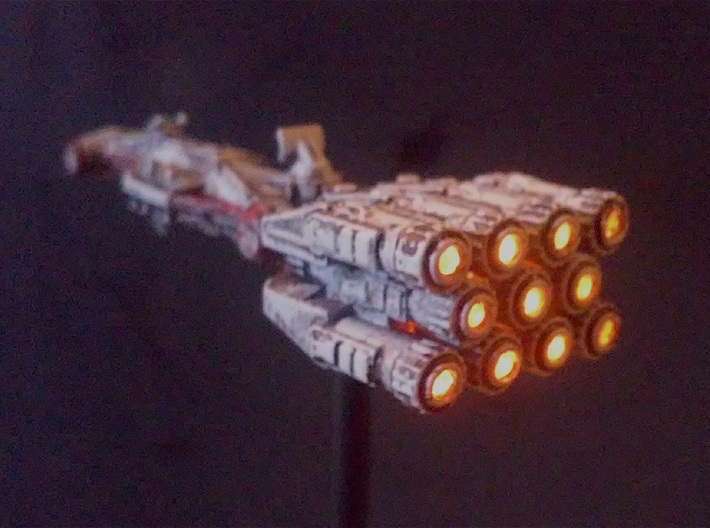
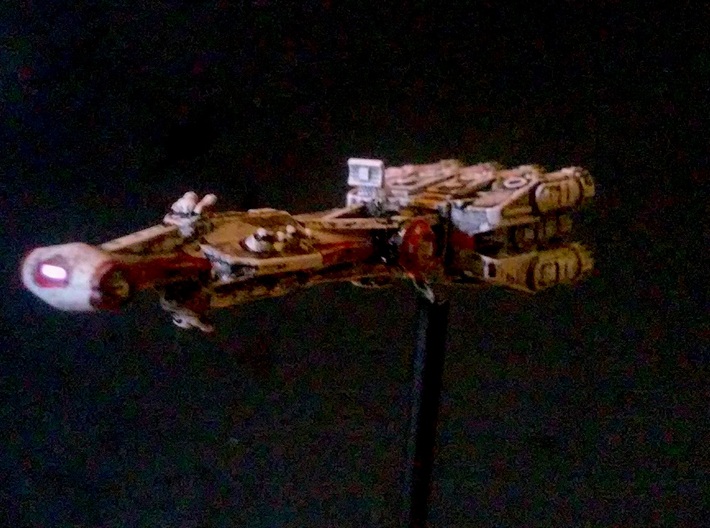
The attached photos are of this model painted and lit by experienced modelmaker Robert "Robiwon" Cass, a generous man now much missed in the model making community. He added two SMD LEDs, to illuminate both the rear engines and the cockpit.
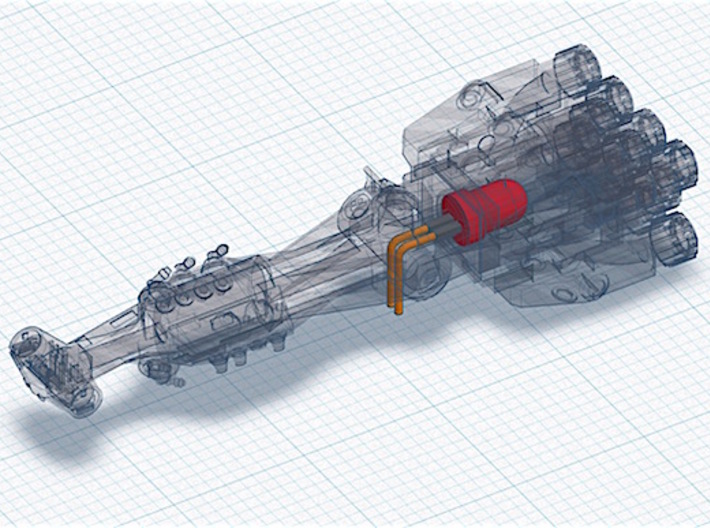
First, because of tight clearances and curves, it will be difficult to feed an LED's wires out through the bottom if you're using a 3mm LED. You're best off cutting the LED's wires short, and soldering on some really thin magnet wire, then feeding that through. See the diagram. Or use a prewired SMD LED.
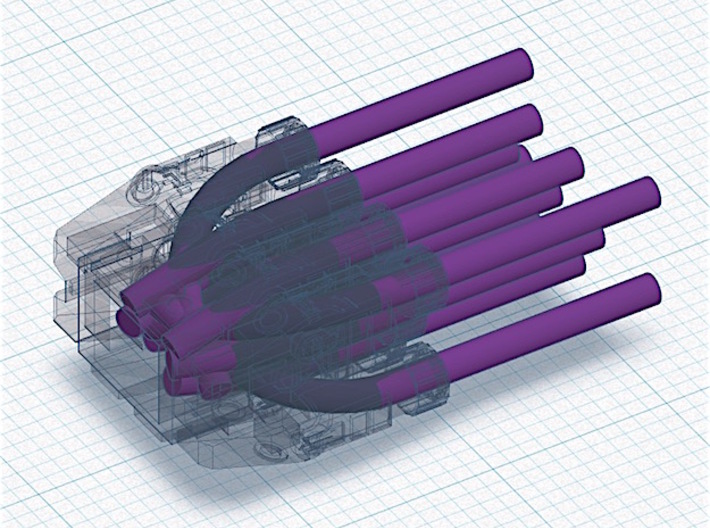
I've provided tiny internal tunnels in the engine block so that 1mm fibres can run from the engines through to the LED. (shown in purple in the attached rendering) These tunnels are needed since the outer engine fibres have to curve - you can't simply drill the engines out to accommodate lighting. In fact, the tunnels are cut for 1.5mm fibres, but you'll probably find that 1.5mm fibres are too thick to bend correctly for the outer engines - 1mm works better.
You'll also need to file the end of the LED down flat - but don't damage the internal die or wiring! - so all the fibres get lit properly. This is because 3mm LEDs have lenses to direct light in a focused beam. In the tight confines of this model, that would mean that the fibres in the middle will get lots of light, but the fibres around the edges (which come into the light bay at a sharp angle) would get very little. By filing the LED flat you're getting more even light distribution across the engine ports.
Incidentally, support for fibres means that the model deviates slightly from screen accuracy. In order to accommodate the curved fibre paths I had to enlarge the internal dimensions of part of the front engine block. This is pretty hard to notice, and the outer dimensions of the engines are not affected.
Note that the tunnels are so narrow that it's likely that some of them may contain remnants of the wax used to support the model while printing. If so, you'll need to clean those tunnels out with hot water and a thin wire.
If you don't want to light the engines (perhaps you want to depict the ship being hauled haplessly into the destroyer's belly) then I also have a one-piece version.
Lighting the bridge
For fun I also built internal detailing into the bridge. There are dash consoles, a doorway, etc. (you can see it in the 3D view above) Unfortunately the support wax used by the 3D printers is difficult for Shapeways' cleaning process to remove, since the bridge window is so small. So you may need to clean the bridge yourself - run hot water and use a fine wire or needle to gently poke the softened wax out, especially from the sides of the interior room.
Then you could clean out the central tunnel that runs the length of the ship's spine and feed through a prewired 0402 SMD LED and backlight the cockpit area if you wanted to. (yes - it is possible!)
Fun fact 1:
Did you know that this ship, albeit with a simple nose cone and not the later hammerhead design, was meant to be the Falcon? The final saucer shape of the Falcon was a last-minute change, and then the ship was recycled as the blockade runner.
Fun fact 2:
The shooting model's cockpit contains a tiny movie poster and a miniature copy of a Playboy centrefold. This tiny replica is too small for that, of course.
Fun fact 3:
The main shooting model of the ship was actually twice as big as the model of the destroyer that attacks it. Clever optical work, and a second model for the docking bay scene, make it look much smaller.
The original film spacecraft was designed by Ralph McQuarrie and Joe Johnston.
This is a model of the spacecraft with the honour of being the first vehicle to appear on-screen in the first film in the most lucrative space fantasy ever produced. Albeit a blockade runner that's attacked by, and subsequently sucked into, a destroyer in the film's memorable opening sequence.
It's reproduced here to the correct tiny size to match the Zvezda/Revell 1:2700 destroyer model kit. At least in theory. The lengths of the two vessels are somewhat debatable, so I've made this model about 47mm long. That fits into the Zvezda/Revell kit's bay with room to spare, guided by the scene in the movie. However, some references place the ship's length at 150 metres, which would scale down to 56mm at 1:2700.
Note that at this small a size, compromises to screen accuracy in terms of component thickness are unavoidable. Even with enlarged guns, fins, and other details, this is a really fragile and brittle model!
Please read the following if you're interested in these items.
These accurizing parts are not mass-market commercial products. I made them for my own use, and have put them here in case they're of interest to someone else. Possibly you, since you’re reading this.
These are components for the serious model maker who wants to build a more accurate miniature. They require finishing. If you don't want to trim, file, sand, and glue, then these aren't the parts you're looking for!
The parts are tiny, and easily broken. They push the limits of today's 3D printers. The detail in the digital previews is all there, but it won't always be visible at the miniscule sizes that this scale requires!
Which movie?
Now admittedly matching this ship to the Zvezda/Revell model isn't technically 100% screen accurate, since the latter is modelled after the destroyer design seen in episode 5 and not episode 4. But if you want to have the episode 5 grabbing this thing, why not? Alternatively I have super-tiny models of the bounty hunter ship for the ship's garbage chute.
Lighting
This model is printed in two halves which must be glued together with epoxy or superglue. The reason is so you can stick an LED or two inside to light the engines. But note that lighting is very challenging, owing to the tiny size of the model!
The attached photos are of this model painted and lit by experienced modelmaker Robert "Robiwon" Cass, a generous man now much missed in the model making community. He added two SMD LEDs, to illuminate both the rear engines and the cockpit.
First, because of tight clearances and curves, it will be difficult to feed an LED's wires out through the bottom if you're using a 3mm LED. You're best off cutting the LED's wires short, and soldering on some really thin magnet wire, then feeding that through. See the diagram. Or use a prewired SMD LED.
I've provided tiny internal tunnels in the engine block so that 1mm fibres can run from the engines through to the LED. (shown in purple in the attached rendering) These tunnels are needed since the outer engine fibres have to curve - you can't simply drill the engines out to accommodate lighting. In fact, the tunnels are cut for 1.5mm fibres, but you'll probably find that 1.5mm fibres are too thick to bend correctly for the outer engines - 1mm works better.
You'll also need to file the end of the LED down flat - but don't damage the internal die or wiring! - so all the fibres get lit properly. This is because 3mm LEDs have lenses to direct light in a focused beam. In the tight confines of this model, that would mean that the fibres in the middle will get lots of light, but the fibres around the edges (which come into the light bay at a sharp angle) would get very little. By filing the LED flat you're getting more even light distribution across the engine ports.
Incidentally, support for fibres means that the model deviates slightly from screen accuracy. In order to accommodate the curved fibre paths I had to enlarge the internal dimensions of part of the front engine block. This is pretty hard to notice, and the outer dimensions of the engines are not affected.
Note that the tunnels are so narrow that it's likely that some of them may contain remnants of the wax used to support the model while printing. If so, you'll need to clean those tunnels out with hot water and a thin wire.
If you don't want to light the engines (perhaps you want to depict the ship being hauled haplessly into the destroyer's belly) then I also have a one-piece version.
Lighting the bridge
For fun I also built internal detailing into the bridge. There are dash consoles, a doorway, etc. (you can see it in the 3D view above) Unfortunately the support wax used by the 3D printers is difficult for Shapeways' cleaning process to remove, since the bridge window is so small. So you may need to clean the bridge yourself - run hot water and use a fine wire or needle to gently poke the softened wax out, especially from the sides of the interior room.
Then you could clean out the central tunnel that runs the length of the ship's spine and feed through a prewired 0402 SMD LED and backlight the cockpit area if you wanted to. (yes - it is possible!)
Fun fact 1:
Did you know that this ship, albeit with a simple nose cone and not the later hammerhead design, was meant to be the Falcon? The final saucer shape of the Falcon was a last-minute change, and then the ship was recycled as the blockade runner.
Fun fact 2:
The shooting model's cockpit contains a tiny movie poster and a miniature copy of a Playboy centrefold. This tiny replica is too small for that, of course.
Fun fact 3:
The main shooting model of the ship was actually twice as big as the model of the destroyer that attacks it. Clever optical work, and a second model for the docking bay scene, make it look much smaller.
The original film spacecraft was designed by Ralph McQuarrie and Joe Johnston.
Details
What's in the box:
Tantive Lit

Dimensions:
Success Rate:
First To try.
What's this?
Rating:
Mature audiences only.


