
Standard High Definition Full Color


Disco Robo cassette deck control replacement
Made by
Print With Shapeways
 Choose Your Material
 Choose your color and finish
$110.52
Have a question about this product?
contact the designerYou must be logged in and verified to contact the designer.
Product Description
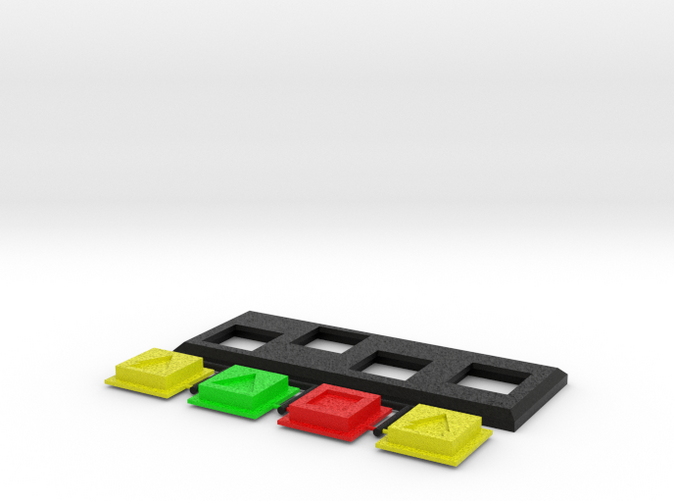
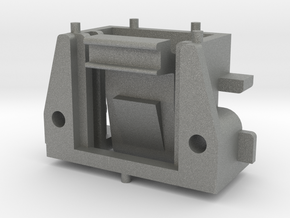
Complete assembly of all 5 pieces, to replace the deteriorated keypad membrane of the Pioneer J-7 Disco Robo. We do recommend that you get these printed individually (see our store for the parts being offered individually) so you won't have to fuss with getting them hand finished and painted. However, if you want to save some money and paint (finish) them yourself, you can choose this model instead. Note that once installed, they may be hard to remove, especially if affixed using strong glue. This is noteworthy because if painted, the finish may wear through over time and it could be hard to repaint then after they are already installed. Something for you to consider.
-----------------------------------------------
PHOTOS:
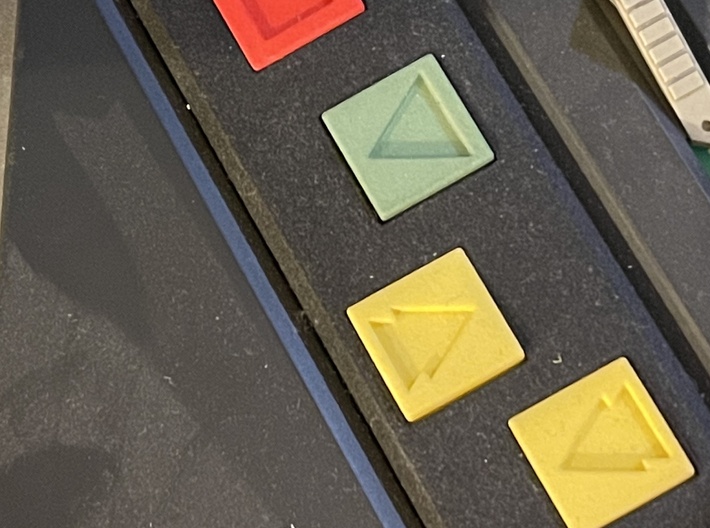
The interface randomly displays an image from the saved gallery. Sometimes, the photo thumbnails scroll off-screen. You need to click the direction arrows to bring them back into focus. The photos are for your benefit to show you what the kit might look like installed and if you get them pre-colored. Scroll through the photos so you have a good idea of what you are buying.
Remember, you are getting all 5-peices connected together by a tree. Unless you choose high-definition full color option, they will not be colored. Some photos show the kit in varioius colors but those were ordered individually in the desired colors, and not as an assembly like this is. Select the material of choice and the app will render an image similar to what you will receive.
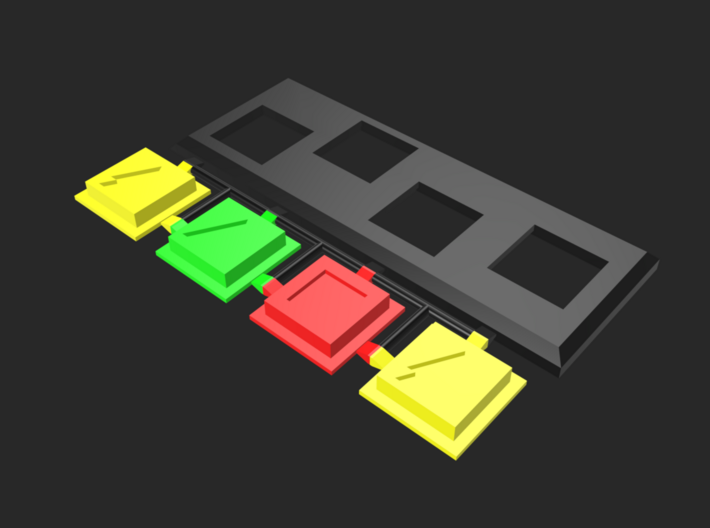
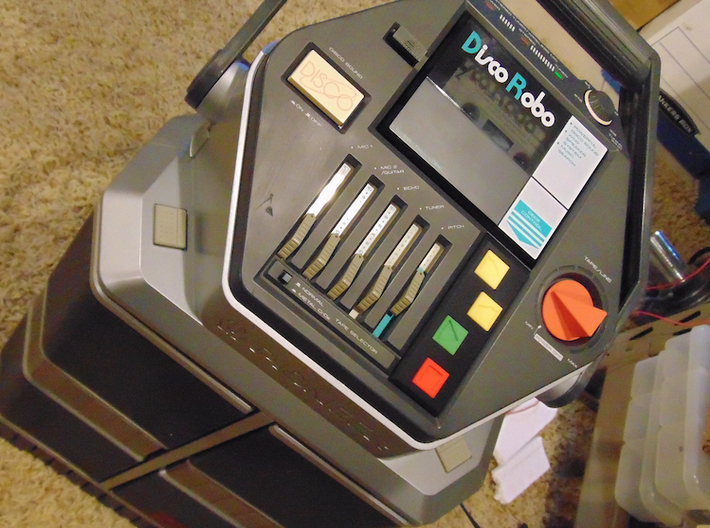
Never Replace the Disco Robo Tape Button membrane again! The Pioneer J-7 Disco Robo tape control panel membrane are degraded in almost all examples by now and need replacement. The original flexible membrane system might be OK for microwave ovens, but not a good system for durability. I have devised a new replacement system using "real" mechanical button caps and once installed, provides a quality replacement system that will last forever. The operational effort is light, and the buttons will give a nice positve click on actuation.
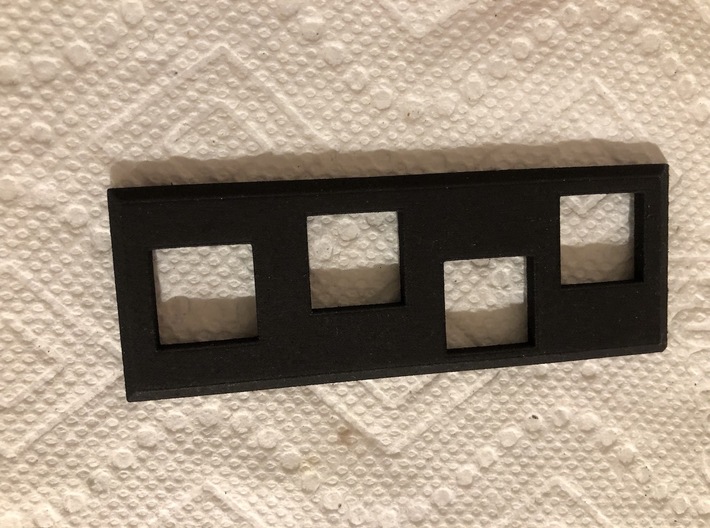
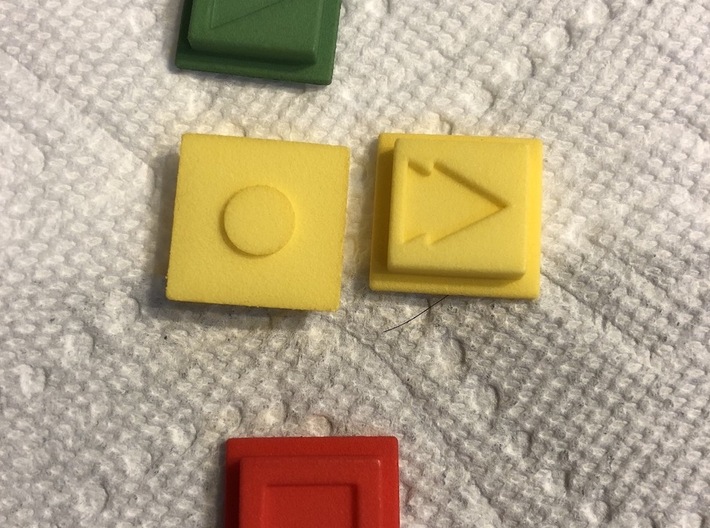
This kit includes the top panel and all 4 buttons required to complete the system. The FF/RW buttons are the same, just install them pointed in the proper direction. Trim all the parts off the tree and finish them as you like. Once they are finished, they are ready to install.
Installation: Installation is simple. First make sure all evidence of the original membrane is cleaned off and all 4 switch holes are exposed. Then populate the control panel with the switch cap buttons. The large bevel is the top edge. Test the fit of the buttons inside the control panel, sand and file as necessary to ensure the buttons work smoothly. Place panel with buttons (use tape on top side to keep buttons from falling out) over the the area where the original membrane (removed) is located. Operate all switches to ensure they work without intererence. If too tight, you might need to lightly sand the bottom edges of the switch caps. Once you are satisfied with the fit, Place tape over the panel and buttons to hold all the parts together so that the buttons don't fall out, then remove the assembly and flip upside down. Affixing the assembly to the top housing. Only the Disco_Robo_Tape_Button_Panel is affixed. You may do so with double stick tape (thin) or contact cement or whatever adhesive you choose. Make sure you do not glue the buttons into the assembly or they will no longer work. They need to be free in order to work properly. I affixed mine with a thin double side industrial tape. Remember that it does not need a lot of holding power. Certain types of glue may make it impossible to remove assembly in future.
Materials:
Because this assembly is going to be all the same color, you will likely want to paint the parts in the scheme of your choice. In this case, it does not matter much what material is chosen, but fine detail plastic gives a better finish. Versatile plastic is the cheapest but results in a rough finish. You likely won't be able to sand it smooth so paint or dye it as-is. If you want smooth, get fine detail plastic... the amount of work saved is far worth it. You will also see this offered in high definition full color, already colored. This is an expensive option but convenient. If you go this route, you may prefer to purchase the buttons and panels individually instead, it's cheaper that way.
-----------------------------------------------
PHOTOS:
The interface randomly displays an image from the saved gallery. Sometimes, the photo thumbnails scroll off-screen. You need to click the direction arrows to bring them back into focus. The photos are for your benefit to show you what the kit might look like installed and if you get them pre-colored. Scroll through the photos so you have a good idea of what you are buying.
Remember, you are getting all 5-peices connected together by a tree. Unless you choose high-definition full color option, they will not be colored. Some photos show the kit in varioius colors but those were ordered individually in the desired colors, and not as an assembly like this is. Select the material of choice and the app will render an image similar to what you will receive.
Never Replace the Disco Robo Tape Button membrane again! The Pioneer J-7 Disco Robo tape control panel membrane are degraded in almost all examples by now and need replacement. The original flexible membrane system might be OK for microwave ovens, but not a good system for durability. I have devised a new replacement system using "real" mechanical button caps and once installed, provides a quality replacement system that will last forever. The operational effort is light, and the buttons will give a nice positve click on actuation.
This kit includes the top panel and all 4 buttons required to complete the system. The FF/RW buttons are the same, just install them pointed in the proper direction. Trim all the parts off the tree and finish them as you like. Once they are finished, they are ready to install.
Installation: Installation is simple. First make sure all evidence of the original membrane is cleaned off and all 4 switch holes are exposed. Then populate the control panel with the switch cap buttons. The large bevel is the top edge. Test the fit of the buttons inside the control panel, sand and file as necessary to ensure the buttons work smoothly. Place panel with buttons (use tape on top side to keep buttons from falling out) over the the area where the original membrane (removed) is located. Operate all switches to ensure they work without intererence. If too tight, you might need to lightly sand the bottom edges of the switch caps. Once you are satisfied with the fit, Place tape over the panel and buttons to hold all the parts together so that the buttons don't fall out, then remove the assembly and flip upside down. Affixing the assembly to the top housing. Only the Disco_Robo_Tape_Button_Panel is affixed. You may do so with double stick tape (thin) or contact cement or whatever adhesive you choose. Make sure you do not glue the buttons into the assembly or they will no longer work. They need to be free in order to work properly. I affixed mine with a thin double side industrial tape. Remember that it does not need a lot of holding power. Certain types of glue may make it impossible to remove assembly in future.
Materials:
Because this assembly is going to be all the same color, you will likely want to paint the parts in the scheme of your choice. In this case, it does not matter much what material is chosen, but fine detail plastic gives a better finish. Versatile plastic is the cheapest but results in a rough finish. You likely won't be able to sand it smooth so paint or dye it as-is. If you want smooth, get fine detail plastic... the amount of work saved is far worth it. You will also see this offered in high definition full color, already colored. This is an expensive option but convenient. If you go this route, you may prefer to purchase the buttons and panels individually instead, it's cheaper that way.
Details
What's in the box:
Combo_array_colors
Dimensions:
Success Rate:
First To try.
What's this?
Rating:
Mature audiences only.

