
gray PA12


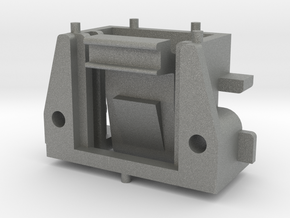
GE 3-5259 & Realistic SCR-8 boombox head bracket
Made by
Print With Shapeways
 Choose Your Material
 Choose your color and finish
$13.49
Have a question about this product?
contact the designerYou must be logged in and verified to contact the designer.
Product Description
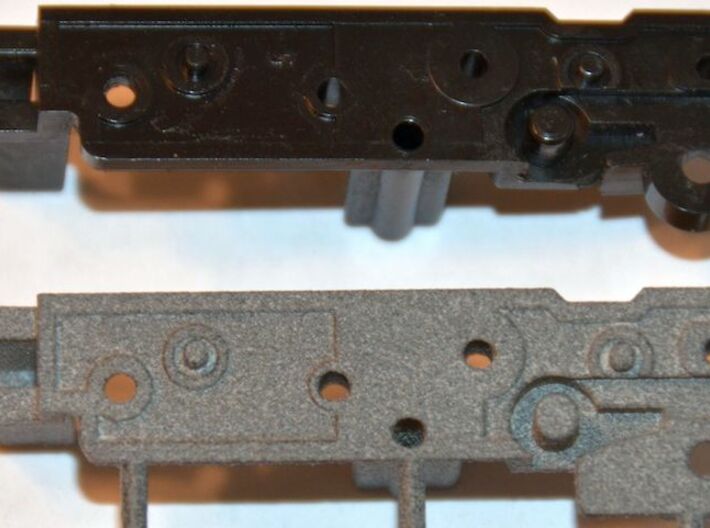
This is the black nylon block in the cassette deck that the play and record heads mount onto.
Included photo shows the original head mount bracket next to the actual printed replacement (in PA12 gray material).
Details: The cassette player of the GE (General Electric) Model 3-5259 Blockbuster "boombox" and Realistic SCR-8 (14-778A) which is 40-50 years old are usually not working anymore. Even with new belts installed and properly lubed, you may find that the cassette deck just won't play and upon further investigation, you'll probably find that the heads simply don't raise high enough to contact the tape media sufficiently to produce audio. The cause is almost certain to be due to the black plastic head carriage mount has cracked where a high tension spring seats. This crack enables the spring to become loose and not develop the necessary tension to raise the heads to the proper play position. Due to age, the plastic becomes brittle and we estimate that all or nearly all examples of this model probably already suffers from this issue. We recreated this product to be a drop in replacement. It is exactly like the original except that we added a little more material above the pocket that houses the short spring tail, which is subject to enormous forces. We have installed and tested this in over 1/2 dozen cases of broken head mounts, and it fits properly and restores function to the mechanism.
Materials offered: The default material is (PA12) nylon printed using the multi-jet fusion process and is natural gray which is cheaper. It is the material which we tested it with and we believe it is the strongest plastic material shapeways offers. Optionally, you can choose the same material but in dyed black color which might more closely match the original but will cost a couple dollars more. Either material is functionally the same, it is up to you if the color of that bracket is important. FYI, this PA12 material is a matte texture and not shiny/smooth like the original material.
Installation: This product simply installs in place of the original product. Scroll down to bottom (Steps) for how we recommend you do the installation. You should feel sufficiently comfortable with disassembling your cassette deck and possess the mechanical aptitude to do it. If in doubt, you should have a technician perform the repair for you. When done, you may need to have the azimuth adjusted for best results. If you wish to do this yourself and don't plan on getting the azimuth adjusted, at the very least, it is important to restore the head mount screws back to their original mounting depth. The best way to do this is to count the number of turns it takes to bottom out each screw. Each of the 2 heads will have 1 screw that is adjustable (the other is bottomed out). Record this number. When the head is replaced, drive the screw down until it bottoms out, then back out the same number of turns you recorded earlier. This should get you back to the original position or at least close to it. On one of the included photos, you will see the silver head mounted onto the bracket. One screw mounts tight. The other, with the spring is adjustable. The adjustable screw is the one you should make sure to count the number of turns to bottom out before removing in order to replace back to the original position.
STEPS:
1). Each head has 2 mounting screws. One will be tight. The other floats on a spring. Drive that screw down until it bottoms out while counting the number of turns. Record this number for later. Remove both heads. There may be springs below the screws, retain those for reinstallation on new mount.
2). Remove the broken mount.
3). Note the torsion spring below the head mount. It may come out with the block, or simply fall out.
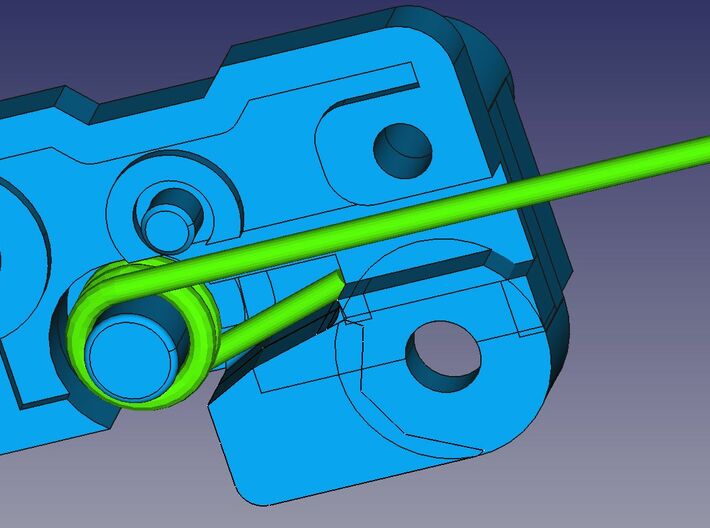
4). On the images above, note the photo that shows a blue mount and green spring (not actual colors of those items). Use this photo as reference on how to install this torsion spring onto the new head mount. Insert the short end of spring into mount first, then while holding the short end in place, slowly wrench the long end around until it sits along the ledge and push in. While doing this, be careful that you do not put too much pressure on the locating peg/nub. You may have to lift the long spring tail slightly as you spin it to clear the peg. Also, do not rest the compressed spring tail on the peg, as the spring has a lot of force and can break it off -- instead use the ledge where the screw hole is to hold it.
5). Carefully place the new mount in the original location. There are 2 tiny pegs that should locate the mount in the correct position.
6). Reinstall the heads taking care to replace the springs from their original locations. Tighten down the screw (with the spring) all the way snug, then back off the same number of turns that you recorded earlier. The other screw on the head(s) will be snugged down all the way.
7). Reinstall all the other hardware that was removed or loosened to perform this replacement.
8). Continue with deck service as normal (lubrication, belt replacement, speed adjustment, etc.).
Associated Products: The head mount bracket is the most common cassette deck failure in our opinion, but there is another issue that we are aware of and that is that a gear inside the mechanism splits and causes issues with the tape reels. See that product here: https://www.shapeways.com/product/UF2XJGF24/ge-blockbuster-3-5259a-cassette-idler-gear
Included photo shows the original head mount bracket next to the actual printed replacement (in PA12 gray material).
Details: The cassette player of the GE (General Electric) Model 3-5259 Blockbuster "boombox" and Realistic SCR-8 (14-778A) which is 40-50 years old are usually not working anymore. Even with new belts installed and properly lubed, you may find that the cassette deck just won't play and upon further investigation, you'll probably find that the heads simply don't raise high enough to contact the tape media sufficiently to produce audio. The cause is almost certain to be due to the black plastic head carriage mount has cracked where a high tension spring seats. This crack enables the spring to become loose and not develop the necessary tension to raise the heads to the proper play position. Due to age, the plastic becomes brittle and we estimate that all or nearly all examples of this model probably already suffers from this issue. We recreated this product to be a drop in replacement. It is exactly like the original except that we added a little more material above the pocket that houses the short spring tail, which is subject to enormous forces. We have installed and tested this in over 1/2 dozen cases of broken head mounts, and it fits properly and restores function to the mechanism.
Materials offered: The default material is (PA12) nylon printed using the multi-jet fusion process and is natural gray which is cheaper. It is the material which we tested it with and we believe it is the strongest plastic material shapeways offers. Optionally, you can choose the same material but in dyed black color which might more closely match the original but will cost a couple dollars more. Either material is functionally the same, it is up to you if the color of that bracket is important. FYI, this PA12 material is a matte texture and not shiny/smooth like the original material.
Installation: This product simply installs in place of the original product. Scroll down to bottom (Steps) for how we recommend you do the installation. You should feel sufficiently comfortable with disassembling your cassette deck and possess the mechanical aptitude to do it. If in doubt, you should have a technician perform the repair for you. When done, you may need to have the azimuth adjusted for best results. If you wish to do this yourself and don't plan on getting the azimuth adjusted, at the very least, it is important to restore the head mount screws back to their original mounting depth. The best way to do this is to count the number of turns it takes to bottom out each screw. Each of the 2 heads will have 1 screw that is adjustable (the other is bottomed out). Record this number. When the head is replaced, drive the screw down until it bottoms out, then back out the same number of turns you recorded earlier. This should get you back to the original position or at least close to it. On one of the included photos, you will see the silver head mounted onto the bracket. One screw mounts tight. The other, with the spring is adjustable. The adjustable screw is the one you should make sure to count the number of turns to bottom out before removing in order to replace back to the original position.
STEPS:
1). Each head has 2 mounting screws. One will be tight. The other floats on a spring. Drive that screw down until it bottoms out while counting the number of turns. Record this number for later. Remove both heads. There may be springs below the screws, retain those for reinstallation on new mount.
2). Remove the broken mount.
3). Note the torsion spring below the head mount. It may come out with the block, or simply fall out.
4). On the images above, note the photo that shows a blue mount and green spring (not actual colors of those items). Use this photo as reference on how to install this torsion spring onto the new head mount. Insert the short end of spring into mount first, then while holding the short end in place, slowly wrench the long end around until it sits along the ledge and push in. While doing this, be careful that you do not put too much pressure on the locating peg/nub. You may have to lift the long spring tail slightly as you spin it to clear the peg. Also, do not rest the compressed spring tail on the peg, as the spring has a lot of force and can break it off -- instead use the ledge where the screw hole is to hold it.
5). Carefully place the new mount in the original location. There are 2 tiny pegs that should locate the mount in the correct position.
6). Reinstall the heads taking care to replace the springs from their original locations. Tighten down the screw (with the spring) all the way snug, then back off the same number of turns that you recorded earlier. The other screw on the head(s) will be snugged down all the way.
7). Reinstall all the other hardware that was removed or loosened to perform this replacement.
8). Continue with deck service as normal (lubrication, belt replacement, speed adjustment, etc.).
Associated Products: The head mount bracket is the most common cassette deck failure in our opinion, but there is another issue that we are aware of and that is that a gear inside the mechanism splits and causes issues with the tape reels. See that product here: https://www.shapeways.com/product/UF2XJGF24/ge-blockbuster-3-5259a-cassette-idler-gear
Details
What's in the box:
Blockbuster_head_bracket_modded

Dimensions:
Success Rate:
First To try.
What's this?
Rating:
Mature audiences only.

