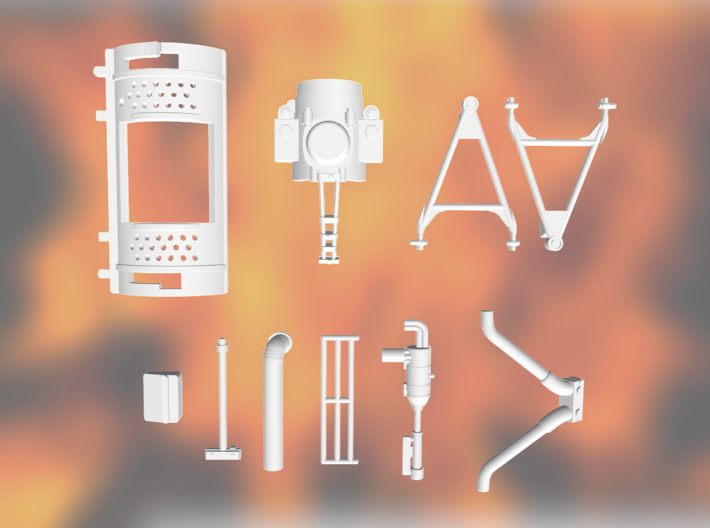
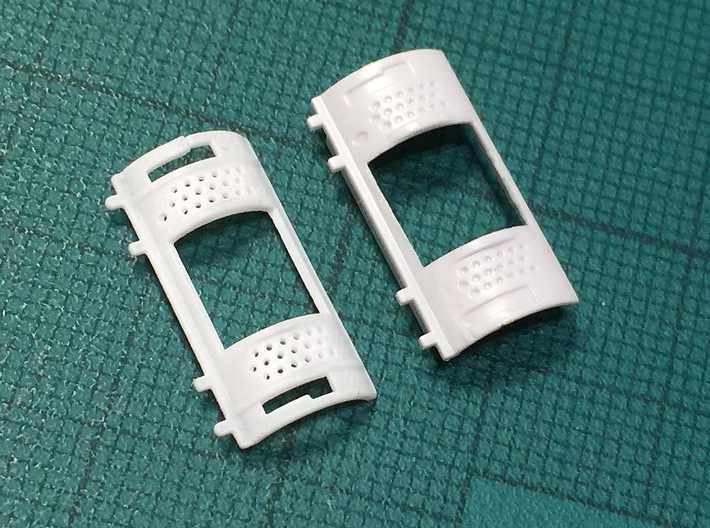
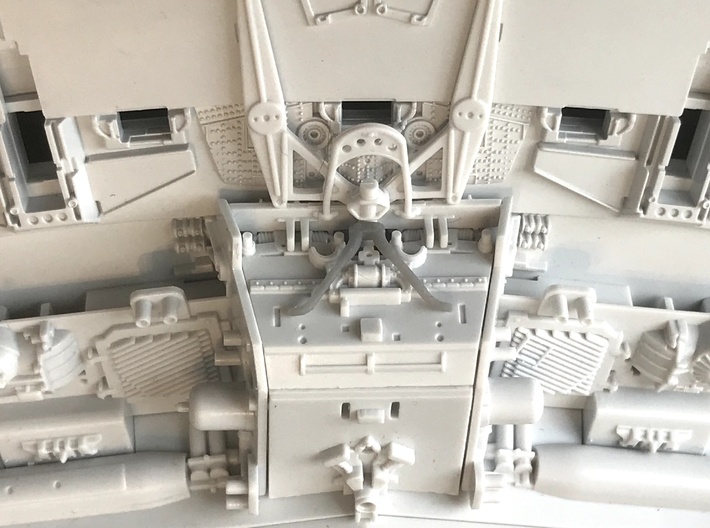
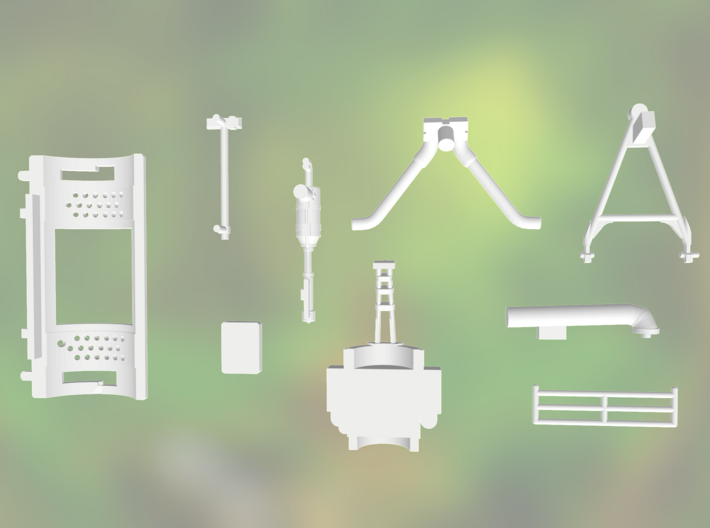
A preview of the parts without the protective sprues


Product Description
Bandai's "Perfect Grade" 1:72 Falcon is a pretty amazing kit. The thoroughness and accuracy of the product is unsurpassed for a model of a fantasy spaceship. The fact that only a handful of nearly microscopic parts is either missing or slightly inaccurate is a real tribute to Bandai's work.
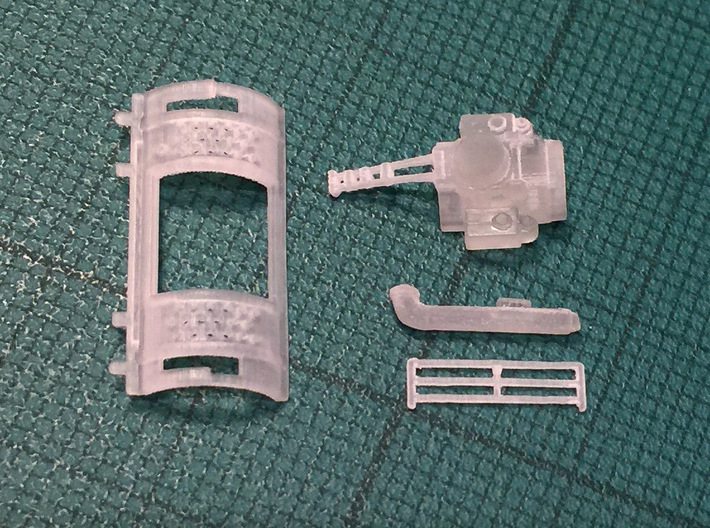
But if you're an ultra-completist sort of person, here are ten extra greeblies (detail parts) for getting your model as close to the original 1976-77 shooting miniature as possible! The parts have been sprued together in a rectangular frame, in order to save money plus protect the delicate parts in shipping. (and if you'd like your landing gear to have properly perforated discs, I have those available too!)
Four of the parts are replacements for parts that are included with the Bandai kit. Six are missing from the Bandai PG Falcon.
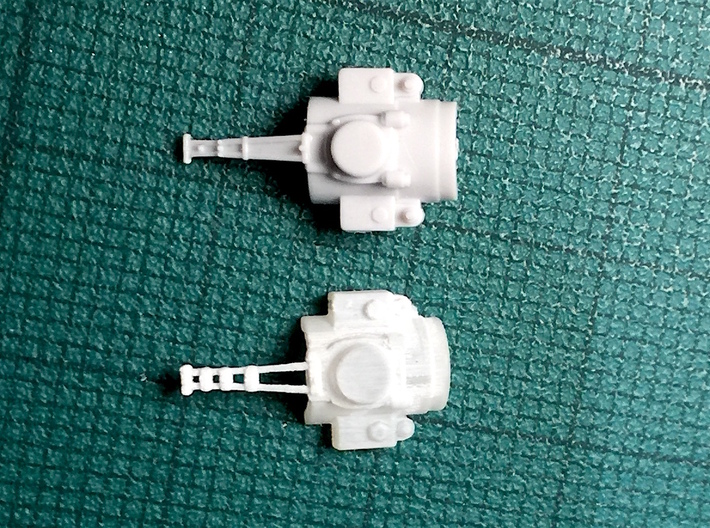
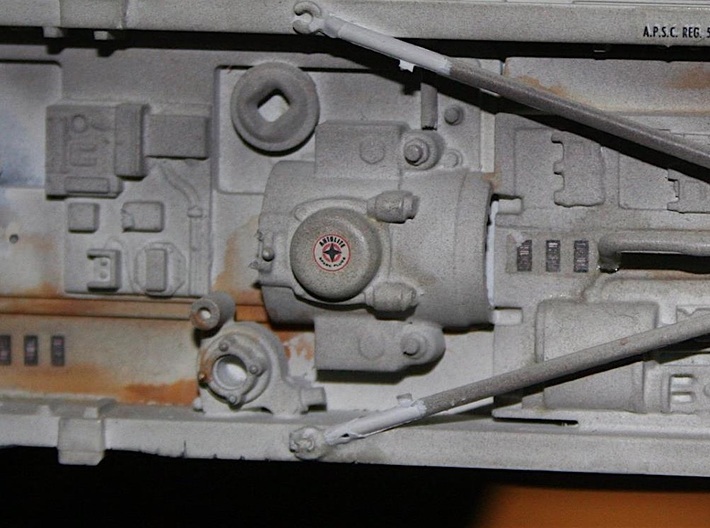
1) Starboard mandible "Kettenkrad" greebly.
The starboard/right mandible of the five foot Falcon has tons of details (greeblies), and this perforated half-cylinder is a prominent one.
It’s often called a “Kettenkrad” greebly, because the original component came from a 1:9 scale model kit of a World War II German Kettenkraftrad motorcycle gun tractor, made by Italian firm ESCI. The Star Wars shooting miniatures were covered in such model kit parts, from tanks to race cars.
The 1:72 “Perfect Grade” Falcon kit has excellent replicas of all the movie model’s parts, but Bandai's reproduction of this particular Kettenkrad bit lacks perforations. And the light airy look of the tiny holes is pretty important to the model’s overall appearance. The Bandai part is also rather thick, whereas the original part was so thin it looked like sheet metal.
It’s straightforward to drill out the Bandai part with a 0.5mm bit, to get the tiny round holes. But the narrow slots at the top and bottom, which also should be open, are a bit more fiddly to cut out. So this part is a time saver. Just be careful when painting not to fill the holes with paint.
Note that I have the Kettenkrad greebly available as a single part, if you only want that bit without the other three greeblies. The solo version isn't sprued, and so won't require any fiddly cutting.
Trivia note: anyone else notice that there's a greebly which looks exactly like one of these Kettenkrad pieces, cut in half, on Luke's mechanical hand in The Last Jedi?
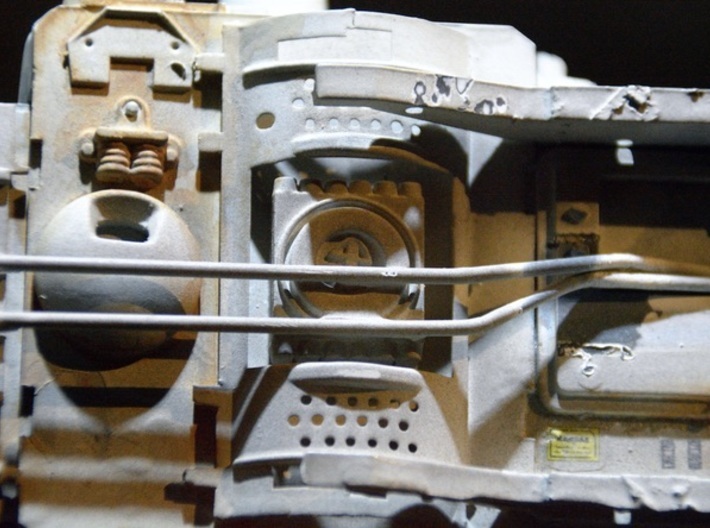
2) Starboard mandible "Tiger I" greebly + Entex Mazda rotary engine greebly.
The five foot Falcon effects miniature has suffered many indignities over the years. A number of greeblies and other detail parts were broken and lost during – and since – the filming of the original trilogy.
One of these now-missing bits is a particularly tiny detail part on the starboard mandible. It's a pair of angled struts taken from Tamiya's 1:35 model kit of a German Tiger I Panzerkampfwagen tank (Ausf A, I think).
The struts are actually a rather simplified-looking pair of wirecutters, and were glued to a half cylinder component that was taken from Entex's model of a Mazda Wankel rotary engine. This Entex part still exists on the five foot miniature, and you can see where the wirecutters got snapped off.
Interestingly, while the Tiger I wirecutters are visible in photos taken around the shooting of ANH in 1977 and 1978 or so, they don't appear to be visible in the five foot model shots seen in finished ESB movie footage. So if you're going for a 1980 and later Falcon, cut off the Bandai-supplied Tiger I wirecutters so that the Entex part looks like it does in the supplied photo.
Bandai have replicated the missing "Tiger I" part on their 1:72 Falcon, thanks to their assiduous research into what the model looked like in 1976 and 1977. But it’s a super tiny component when scaled down to 1:72. And so Bandai’s engineers basically had to mould it as a single strip with a fine groove down the middle representing the gap between the arms of the wirecutters.
Unfortunately it’s also too small a part to 3D-print with perfect accuracy. But I thought I’d see how close we could get it. And so here it is. The wirecutter arms are thicker for structural strength and to make it printable, but the part does replicate the gap between the arms nicely. Note that they don't really look like wirecutters, mainly because the original Tamiya part is a bit basic in shape.
So you have a choice. You can stick with the scale-accurate Bandai part, which lacks the correct gap. Maybe paint the gap black to make it less obvious. Or you could have a slightly larger 3D printed piece which has the gap, but which is a bit wider at the end.
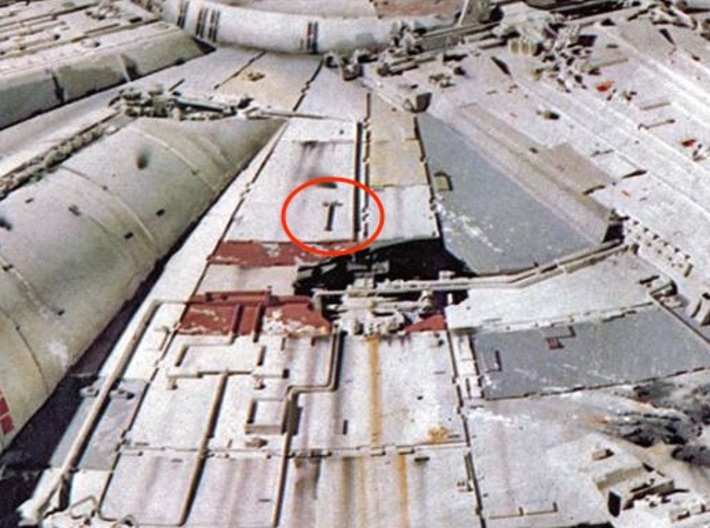
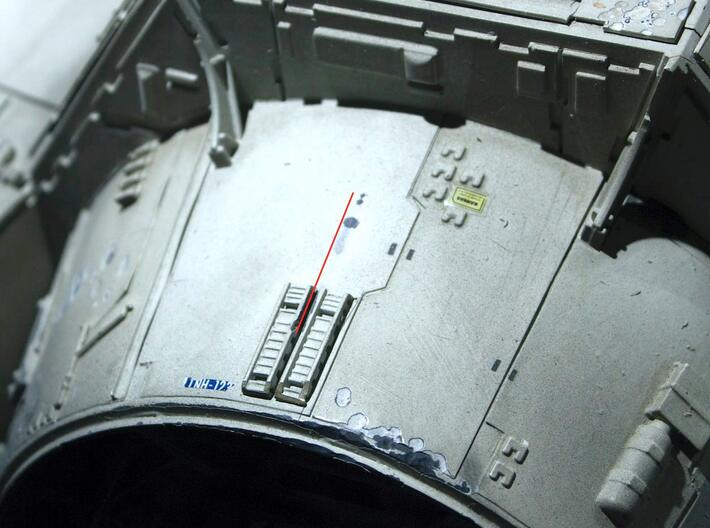
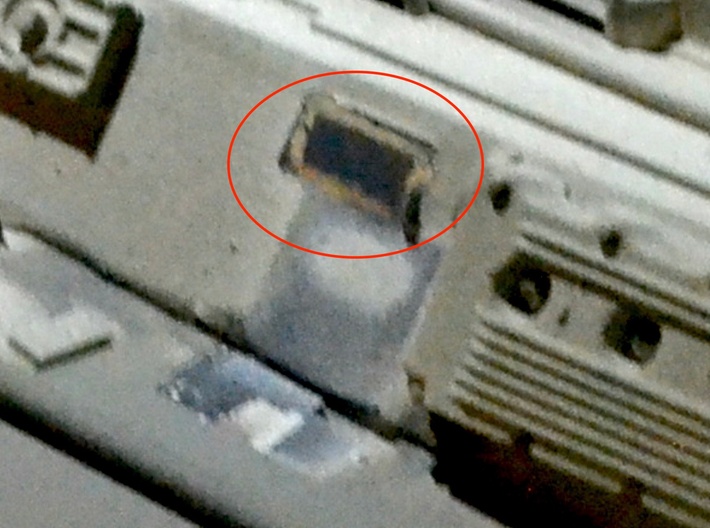
2) Starboard saucer "Panther A" greebly.
A greebly that fell off pretty early was a small T-shaped part on the starboard saucer, just above the octagonal maintenance pit. This seems to have been a sledgehammer from a Tamiya 1:35 model of a German Panther A (Panzerkampfwagen Ausf A) tank.
Bandai can be forgiven for missing this part, since it was already missing by the time the famous set of black and white Falcon photos were taken sometime in 1978. But if you look closely you can see evidence of the sledgehammer both in terms of exposed primer on the surviving miniature, and actual movie footage in ANH. It was obviously gone by the time of ESB.
Since the greebly was only glued down at each end (the original part is a sort of simplified rendition of a sledgehammer with tie-down clips) it's easy to see how it got broken off so early on. In fact, it's so small at 1:72 that it's going to be really fragile and vulnerable to damage. Another approach to fastening it would be to leave the tiny sprues intact, and then drill fine holes in the saucer deck. Then insert the sprues into the holes and glue. You have to be careful with the size so that the holes aren't visible once the greebly is in place, of course.
Thanks to RPF users Lab and Stuart Brown for tracking this one down. Sledgehammer greebly added to this set on 11 February 2018.
4) Port mandible "8 ton truck" greebly.
A particularly obscure greebly, missing from the port side of the PG kit, is a three bar railing kind of thing taken from Bandai's model of a German 8 ton semi truck / Zugkraftwagen.
Like the Tiger greebly, I've had to thicken the bars on the part to make it printable, so it's not quite to scale. It's kind of a weird piece, as it appears it was glued over top of another couple of parts. So it's not surprising that the delicate railing got snapped off along the way. The five footer as it exists today shows no evidence at all of where it lived.
Even though it's thicker than scale, it's the most insanely tiny part. It's really, really thin and easy to break.
Thanks to Stuart Brown for the photo and information!
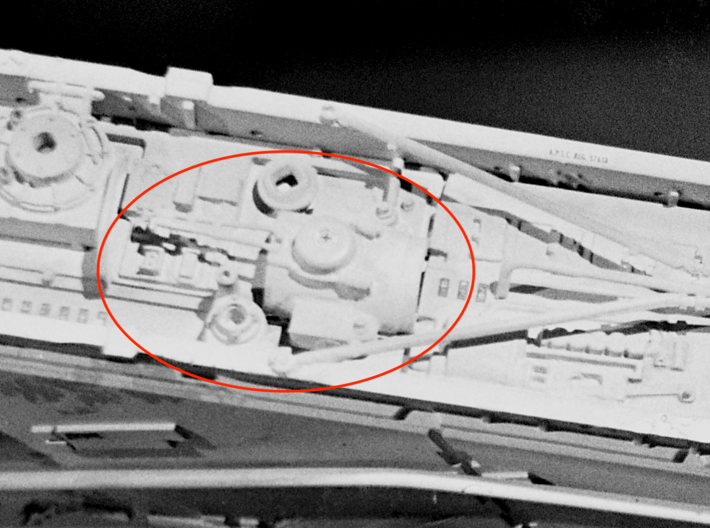
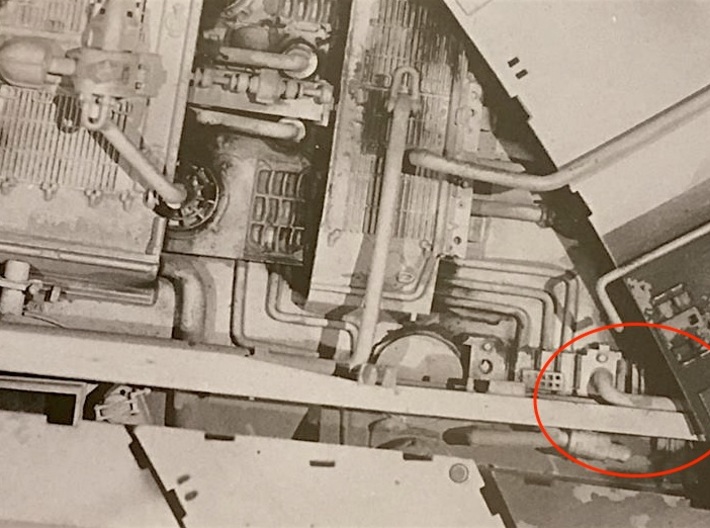
5) Missing pipe.
The starboard undersaucer maintenance pit is missing one of the pipes that were present in the original ANH shooting model. It looks like Bandai forgot to include it. So I include this stupidly tiny bit of pipework for you to add if you really really want to be complete and can't be bothered to fabricate one yourself! See the photo above for the correct location.
Thanks to Seiji Takahashi for pointing this missing pipe out.
6) Airfix 1:24 Hurricane greebly.
The port docking ring is missing a small pipe-like detail. Not surprising, really, as the greebly wasn't really in contact with much of the docking ring surface. Since my replacement part would have exactly the same problem of accidental dislodgement, I decided to build a narrow strut into the part, extending perpendicular from the barrel section. This means you can drill a 1mm hole into the surface of the Bandai plastics to attach the greebly slightly more firmly. I also added an extra strip at the narrow end of the pipe, which wedges in between the two kinda ladder-like pieces which exist on the outer edge of the ring. You will likely have to trim out a tiny bit of Bandai plastic between these two laddery bits in order to get the Airfix greebly to fit properly, but hopefully it will provide a tiny bit more protection to it. And, yes, I replicated the mould lines that were present on the original 1970s part...
Thanks to RPF members Lab and eagle1 for spotting this one! Airfix pipe added to this greebly set on 12 May 2018.
7, 8) Tamiya 1:12 McLaren M23.
The triangular pieces are from a Tamiya McLaren racing car kit. They can replace the two Bandai pieces on the sidewalls if you wish – these are slightly more detailed, but obviously a bit more fragile.
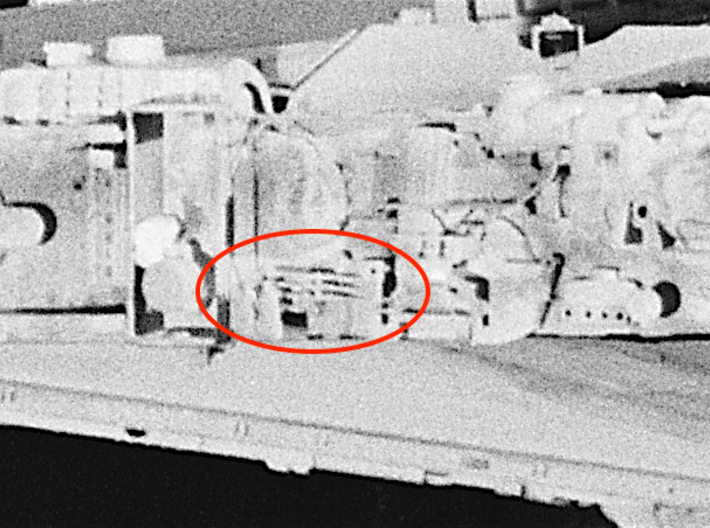
9) Bandai 1:48 Hetzer.
Bandai Jagdpanzer "Hetzer" kit in 1:48. This piece is now missing, but you can see the grey outline rectangle (which looks like a decal) on the side of the starboard jaw piece where the part once resided. It was installed sloping side up, and it was aligned slightly to the left (or aft) of the piece below it.
Thanks to Rob Lawson and Stuart Brown for identifying the missing part. Added December 2021.
10) Aurora 1:72 Sealab III piece.
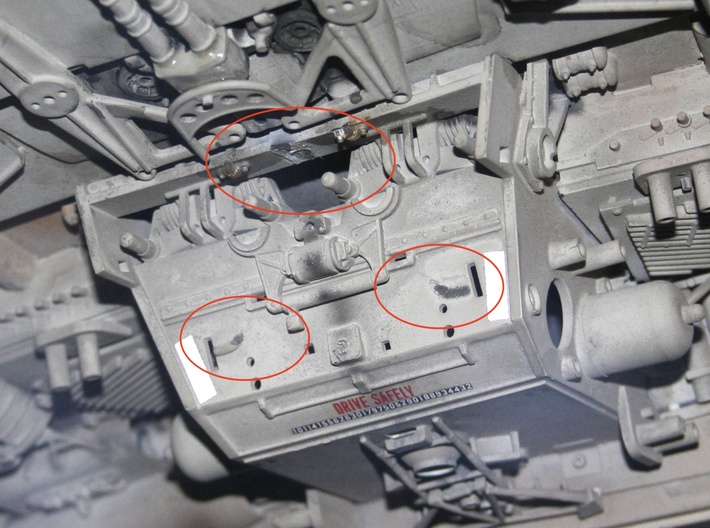
One of the key model kits used in the construction of the original Millennium Falcon was the Aurora Sealab kit. A bunch of characteristic shapes were taken from these pieces - details on the shoulders, many of the parts of the hexagonal docking rings, and so on. And it seems that on the back underside of the model there was this simple V-shaped piece from Sealab.
It isn't there today. There's a tiny bit of one foot still present, and the dark primer shadows of where the part was glued down. It was located on the sort of boxy protrusion on the underside back - the box that had "DRIVE SAFELY" on it as a red decal.
However, we don't know if it was actually present during filming or whether it got broken off as shooting went along. We know it was missing by the time the black and white documentary photos of the Falcon were taken in 1977.
This replica part is a little oversized for printability and to make it slightly less likely to be snapped off if knocked. It's still really fragile, though.
Thanks to RPF members kamandi, t2sides, and Jaitea for pointing this part out. Added to this greebly set December 2021.
Cutting the sprues.
The trickiest bit here is detaching the parts from the sprues. The greeblies needed to be enclosed within a little frame to protect them in shipping, as they're so incredibly fragile. This unfortunately means you have to cut the parts from the sprues.
Use very sharp sprue cutters/nippers to detach the pieces. Normally I'd say be cautious with such tools around 3D-printed acrylic plastic, but in this case you're cutting a small sprue off a slightly larger part, so it should work OK. You must use cutters with blades that touch flush. Side-swipe scissors-type cutters, such as Xuron ones, must NOT be used as they tend to crack the hard plastic!
I would recommend cutting the sprues at obvious points – many are marked with triangular notches. This should free the various parts from the frame, and then you can carefully remove the sprues from the parts themselves.
The really challenging things are the 8 ton truck part (the three bar fence) and the hammer-shaped part. Those pieces are so incredibly fragile that it's really difficult to cut them off without damaging them. I used a very very sharp knife to chisel the edges of the sprues gently until the parts come free. Take your time and resist the temptation to use any pressure. Any excess sprue material can be carefully removed using the finest flat needle file you can find. I wouldn't try sandpaper or a coarser file, as the greeblies will simply snap!
Finally you'll notice that some parts have thin cylinders sticking out from their undersides. The idea is you can either cut those off and glue the part down. Or you can drill a teeny-tiny hole with a pin vice tool and tiny carbide drill bit, and put the cylinder part in, to strengthen the part's attachment to the model.
Please read the following if you're interested in these items.
These accurizing parts are not mass-market commercial products. I made them for my own use, and have put them here in case they're of interest to someone else. Possibly you, since you’re reading this.
These are components for the serious model maker who wants to build a more accurate miniature. They requires finishing. If you don't want to trim, file, sand, and glue, then these aren't the parts you're looking for!
The parts are tiny, and easily broken. They push the limits of today's 3D printers. The detail in the digital previews is all there, but it won't always be visible at the miniscule sizes that this scale requires!
But if you're an ultra-completist sort of person, here are ten extra greeblies (detail parts) for getting your model as close to the original 1976-77 shooting miniature as possible! The parts have been sprued together in a rectangular frame, in order to save money plus protect the delicate parts in shipping. (and if you'd like your landing gear to have properly perforated discs, I have those available too!)
Four of the parts are replacements for parts that are included with the Bandai kit. Six are missing from the Bandai PG Falcon.
1) Starboard mandible "Kettenkrad" greebly.
The starboard/right mandible of the five foot Falcon has tons of details (greeblies), and this perforated half-cylinder is a prominent one.
It’s often called a “Kettenkrad” greebly, because the original component came from a 1:9 scale model kit of a World War II German Kettenkraftrad motorcycle gun tractor, made by Italian firm ESCI. The Star Wars shooting miniatures were covered in such model kit parts, from tanks to race cars.
The 1:72 “Perfect Grade” Falcon kit has excellent replicas of all the movie model’s parts, but Bandai's reproduction of this particular Kettenkrad bit lacks perforations. And the light airy look of the tiny holes is pretty important to the model’s overall appearance. The Bandai part is also rather thick, whereas the original part was so thin it looked like sheet metal.
It’s straightforward to drill out the Bandai part with a 0.5mm bit, to get the tiny round holes. But the narrow slots at the top and bottom, which also should be open, are a bit more fiddly to cut out. So this part is a time saver. Just be careful when painting not to fill the holes with paint.
Note that I have the Kettenkrad greebly available as a single part, if you only want that bit without the other three greeblies. The solo version isn't sprued, and so won't require any fiddly cutting.
Trivia note: anyone else notice that there's a greebly which looks exactly like one of these Kettenkrad pieces, cut in half, on Luke's mechanical hand in The Last Jedi?
2) Starboard mandible "Tiger I" greebly + Entex Mazda rotary engine greebly.
The five foot Falcon effects miniature has suffered many indignities over the years. A number of greeblies and other detail parts were broken and lost during – and since – the filming of the original trilogy.
One of these now-missing bits is a particularly tiny detail part on the starboard mandible. It's a pair of angled struts taken from Tamiya's 1:35 model kit of a German Tiger I Panzerkampfwagen tank (Ausf A, I think).
The struts are actually a rather simplified-looking pair of wirecutters, and were glued to a half cylinder component that was taken from Entex's model of a Mazda Wankel rotary engine. This Entex part still exists on the five foot miniature, and you can see where the wirecutters got snapped off.
Interestingly, while the Tiger I wirecutters are visible in photos taken around the shooting of ANH in 1977 and 1978 or so, they don't appear to be visible in the five foot model shots seen in finished ESB movie footage. So if you're going for a 1980 and later Falcon, cut off the Bandai-supplied Tiger I wirecutters so that the Entex part looks like it does in the supplied photo.
Bandai have replicated the missing "Tiger I" part on their 1:72 Falcon, thanks to their assiduous research into what the model looked like in 1976 and 1977. But it’s a super tiny component when scaled down to 1:72. And so Bandai’s engineers basically had to mould it as a single strip with a fine groove down the middle representing the gap between the arms of the wirecutters.
Unfortunately it’s also too small a part to 3D-print with perfect accuracy. But I thought I’d see how close we could get it. And so here it is. The wirecutter arms are thicker for structural strength and to make it printable, but the part does replicate the gap between the arms nicely. Note that they don't really look like wirecutters, mainly because the original Tamiya part is a bit basic in shape.
So you have a choice. You can stick with the scale-accurate Bandai part, which lacks the correct gap. Maybe paint the gap black to make it less obvious. Or you could have a slightly larger 3D printed piece which has the gap, but which is a bit wider at the end.
2) Starboard saucer "Panther A" greebly.
A greebly that fell off pretty early was a small T-shaped part on the starboard saucer, just above the octagonal maintenance pit. This seems to have been a sledgehammer from a Tamiya 1:35 model of a German Panther A (Panzerkampfwagen Ausf A) tank.
Bandai can be forgiven for missing this part, since it was already missing by the time the famous set of black and white Falcon photos were taken sometime in 1978. But if you look closely you can see evidence of the sledgehammer both in terms of exposed primer on the surviving miniature, and actual movie footage in ANH. It was obviously gone by the time of ESB.
Since the greebly was only glued down at each end (the original part is a sort of simplified rendition of a sledgehammer with tie-down clips) it's easy to see how it got broken off so early on. In fact, it's so small at 1:72 that it's going to be really fragile and vulnerable to damage. Another approach to fastening it would be to leave the tiny sprues intact, and then drill fine holes in the saucer deck. Then insert the sprues into the holes and glue. You have to be careful with the size so that the holes aren't visible once the greebly is in place, of course.
Thanks to RPF users Lab and Stuart Brown for tracking this one down. Sledgehammer greebly added to this set on 11 February 2018.
4) Port mandible "8 ton truck" greebly.
A particularly obscure greebly, missing from the port side of the PG kit, is a three bar railing kind of thing taken from Bandai's model of a German 8 ton semi truck / Zugkraftwagen.
Like the Tiger greebly, I've had to thicken the bars on the part to make it printable, so it's not quite to scale. It's kind of a weird piece, as it appears it was glued over top of another couple of parts. So it's not surprising that the delicate railing got snapped off along the way. The five footer as it exists today shows no evidence at all of where it lived.
Even though it's thicker than scale, it's the most insanely tiny part. It's really, really thin and easy to break.
Thanks to Stuart Brown for the photo and information!
5) Missing pipe.
The starboard undersaucer maintenance pit is missing one of the pipes that were present in the original ANH shooting model. It looks like Bandai forgot to include it. So I include this stupidly tiny bit of pipework for you to add if you really really want to be complete and can't be bothered to fabricate one yourself! See the photo above for the correct location.
Thanks to Seiji Takahashi for pointing this missing pipe out.
6) Airfix 1:24 Hurricane greebly.
The port docking ring is missing a small pipe-like detail. Not surprising, really, as the greebly wasn't really in contact with much of the docking ring surface. Since my replacement part would have exactly the same problem of accidental dislodgement, I decided to build a narrow strut into the part, extending perpendicular from the barrel section. This means you can drill a 1mm hole into the surface of the Bandai plastics to attach the greebly slightly more firmly. I also added an extra strip at the narrow end of the pipe, which wedges in between the two kinda ladder-like pieces which exist on the outer edge of the ring. You will likely have to trim out a tiny bit of Bandai plastic between these two laddery bits in order to get the Airfix greebly to fit properly, but hopefully it will provide a tiny bit more protection to it. And, yes, I replicated the mould lines that were present on the original 1970s part...
Thanks to RPF members Lab and eagle1 for spotting this one! Airfix pipe added to this greebly set on 12 May 2018.
7, 8) Tamiya 1:12 McLaren M23.
The triangular pieces are from a Tamiya McLaren racing car kit. They can replace the two Bandai pieces on the sidewalls if you wish – these are slightly more detailed, but obviously a bit more fragile.
9) Bandai 1:48 Hetzer.
Bandai Jagdpanzer "Hetzer" kit in 1:48. This piece is now missing, but you can see the grey outline rectangle (which looks like a decal) on the side of the starboard jaw piece where the part once resided. It was installed sloping side up, and it was aligned slightly to the left (or aft) of the piece below it.
Thanks to Rob Lawson and Stuart Brown for identifying the missing part. Added December 2021.
10) Aurora 1:72 Sealab III piece.
One of the key model kits used in the construction of the original Millennium Falcon was the Aurora Sealab kit. A bunch of characteristic shapes were taken from these pieces - details on the shoulders, many of the parts of the hexagonal docking rings, and so on. And it seems that on the back underside of the model there was this simple V-shaped piece from Sealab.
It isn't there today. There's a tiny bit of one foot still present, and the dark primer shadows of where the part was glued down. It was located on the sort of boxy protrusion on the underside back - the box that had "DRIVE SAFELY" on it as a red decal.
However, we don't know if it was actually present during filming or whether it got broken off as shooting went along. We know it was missing by the time the black and white documentary photos of the Falcon were taken in 1977.
This replica part is a little oversized for printability and to make it slightly less likely to be snapped off if knocked. It's still really fragile, though.
Thanks to RPF members kamandi, t2sides, and Jaitea for pointing this part out. Added to this greebly set December 2021.
Cutting the sprues.
The trickiest bit here is detaching the parts from the sprues. The greeblies needed to be enclosed within a little frame to protect them in shipping, as they're so incredibly fragile. This unfortunately means you have to cut the parts from the sprues.
Use very sharp sprue cutters/nippers to detach the pieces. Normally I'd say be cautious with such tools around 3D-printed acrylic plastic, but in this case you're cutting a small sprue off a slightly larger part, so it should work OK. You must use cutters with blades that touch flush. Side-swipe scissors-type cutters, such as Xuron ones, must NOT be used as they tend to crack the hard plastic!
I would recommend cutting the sprues at obvious points – many are marked with triangular notches. This should free the various parts from the frame, and then you can carefully remove the sprues from the parts themselves.
The really challenging things are the 8 ton truck part (the three bar fence) and the hammer-shaped part. Those pieces are so incredibly fragile that it's really difficult to cut them off without damaging them. I used a very very sharp knife to chisel the edges of the sprues gently until the parts come free. Take your time and resist the temptation to use any pressure. Any excess sprue material can be carefully removed using the finest flat needle file you can find. I wouldn't try sandpaper or a coarser file, as the greeblies will simply snap!
Finally you'll notice that some parts have thin cylinders sticking out from their undersides. The idea is you can either cut those off and glue the part down. Or you can drill a teeny-tiny hole with a pin vice tool and tiny carbide drill bit, and put the cylinder part in, to strengthen the part's attachment to the model.
Please read the following if you're interested in these items.
These accurizing parts are not mass-market commercial products. I made them for my own use, and have put them here in case they're of interest to someone else. Possibly you, since you’re reading this.
These are components for the serious model maker who wants to build a more accurate miniature. They requires finishing. If you don't want to trim, file, sand, and glue, then these aren't the parts you're looking for!
The parts are tiny, and easily broken. They push the limits of today's 3D printers. The detail in the digital previews is all there, but it won't always be visible at the miniscule sizes that this scale requires!


