
Cambrian Class 61 - Body - FUD
Made by
Have a question about this product?
contact the designerProduct Description
Note - You may notice other loco's on this shop have the smokebox door sprued on the front and this one does not. The reason is because this model has printed fine in FUD and FXD so there is not much point in touching it. A couple others had issues due to the sprues being too thin on occasions so I redesigned them for that.
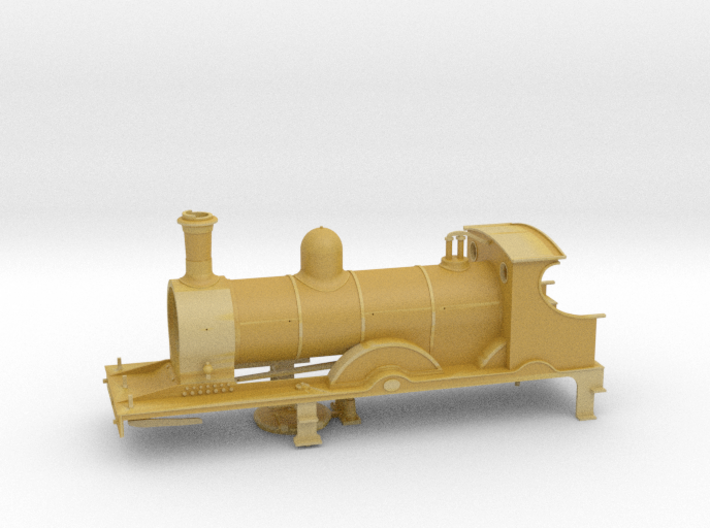
This is a body of a 4mm / 1:76 model of a Cambrian Railways Class 61 Locomotive.
This is the smoother crisper version in FUD, a lesser but cheaper version is also available in WSF/BSF.
IMPORTANT NOTE: Both textual and scale drawings don't always seem to agree on what
wheelbase and diameter bogie wheels the Furness Railway K2 (21 Class) and the Cambrian
Railways Class 61's ran with. For the Bogie wheel diameter many sources say 3' 6" but other
sources say 3' 0", similarly the
wheelbase is disputed between
5’ 6” + 6’ 6½” + 8’ 3”
5' 9" + 6'6" + 8'6"
&
5’ 9” + 6’ 8” + 8’ 6”
The Cambrian Class 61 available from SCC have been built and designed
with the top wheelbase and is designed to take 3' 6" Bogies.
As all the Class 61 chassis and bodies are common to each other, any will fit in combination as they
are interchangable.
For more information on the discrepancies and to help you decide, you may look here for
more information...
http://www.rmweb.co.uk/community/index.php?/topic/106162-scc-sparkshot-custom-
creations/page-2#entry2146281
or here...
http://www.scalefour.org/forum/viewtopic.php?f=30&t=4577&start=25
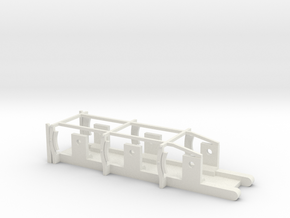
As the frame is designed to take 3' 6" bogie wheels the top of the frames will be very thin and weak. Neatly
cutting the frame here and glueing the front section that goes above the front bogie wheel
to the loco body may be a consideration and you may need to file a little extra clearence for the wheels, same for the optional bogie splashers. The real thing was a tight fit too.
Also prototype photo's sometimes showed the
optional bogie splashers removed (on the K2 at least), unless you have generous curve radii
these will likely have to be ommitted.
On the EM and P4 versions these have been pulled
inwards by 0.7mm's. As neither are to perfect width due to thickness and bogie movement, If you would like Optional Bogie Splashers pulled in or out to a
different degree please contact me and It'll be arranged. The 00 ones are 5.7mm's width.
Finally a more solid answer to the wheelbase issue between the Furness K2's and Cambrian Class 61's has been found with much thanks and credit to Mike Peascod of the Cumbrian Railways Association. Here is His PDF he kindly compiled from a few sources to show the different wheelbases that existed as genuine variation...
http://www.scalefour.org/forum/download/file.php?id=10574
As a reminder, the Cambrian Class 61 bodies and the chassis are designed to fit the
5’ 6” + 6’ 6½” + 8’ 3”
wheelbase and will not fit the K2 chassis that has a wheelbase of 5’ 9” + 6’ 8” + 8’ 6”.
If you would like a Cambrian Class 61 with the same wheelbase as the K2 then please get in touch and will upload one as it is ready just in case.
-
BODY INSTRUCTIONS: The Reverser Rod, is located under the boiler. This needs to be cut off and added to the post sticking out from the right side in front of the front splasher and joined to the hole in the cab front. You will notice to the right of the smokebox saddle on the running plate is a sprued pipe - again, cut this off and add it to the side of the smokebox approximately a millimetre or two above the handrail pillar hole. Some 0.7-1.2mm rod made from plastic, brass or nickel silver is to be joined to this with a small split pin as a handrail pillar situated roughly halfway along the boiler, above the handrail pillar hole that is above the main splasher.
The rear of this pipe needs to be bent slightly into a reverse curve before it reaches the front of the cab sheet. Please refer to prototype photographs for more. Hand rail pillars and 0.45mm brass or nickel silver rod are also needed.
At the rear of the cab are 'cab beading' protrusions that need some 0.45mm metal rod adding downwards for a handrail.
You will find the smokebox door and buffers under the boiler - simply cut them out and position them as desired.
The advantage of you adding these yourself is because many people prefer to substitute their own and it would be easier for you to add what you like rather than have to hack away at them already moulded on.
Similarly the guard irons are located under the running plate at the front on sprue. Cut these off and add them to the front of the buffer beam at the distance dictated by your chosen wheel gauge.
The optional Jack that is sometimes seen on these loco's on the running plate between the two driving wheels on the right hand side is sprued under the cab. It will need cutting off but it is up to you if you use it or not
With a little tweaking some RTR examples may be able to fit underneath this body.
Alternatively Chassis are designed and available in this shop along with suitable Coupling Rods in Raw Brass.
CHASSIS INSTRUCTIONS: Please see the Chassis themselves for more information.
Those modelling GWR absorbed locos can find etched number plates here: http://www.coastline...ilter_class=488
Loco builds have shown that a London Road Models GB4 Single stage Motor Mount (Gearbox) fits easy and is cheaper and quicker to build than most. As with all loco kits the choice is entirely yours though.
http://traders.scalefour.org/LondonRoadModels/various/components/
For wheels, axles, crankpins etc
Alan Gibson is a great resource
...as is Markits
http://www.markits.com
For Motors and Gearboxes, High Level are recommended.
http://highlevelkits.co.uk/
For crank pins, hand rail rod/wire and pillars, washers, bearings and other small sundry items Mainly Trains is a good website to visit.
http://www.mainlytrains.co.uk/acatalog/index.html
But of course you can use whatever suits your needs and preference best,
the above has been typed out to hopefully aid you should you be new to kit building. The advantage of these 3D printed kits is 90% of the work is done for you, both on the body and the chassis.
Due to printing tolerance issues the whistles have had to be removed. Whistles with printable geometry are now available from SCC also - please look in the spares section.
For a video series on building SCC locomotive kits...
https://www.youtube.com/watch?v=Lgx2_q3bfbo

Details


