
When I began designing 3D printed jewelry, I figured I’d never be able to do everything that jewelers with bench training can do. Stone-setting was always the thing I was most bummed to be missing out on, but when I began fabricating my designs in cast metals, I realized that the gem-encrusted rings of my dreams weren’t so far out of my reach after all.
In this post, I’ll go over my first simple stone-setting project (the Third Eye Mood Ring) and show you how easy it can be to incorporate some bling into your next ring. As it turns out, designing a simple stone setting isn’t so different from designing any functional parts that fit together.

Getting Started
Once you choose a type of stone, research some setting techniques associated with that type of stone. Will there be a bezel for the stone to grip onto, or elaborate bearings? Are the prongs small and tailored, or dramatic and claw-like? Choose techniques that suit the needs of your project and match your skill level.
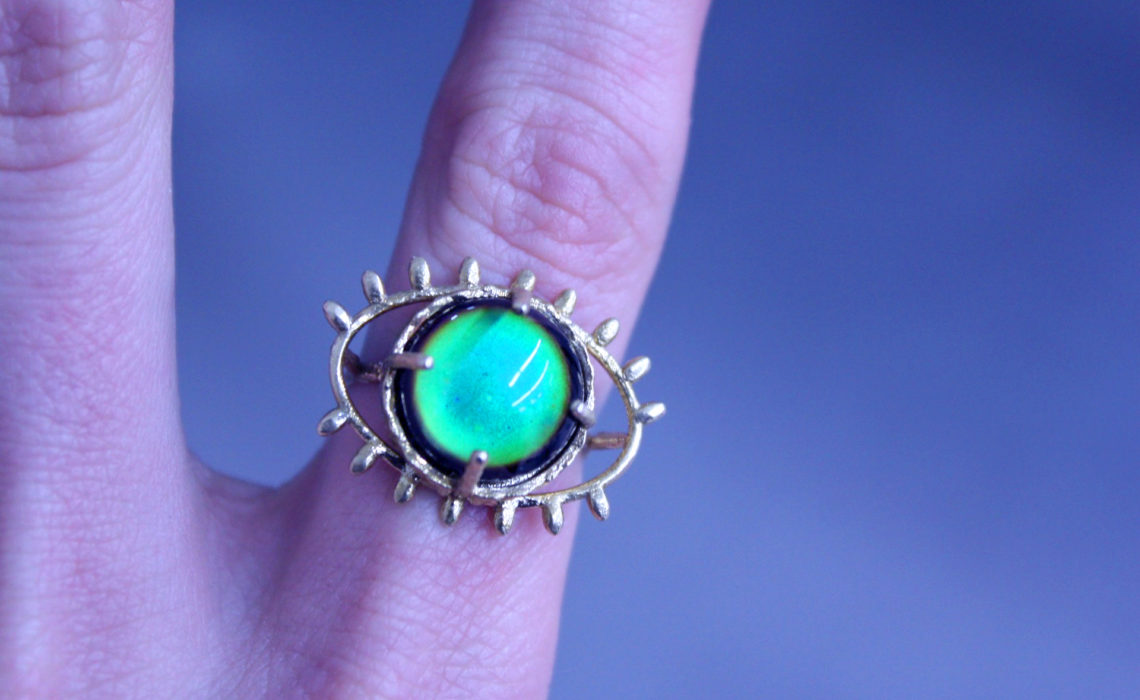
For my first foray into stone-setting, I selected a 12-mm thermochromic cabochon, which is just a fancy name for a mood ring stone. I decided to set my cabochon in a simple bezel, with long prongs that bend over the stone for extra security. I chose a stone with a regular shape, which made it easier to take accurate measurements.

READY TO PROTOTYPE?
PRINT IT NOW
Into the 3D Design Space
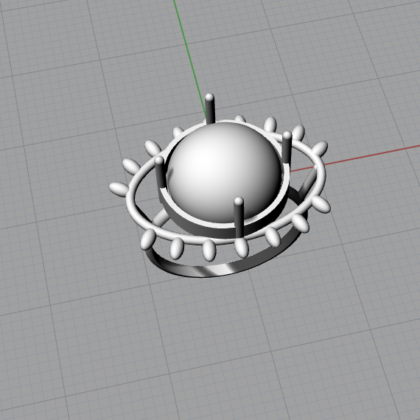
Next I had to find a digital placeholder for the real cabochon in my 3D workspace, so I could build around it at a scale proportional to the piece. I used Rhino3D to create a digital replica of my cabochon.
If you’re using a stone that’s more complex than a cabochon, you may want to look into some free CAD lapidary resources. Make sure that your stone’s shape matches the lapidary model exactly, and that you scale the model to accurately reflect the real thing.

From there, I constructed a shallow bezel with a depth of 2.5 mm for the stone to nest in. Getting the clearance tolerance right when you have two parts made of different materials can be tricky — and something you should always be ready to prototype and test. I found that offsetting the bezel .5 mm from the edge of my cabochon provided the perfect amount of space between the two.

Then I modeled the prongs. How long should they be to accommodate the dome of the cabochon? How thick should they be, given that they will be bent into place while assembling the ring but hold the stone in place once it’s done?
Your answers will vary, but I decided to make my prongs 1mm thick and 7mm long from the base of the bezel to secure my cabochon.

The only thing left to do was anchor the stone setting in an interesting design, so I created a rustic eye shape by adding mass to a simple 2D drawing of an eye, and then ordered the model in Raw Brass.

next step: print your 3d model
Setting the Stone
When I received the Raw Brass print of my ring, the first thing I did was check the fit of the cabochon within the bezel — and it turned out that the fit was perfect. I then got some E6000 epoxy and squeezed three tiny beads of glue onto the center of the bezel. Epoxy dries quickly, so I made sure to place the cabochon in the bezel swiftly and accurately.

Then I gently bent the prongs over the cabochon with pliers. I expected that this would be simple, but it proved to be tricky without an arsenal of bench tools at my disposal. My pliers got the prongs as flush to the cabochon as they could. Then I gently rolled the ring face-down on a wooden work bench to make an even closer connection.

My stone setting may not be flawless, technically or aesthetically, but I like to think that the addition of a few handmade imperfections gives my 3D printed work an unexpected flare. And my Third Eye Mood Ring has held up through months of nonstop wear-testing.
Have you tried making a stone setting? How did it go? Let us know in the comments.
E6000 is not an epoxy as far as their literature is concerned. Also I have never heard of an epoxy that was not two parts that had to be mixed together. I checked the MSDS sheet for E6000 and it says it contains one solvent called Tetrachloroethylene which must keep the plastic in it a liquid state until allowed to evaporate (it is also a dry cleaning agent).
Turns out E6000 is a synthetic rubber called Styrene Butadiene Copolymer dissolved in Tetrachloroethylene. It has nothing to do with Epoxy.