

Dain Penman is a member of Shapeways Crew and the owner of the Madasu Designs Shapeways shop
This blog outlines what you need to do to start 3D printing, based on my own experience.
The first thing you will need (aside from an idea) is a design program – unless you would like to use one of Shapeways Easy Creator Apps. I am currently using Autodesk’s 123D Design which is a free 3D design program I downloaded (http://www.123dapp.com/design). Autodesk also have a number of associated programs such as 123 Catch which is a 3D scanner using a smartphone and Meshmixer, an editing program where you can update textures, combine models and generally play around with 3D models.
To create a design, there are 3 main methods I use (often in combination):
Working with functions such as using 3D objects like cubes, spheres and cylinders. I then modify these objects to end up with a 3D model;
Create 2D sketches using 2D objects like squares, circles and lines and make them 3D by applying a thickness, or;
Importing 2D sketches from the internet.
The process is best explained using an example of a pair of cufflinks:
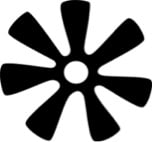
I started by importing a 2D image (which I found on the internet and converted to a .svg file), as below:
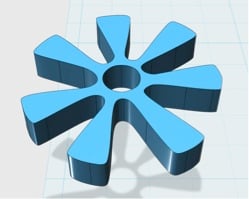
The imported file becomes a 2D sketch, to which I applied a thickness – so I then had a 3 dimensional object shaped like the above. The picture was quite large (about 20cm across), so I used a scale tool to reduce the size down to around 2cm across. The program has a grid, so I estimated the size against the 5mm grid the object was placed on.
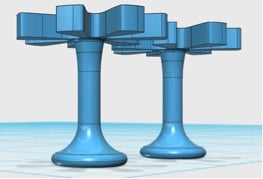
I then checked the thickness by using the measuring tool as I wanted a more precise measurement for the height. I made it 2.5mm high.
To make the backs for the cufflink I created two cylinders. When I create the cylinders I specify the radius of the cylinder and the height. I created one short, wider one for the back piece and a taller, thinner one for the piece joining the front and the back.
I then filleted the edges on the cylinders to create smooth edges. Where the angle is external, it trims away and makes a smoother edge. Where the angle is internal (like where a wall meets the ceiling), the rounding ‘fills in’ to make a smoother corner, much like a cornice on a wall/ceiling join.
Once all this was done and a single cufflink was complete, I duplicated the design to make the pair. I then exported the file in a .stl format which contains the model data including the size of the model.
The file is uploaded to Shapeways on the design page where the model is automatically checked against a number of characteristics to check it can be printed.
The requirements differ between different materials, so you should have an idea what materials you are designing for before you start.
Once it is checked, Shapeways gives you prices for different materials and you can then order your model! You can also select materials to sell and set the price. You can add tags, categories and a description for the model, to get the final product:
What was your first 3D printing project? What inspired you to get started and what resources were helpful?
Hello ! Thank you for your explanation ! How did you convert to STL ? Jan
I used an online STL converter, but cannot recall which one. Search and there are a few around, some work better than others and I also find it depends a bit on the source file which one(s) work and not.