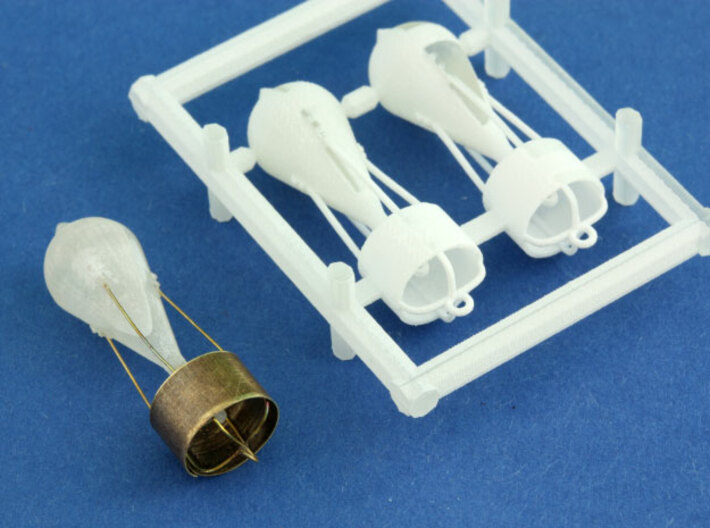
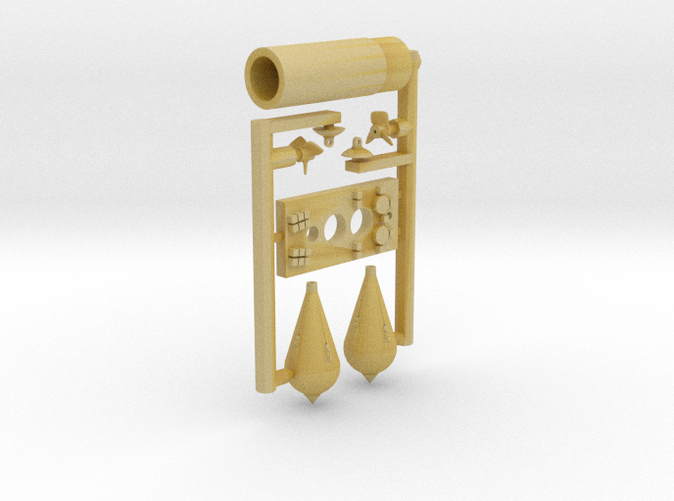
shown assembled. Kit contains parts for two bombs.


1/32 Carbonit 50kg Kit (2 pack)
Made by
Print With Shapeways
 Choose Your Material
 Choose your color and finish
$14.35
Have a question about this product?
contact the designerYou must be logged in and verified to contact the designer.
Product Description
Discounts up to 30% off available. Click here for details.
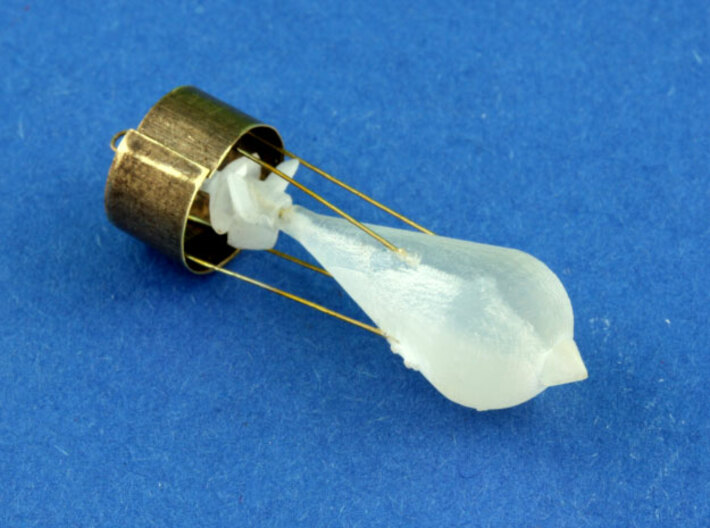
Kit to build a pair of 1:32 scale 50kg World War One German Carbonit Aerial bombs.
These distinctive teardrop shaped bombs were among the earliest designs used by the Germans. They came in a variety of sizes from 4.5kg to 50kg. The Luftstreitkräfte used them from 1914 into 1916, at which time they were replaced by the P.u.W. types, which possessed better aerodynamic characteristics, making them far more accurate. These weapons were manufactured by Sprengstoff A.G. "Carbonit" in Silesia, hence the name.
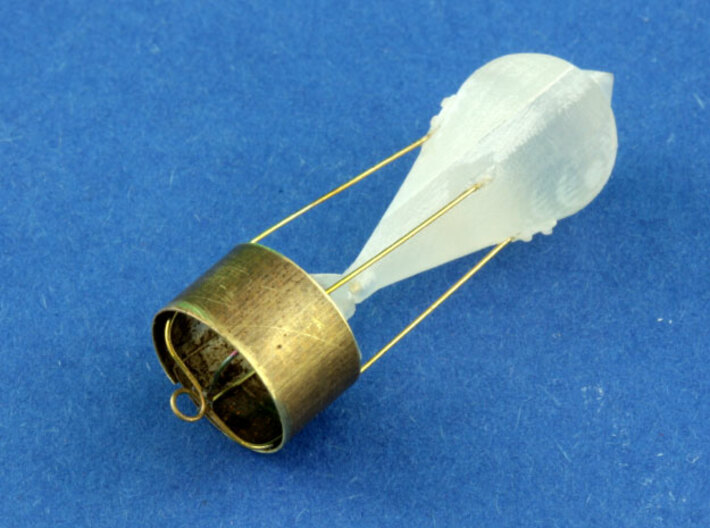
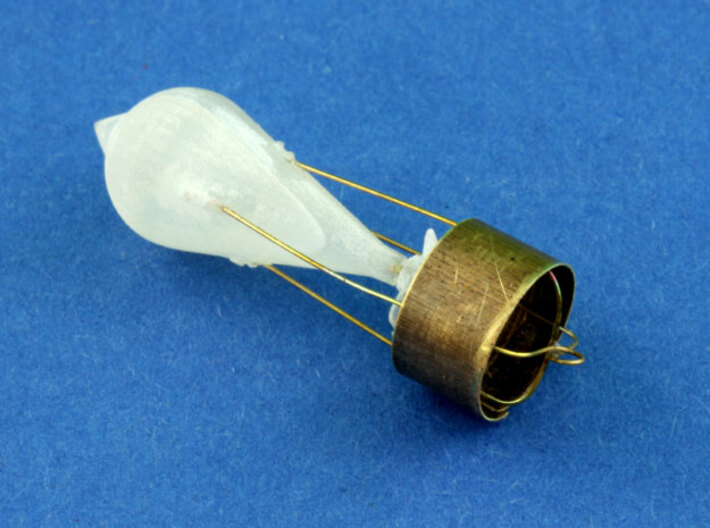
The kit contains 2 Carbonit bomb bodies, props and domed fuse retainers, along with tools to make the circular fins and fin straps. It is intended for advanced modelers only.
Instructions
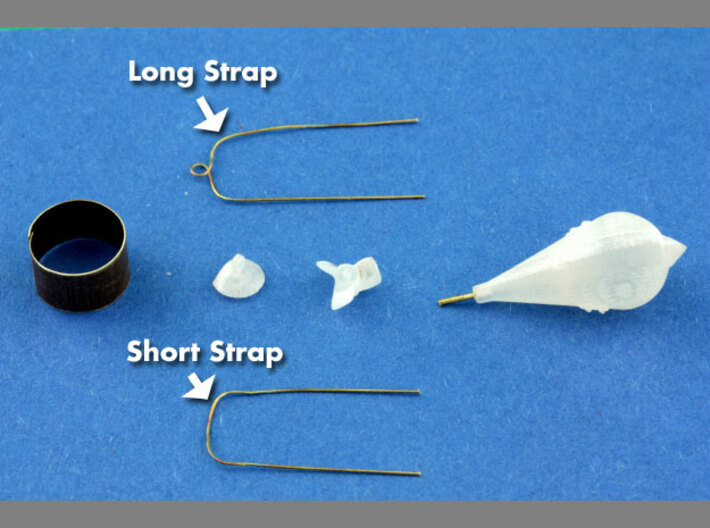
Straps
The straps can be made from .30mm brass wire by forming it around the guides in the tool. The longer strap has a loop at the top; this can be formed by inserting a 1.25mm drill bit in the hole provided, and and looping the wire around it. It may help to anneal the wire before bending, by gently heating the wire with a flame (do not let it get red hot.) The bottom of the wire forming tool has two sets of cut-off notches. Use the bottom notch to create the longer strap, and the upper ones to create the short strap.
Fin
The fin can be created by carefully cutting a 28mm x 5mm rectangle from .005" (.13mm) brass sheet. Anneal the brass by gently heating it with a flame till it changes color, taking care not to let it get red hot. Form the circle by rolling around the notched end of the tool. Use CA (super glue) along the seam thus formed to complete the task.
Assembly
Insert a 4mm length of brass rod (or similar) into the tail end of the body. This forms the shaft for the arming propeller. Carefully cut the propeller off of the sprue and slip it over the shaft. Next, remove the retaining dome from the sprue. You will need to drill a .5mm hole in the bottom of the dome in the center in order to attach it to the shaft. This dome held the propeller blades stationary until the bomb was dropped, thus avoiding accidentally arming the bomb while still in flight!
Attaching the straps
The bomb body has .3mm holes already set at the correct angle to accept the wire straps. It may be necessary to clean the holes with a .3mm drill bit before proceeding. Next, insert the ends of the shorter strap (the one without the loop on top) in the upper set of holes. Secure each side with a drop of CA. Repeat with with longer strap. Finally, fasten the two straps together at the top, taking care to center them with respect to the other. Slip the fin over the straps and secure with a few drops of CA.
Painting
To prepare the parts for painting, scrub them with a toothbrush in ordinary dish washing liquid and rinse thoroughly, or soak them for up to 10 minutes in a small jar filled with acetone (nail polish remover.) Once the waxy support material is completely removed, the parts will appear white wherever support material was needed during printing. We recommend carefully sanding these white areas with a sharpened fine grade sanding stick (or similar) to remove the texture caused by the support material. With care this can be done without spoiling the details.
This product is under development and is specially priced during this phase. Thank you for your support!
Kit to build a pair of 1:32 scale 50kg World War One German Carbonit Aerial bombs.
These distinctive teardrop shaped bombs were among the earliest designs used by the Germans. They came in a variety of sizes from 4.5kg to 50kg. The Luftstreitkräfte used them from 1914 into 1916, at which time they were replaced by the P.u.W. types, which possessed better aerodynamic characteristics, making them far more accurate. These weapons were manufactured by Sprengstoff A.G. "Carbonit" in Silesia, hence the name.
The kit contains 2 Carbonit bomb bodies, props and domed fuse retainers, along with tools to make the circular fins and fin straps. It is intended for advanced modelers only.
Instructions
Straps
The straps can be made from .30mm brass wire by forming it around the guides in the tool. The longer strap has a loop at the top; this can be formed by inserting a 1.25mm drill bit in the hole provided, and and looping the wire around it. It may help to anneal the wire before bending, by gently heating the wire with a flame (do not let it get red hot.) The bottom of the wire forming tool has two sets of cut-off notches. Use the bottom notch to create the longer strap, and the upper ones to create the short strap.
Fin
The fin can be created by carefully cutting a 28mm x 5mm rectangle from .005" (.13mm) brass sheet. Anneal the brass by gently heating it with a flame till it changes color, taking care not to let it get red hot. Form the circle by rolling around the notched end of the tool. Use CA (super glue) along the seam thus formed to complete the task.
Assembly
Insert a 4mm length of brass rod (or similar) into the tail end of the body. This forms the shaft for the arming propeller. Carefully cut the propeller off of the sprue and slip it over the shaft. Next, remove the retaining dome from the sprue. You will need to drill a .5mm hole in the bottom of the dome in the center in order to attach it to the shaft. This dome held the propeller blades stationary until the bomb was dropped, thus avoiding accidentally arming the bomb while still in flight!
Attaching the straps
The bomb body has .3mm holes already set at the correct angle to accept the wire straps. It may be necessary to clean the holes with a .3mm drill bit before proceeding. Next, insert the ends of the shorter strap (the one without the loop on top) in the upper set of holes. Secure each side with a drop of CA. Repeat with with longer strap. Finally, fasten the two straps together at the top, taking care to center them with respect to the other. Slip the fin over the straps and secure with a few drops of CA.
Painting
To prepare the parts for painting, scrub them with a toothbrush in ordinary dish washing liquid and rinse thoroughly, or soak them for up to 10 minutes in a small jar filled with acetone (nail polish remover.) Once the waxy support material is completely removed, the parts will appear white wherever support material was needed during printing. We recommend carefully sanding these white areas with a sharpened fine grade sanding stick (or similar) to remove the texture caused by the support material. With care this can be done without spoiling the details.
This product is under development and is specially priced during this phase. Thank you for your support!
Details
What's in the box:
1/32 Carbonit 50kg Kit (2 pack)
Dimensions:
Success Rate:
First To try.
What's this?
Rating:
Mature audiences only.