Tan Fine Detail Plastic


HO Illinois Terminal Class B Bowser Drive
Made by
Print With Shapeways
 Choose Your Material
 Choose your color and finish
$106.46
Have a question about this product?
contact the designerYou must be logged in and verified to contact the designer.
Product Description
Please read all instructions below before assembly.
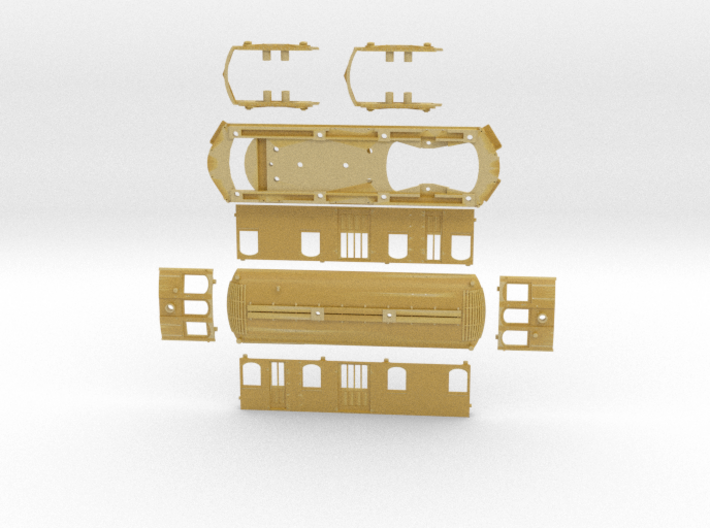
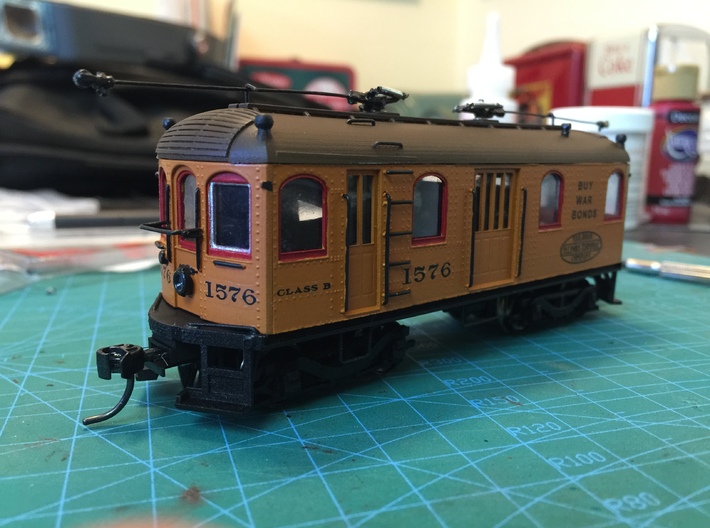
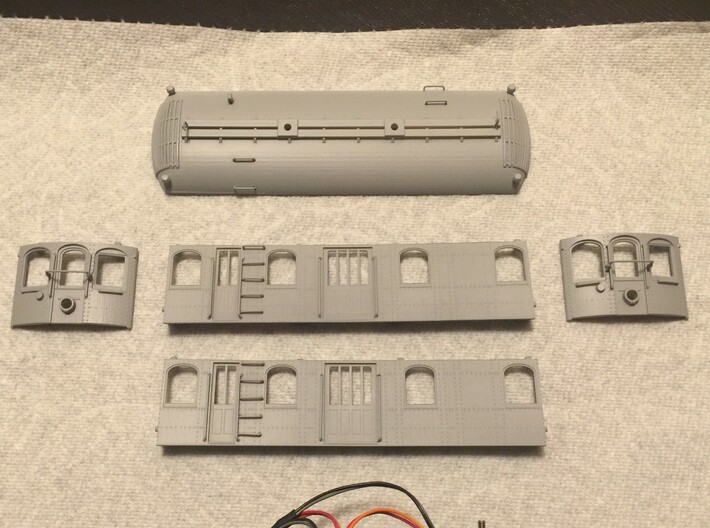
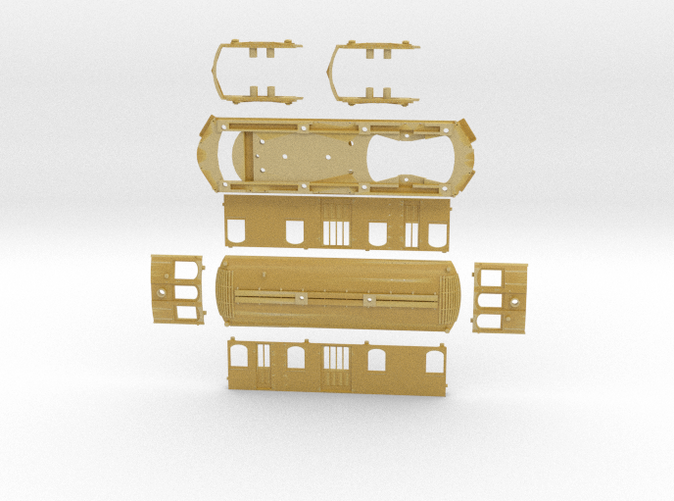
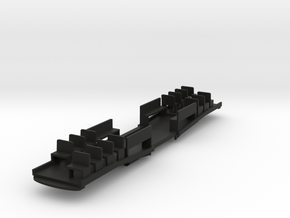
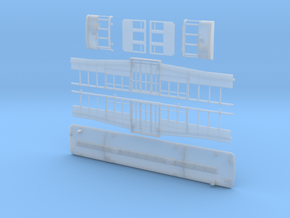
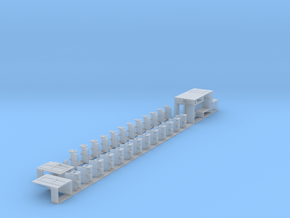
This kit builds an Illinois Terminal Class B electric freight motor. It includes all four walls, the roof, the floor, and a pair of sideframes with pilots which are designed to mount easily to Bowser trucks. The floor is included and does not need to be ordered separately. The required (not included) Bowser 6' wheelbase Bowser drive unit is available from Custom Traxx. Be sure to specify 36" wheel diameters (at extra cost), however a 33" wheel diameter will work just fine if you're not a stickler for detail and wish to save the cost of the larger wheels. Please be aware that the real locomotives had a 7 foot wheelbase. This model is designed to use the inexpesive Bowser drive, but should you want a true 7' wheelbase truck there is a version in the store which is made to use a pair of North West Short Line Stanton drive units that have the correct wheelbase.
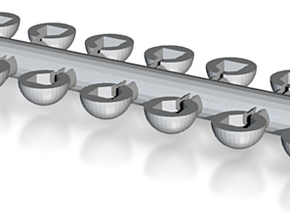
Pilot holes are pre-drilled for the grab irons and steps. They are not included but I used .020 brass wire to create mine. I reccomend a kadee number 143 short-shank coupler with whisker centering device. This coupler pocket will not accomodate the old style brass return spring. Use a trimmed draft gear box lid from the kadee package and a 2-56 screw to install the couplers.
Before assembly be sure to tap all screw holes with a 2-56 tap.
Scrub the parts before assembly with pure simple green and an electric tooth brush, then scrub again in water as hot as you can keep your hand in without burning it. Repeat as needed until the model has no waxy residue left from the print process. I use a sonicare toothbrush for this.
You can paint the pieces individually then assemble them with great ease. Alignment pegs on all parts keep the components in perfect alignment. Add ACC (super glue) to the seams once you are ready to finalize the assembly.
Use plastic compatible primers and paints. Decals are produced by Resin Car Works.
To install the motor and trucks, start by popping the bolster out of the powered truck by prying upward on it to disengage the downward facing pin that sticks through the top of the gearbox. Solder your wires to the pickup tabs on both trucks now to save aggrivation later. insert the powered truck through the hole and snap the bolster back into it. Install the screws into the two mounting holes you tapped earlier. Next, snapthe motor in its cradles into the mounting points in the floor. It is a tight fit but it will go. Two screws from the underside of the floor will hold the motor in place. Next, install the trailing truck using the shouldered brass screw - again, this hole should be tapped beforehand. Wire as desired and you're good to go! Use the contact link at the store page to contact us if needed.
This kit builds an Illinois Terminal Class B electric freight motor. It includes all four walls, the roof, the floor, and a pair of sideframes with pilots which are designed to mount easily to Bowser trucks. The floor is included and does not need to be ordered separately. The required (not included) Bowser 6' wheelbase Bowser drive unit is available from Custom Traxx. Be sure to specify 36" wheel diameters (at extra cost), however a 33" wheel diameter will work just fine if you're not a stickler for detail and wish to save the cost of the larger wheels. Please be aware that the real locomotives had a 7 foot wheelbase. This model is designed to use the inexpesive Bowser drive, but should you want a true 7' wheelbase truck there is a version in the store which is made to use a pair of North West Short Line Stanton drive units that have the correct wheelbase.
Pilot holes are pre-drilled for the grab irons and steps. They are not included but I used .020 brass wire to create mine. I reccomend a kadee number 143 short-shank coupler with whisker centering device. This coupler pocket will not accomodate the old style brass return spring. Use a trimmed draft gear box lid from the kadee package and a 2-56 screw to install the couplers.
Before assembly be sure to tap all screw holes with a 2-56 tap.
Scrub the parts before assembly with pure simple green and an electric tooth brush, then scrub again in water as hot as you can keep your hand in without burning it. Repeat as needed until the model has no waxy residue left from the print process. I use a sonicare toothbrush for this.
You can paint the pieces individually then assemble them with great ease. Alignment pegs on all parts keep the components in perfect alignment. Add ACC (super glue) to the seams once you are ready to finalize the assembly.
Use plastic compatible primers and paints. Decals are produced by Resin Car Works.
To install the motor and trucks, start by popping the bolster out of the powered truck by prying upward on it to disengage the downward facing pin that sticks through the top of the gearbox. Solder your wires to the pickup tabs on both trucks now to save aggrivation later. insert the powered truck through the hole and snap the bolster back into it. Install the screws into the two mounting holes you tapped earlier. Next, snapthe motor in its cradles into the mounting points in the floor. It is a tight fit but it will go. Two screws from the underside of the floor will hold the motor in place. Next, install the trailing truck using the shouldered brass screw - again, this hole should be tapped beforehand. Wire as desired and you're good to go! Use the contact link at the store page to contact us if needed.
Details
What's in the box:
flat_illinois_terminal_class_b_bowser_v2
Dimensions:
Success Rate:
First To try.
What's this?
Rating:
Mature audiences only.
