Tan Fine Detail Plastic

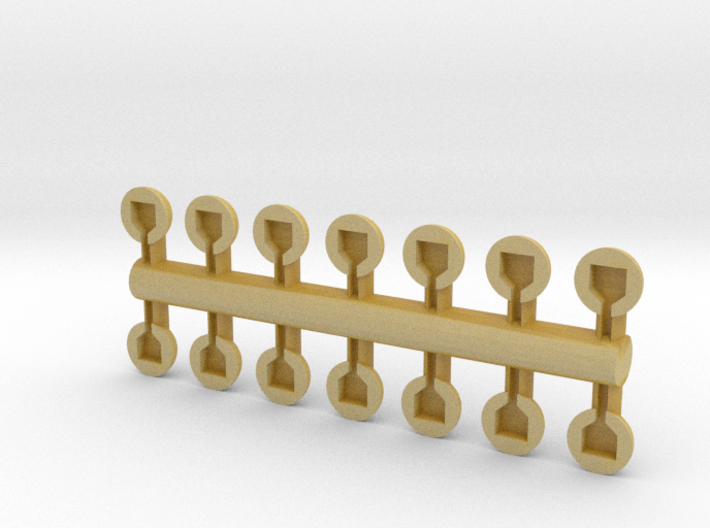
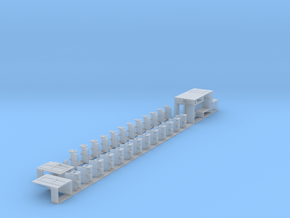
Functional HO Cyclops light housing for LRVs etc
Made by
Print With Shapeways
 Choose Your Material
 Choose your color and finish
$7.50
Have a question about this product?
contact the designerYou must be logged in and verified to contact the designer.
Product Description
This is designed to replicate the cyclops top headlight on a modern LRV, such as the LA Metro P865 and P2020, the San Diego Siemens U2, and similar.
You will need warm white "pico" sized LEDs for this. I buy mine here:
https://www.modeltrainsoftware.com/collections/hobby-leds/products/chip-nano-pico-leds
You'll also need some "formula 560 canopy glue" and some ACC (superglue)
Consult model ligting tutorials online if not sure how to wire a LED to your model.
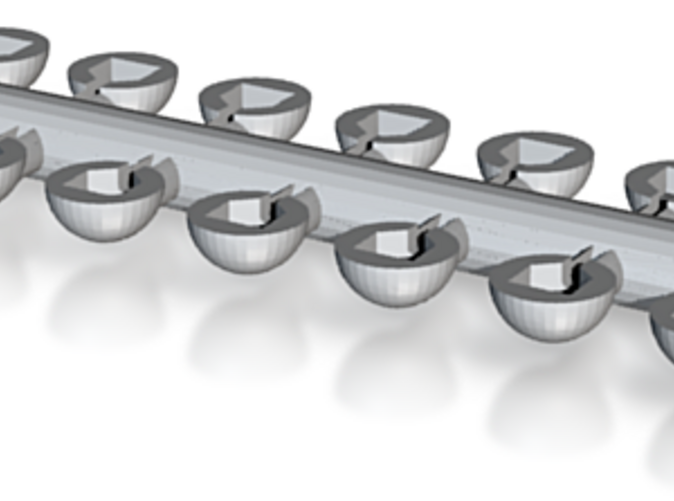
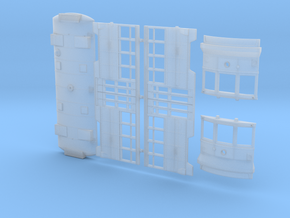
Zoom in on the 3D rendering of this print to understand the concept involved in adding the LED to make this function.
I reccomend using a magnifier for this part as the parts are tiny.
NOTE - When you separate the individual lights from the sprue, CUT RIGHT NEXT TO THE SPRUE.
1. Drill a hole in the mounting location that is just large enough to insert the cylindrical rod at the base of the light, but do not glue the housing into place yet.
2. Insert your wired pico LED through the hole you just drilled from the inside of the model.
3. There is an indention in the face of the cyclops light housing that resembles home plate on a baseball diamond. This is designed to perfectly fit the pico led, and there is a small channel in the mounting post that is meant to hold the tiny wires. Glue the LED into the housing with ACC so that the business side of the LED is facing out, making sure that the wires are held as well as possible into the channel. Don't worry too much if the LED or the wires protrude a little.
4. Once the ACC glue is dry, squeeze a drop of canopy glue onto the face of the LED/cyclops housing to form a rounded lens. The Canopy glue dries almost clear.
DO NOT LIGHT YOUR LED UNTIL THE CANOPY GLUE IS DRY. IT IS CONDUCTIVE WHILE WET AND WILL KILL YOUR LED.
5. Once your canopy glue "lens" is dry, gently pull the LED wires from the inside the model and guide the mounting post into the hole. put a dab of ACC or the glue of your choice to hold it in place from the inside.
6. Connect your LEDs and enjoy.
You will need warm white "pico" sized LEDs for this. I buy mine here:
https://www.modeltrainsoftware.com/collections/hobby-leds/products/chip-nano-pico-leds
You'll also need some "formula 560 canopy glue" and some ACC (superglue)
Consult model ligting tutorials online if not sure how to wire a LED to your model.
Zoom in on the 3D rendering of this print to understand the concept involved in adding the LED to make this function.
I reccomend using a magnifier for this part as the parts are tiny.
NOTE - When you separate the individual lights from the sprue, CUT RIGHT NEXT TO THE SPRUE.
1. Drill a hole in the mounting location that is just large enough to insert the cylindrical rod at the base of the light, but do not glue the housing into place yet.
2. Insert your wired pico LED through the hole you just drilled from the inside of the model.
3. There is an indention in the face of the cyclops light housing that resembles home plate on a baseball diamond. This is designed to perfectly fit the pico led, and there is a small channel in the mounting post that is meant to hold the tiny wires. Glue the LED into the housing with ACC so that the business side of the LED is facing out, making sure that the wires are held as well as possible into the channel. Don't worry too much if the LED or the wires protrude a little.
4. Once the ACC glue is dry, squeeze a drop of canopy glue onto the face of the LED/cyclops housing to form a rounded lens. The Canopy glue dries almost clear.
DO NOT LIGHT YOUR LED UNTIL THE CANOPY GLUE IS DRY. IT IS CONDUCTIVE WHILE WET AND WILL KILL YOUR LED.
5. Once your canopy glue "lens" is dry, gently pull the LED wires from the inside the model and guide the mounting post into the hole. put a dab of ACC or the glue of your choice to hold it in place from the inside.
6. Connect your LEDs and enjoy.
Details
What's in the box:
cyclops_light_housing
Dimensions:
Success Rate:
First To try.
What's this?
Rating:
Mature audiences only.
