
Tan Fine Detail Plastic


HO LARy "Maggie" Type A with floor
Made by
Print With Shapeways
 Choose Your Material
 Choose your color and finish
$116.10
Have a question about this product?
contact the designerYou must be logged in and verified to contact the designer.
Product Description
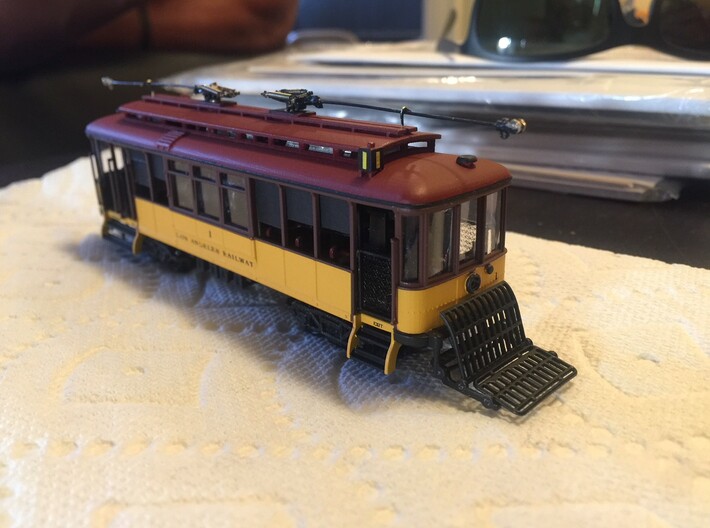
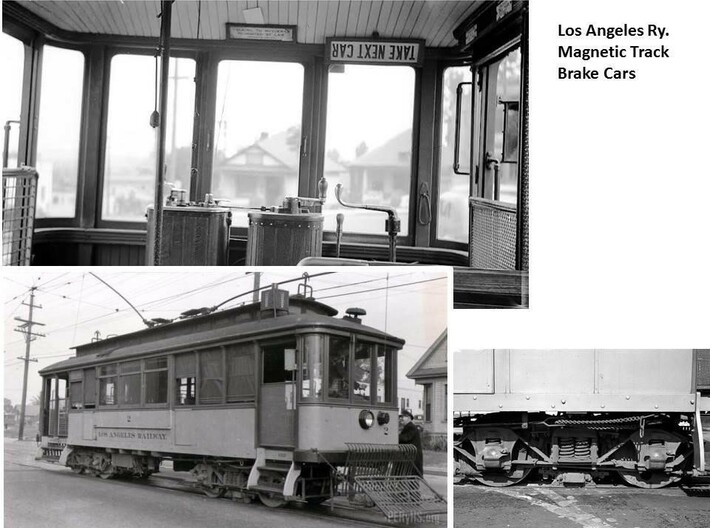
This is an HO scale model of a Los Angeles Railway "Maggie" Type A car. This class used a magnetic track brake system rather than air brakes, hence the name "Maggie".
A small handful of these ran until 1939, and were frequently assigned to the hilly "I" line in the class's final days.
This kit is designed to use the Bowser 4'10" mechanism which comes in an inexpensive kit, part number 125130, available from CustomTraxx. CustomTraxx also sells LARy decal sets, but black RR roman letter sets will also work. The customtraxx "Los Angeles Railway Company" decals will need to be cut into individual letters to condense down onto this short carbody.
This car has been carefully engineered to allow it to make 9" radius curves. In doing so, portions of the sideframes were flattened or deleted to keep the trucks from hitting the steps. Bear in mind that the Los Angeles Railway was 3'6" narrow gauge, as such, truck clearance was not as much of an issue. These modifications have to be made in order to allow this model to reach a standard guage audience without narrow or dual guage to run on. We have not moved the trucks comically close to the center of the car as on the brass models of LARy equipment. There is potential to make 6" radius curves, but the backs of the steps would need to be chamfered a bit in the spots where the wheels hit.
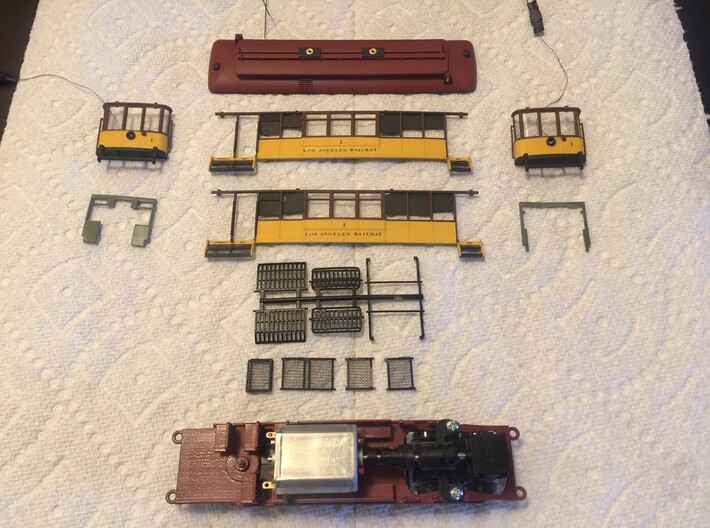
The floor is included with this kit. No second item is required to build this kit.
If you desire to have a car without any provision for motor or trucks please let us know and we will provide a design with a simple floor for you to add the power system of your choice.
Assembly instructions:
1. Inspect all parts for broken or damaged ones. Take photos and contact shapeways for a replacement part if damage is found, otherwise just superglue the part back into place.
2. Scrub all parts very thoroughly with undiluted Simple Green household cleaner and an electric toothbrush. I use a sonicare for this. Rinse and continue scrubbing under the hottest water your hands can stand. Allow the parts to air dry overnight.
3. There are two options for assembly and paint. I prefer to paint and decal the car in pieces, apply decals and window glass, headlights, and even install the decoder into the roof, before the car is glued together.
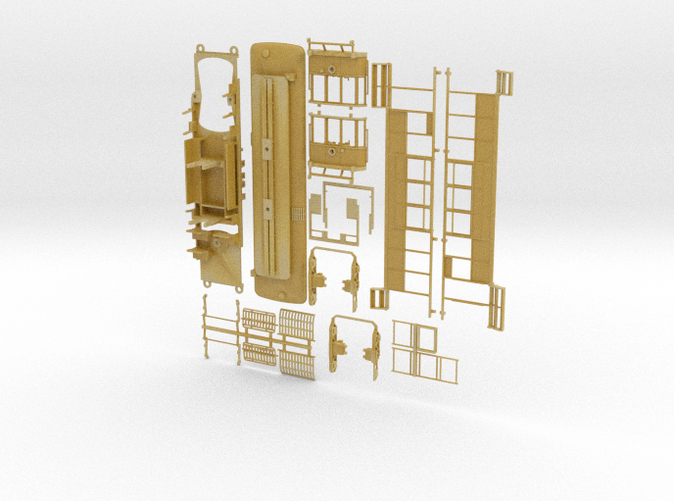
Prime and paint using only plastic-compatible paints. this kit comes with a set of "gates" for the doorways. printing a mesh as fine as the grating on these gates is impossible, so only the frames for them are provided. I used a mesh fabric sourced at a local fabric supply to create the gate mesh.
4. When ready to assemble, use a sanding stick to clean the paint off the locator pegs and gluing surfaces. Gently push the parts together and use a toothpick to apply glue to the seams from the inside of the car. Once the body is assembled, install the two interior bulkheads flush with the ends of the enclosed section. there are stops to align it at the top and bottom of the sides. They may require some light sanding along the edges to fit into place. Note that one is very heavily cut-out to allow it to fit around the can motor. The other has a notch in the middle to fit over the drive shaft.
5. Once the body is painted and assembled, VERY GENTLY tap the holes in the car ends, where the powered truck bolster installs, and where the trailing truck mounts. Go slowly and do not force it. The detail plastic is strong but doesn't accomodate rough handling.
6. Remove the bowser motor mounts from the motor and snap the motor into the cradle of the floor. Clean up the truck sideframe mounting holes in the trucks with a 1/16 drill bit. Insert your trucks and screw them into place after connecting the drive shaft. gently press your sideframes into place.
7. The trolley pole bases are designed to accept standard 2mm brass inserts from CustomTraxx.
8. The fenders snap together. Reference the photos for orientation of the pieces. Gently clean the pivot holes in the fenders with an exacto or drill before assembly to ensure the parts are movable and snap together easily.
9. Wire your car and enjoy!
A small handful of these ran until 1939, and were frequently assigned to the hilly "I" line in the class's final days.
This kit is designed to use the Bowser 4'10" mechanism which comes in an inexpensive kit, part number 125130, available from CustomTraxx. CustomTraxx also sells LARy decal sets, but black RR roman letter sets will also work. The customtraxx "Los Angeles Railway Company" decals will need to be cut into individual letters to condense down onto this short carbody.
This car has been carefully engineered to allow it to make 9" radius curves. In doing so, portions of the sideframes were flattened or deleted to keep the trucks from hitting the steps. Bear in mind that the Los Angeles Railway was 3'6" narrow gauge, as such, truck clearance was not as much of an issue. These modifications have to be made in order to allow this model to reach a standard guage audience without narrow or dual guage to run on. We have not moved the trucks comically close to the center of the car as on the brass models of LARy equipment. There is potential to make 6" radius curves, but the backs of the steps would need to be chamfered a bit in the spots where the wheels hit.
The floor is included with this kit. No second item is required to build this kit.
If you desire to have a car without any provision for motor or trucks please let us know and we will provide a design with a simple floor for you to add the power system of your choice.
Assembly instructions:
1. Inspect all parts for broken or damaged ones. Take photos and contact shapeways for a replacement part if damage is found, otherwise just superglue the part back into place.
2. Scrub all parts very thoroughly with undiluted Simple Green household cleaner and an electric toothbrush. I use a sonicare for this. Rinse and continue scrubbing under the hottest water your hands can stand. Allow the parts to air dry overnight.
3. There are two options for assembly and paint. I prefer to paint and decal the car in pieces, apply decals and window glass, headlights, and even install the decoder into the roof, before the car is glued together.
Prime and paint using only plastic-compatible paints. this kit comes with a set of "gates" for the doorways. printing a mesh as fine as the grating on these gates is impossible, so only the frames for them are provided. I used a mesh fabric sourced at a local fabric supply to create the gate mesh.
4. When ready to assemble, use a sanding stick to clean the paint off the locator pegs and gluing surfaces. Gently push the parts together and use a toothpick to apply glue to the seams from the inside of the car. Once the body is assembled, install the two interior bulkheads flush with the ends of the enclosed section. there are stops to align it at the top and bottom of the sides. They may require some light sanding along the edges to fit into place. Note that one is very heavily cut-out to allow it to fit around the can motor. The other has a notch in the middle to fit over the drive shaft.
5. Once the body is painted and assembled, VERY GENTLY tap the holes in the car ends, where the powered truck bolster installs, and where the trailing truck mounts. Go slowly and do not force it. The detail plastic is strong but doesn't accomodate rough handling.
6. Remove the bowser motor mounts from the motor and snap the motor into the cradle of the floor. Clean up the truck sideframe mounting holes in the trucks with a 1/16 drill bit. Insert your trucks and screw them into place after connecting the drive shaft. gently press your sideframes into place.
7. The trolley pole bases are designed to accept standard 2mm brass inserts from CustomTraxx.
8. The fenders snap together. Reference the photos for orientation of the pieces. Gently clean the pivot holes in the fenders with an exacto or drill before assembly to ensure the parts are movable and snap together easily.
9. Wire your car and enjoy!
Details
What's in the box:
ho_maggie_whole_car_v2
Dimensions:
Success Rate:
First To try.
What's this?
Rating:
Mature audiences only.
