
While there’s still a little time left to take advantage of our holiday sale, try your hand at an easy digital crafting project.

Snowflakes are a classic and always-classy way to decorate the tree, and they’re festive throughout the winter. Snowflakes also happen to lend themselves well to parametric design, a method of creating around parameters that can turn one design into many.
Today, we’ll learn how to turn one design, a simple snowflake, into multiple products in a variety of shapes, sizes, and materials. We’ll start with simple low-res 3D prints and prototypes on desktop FDM machines, and eventually level up to printing in Nylon and Plated Rhodium at Shapeways. Along the way, we’ll have to consider ways to optimize for 3D printing on different types of machines, and how to print affordably with different types of materials. The snowflake design we’ll be working with was created with code in OpenSCAD, and can procedurally generate over a billion unique snowflakes. Let it snow!
3D Printing Snowflakes at Home
Each winter, we make a new 3D-printable snowflake design. Back in 2013, when we didn’t know very much, it was a set of simple Snowflake Ornaments created from extruded SVG images. In 2014 we leveled up to a customizable Snowflake Cutter that used symmetric image maps to mimic the way snowflakes are cut out of folded paper, and in 2015 it was a full-blown Snowflake Machine that uses OpenSCAD code to generate over a billion unique snowflakes in different styles from random seeds.

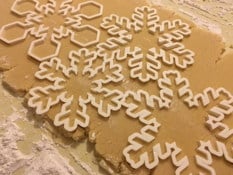
These flexible digital designs can create many different types of snowflake models, including large decorations, small ornaments, and even cookie cutters, all of which we initially printed on a consumer-level Ultimaker desktop 3D printer:

We’ll talk soon about how we converted these designs for printing in SLS Nylon and Metals at Shapeways, but first let’s talk about the parametric design itself.
How to Code a Blizzard
The Snowflake Machine was created in OpenSCAD, a free design program that allows you to use simple code to create and export 3D-printable STL meshes. The power of designing with OpenSCAD is that it is “parametric,” which means that you can construct your designs based on variables and parameters that control the behavior and features of your models.
In real life, snowflakes grow outwards from a core center as they fall through different temperatures, humidity levels, and other atmospheric conditions. These conditions add “plates” and “branches” of various sizes and configurations to the snowflake as it falls. The code for the Snowflake Machine mimics this process, using a random number seed to create many random number sequences that determine the algorithmic creation of plates and branches. Sizing and style parameters allow you to influence the random sequences to create snowflakes with more or fewer plates, fuller or sparser shapes, and so on.
You can make your own unique 3D-printable snowflake designs using the customizable interface of the Snowflake Machine that we uploaded to Thingiverse. Go to the link and click “Open in Customizer” to get started, then change the starting seed and style parameters until you get the snowflake you want. By clicking “Create Thing” you can download an STL of your custom snowflake and then 3D print it at home or by sending to Shapeways.

If you want to have more design flexibility with your snowflake models, then you can download and modify the “Snowflakerator” code from our Hello OpenSCAD one-page tutorial document. For more information on getting started with OpenSCAD, check out our recent Shapeways Tutorial Tuesday post Using OpenSCAD to Design With Code.
Printing Snowflake Ornaments in SLS Nylon
Last year, we decided it was time to level up and 3D print snowflakes on some big-girl machines, with fancy materials like SLS Nylon and even jewelry-quality silver. Of course we don’t have the equipment to do such things from home, so it was time to visit Shapeways!
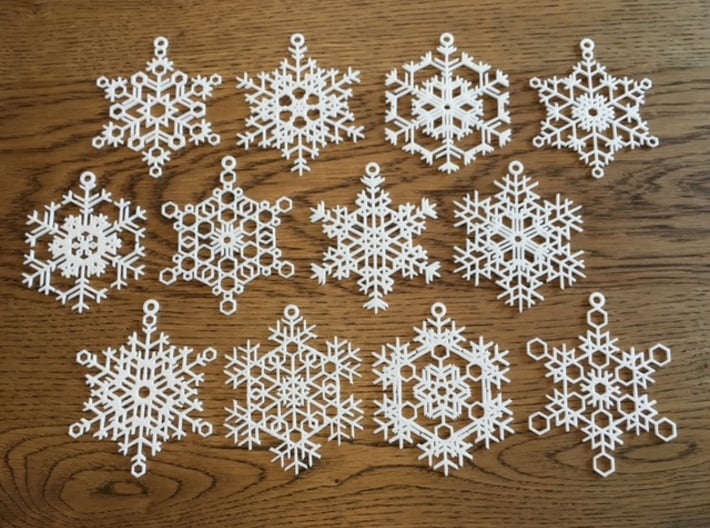
Of course, printing with industrial-grade machines is different than printing with desktop filament-based machines, and the requirements for things like clearances or minimum thickness can be very different. For example, in SLS Nylon we can print much more detailed and delicate snowflakes then we had printed before. By changing parameters in our OpenSCAD code, we created two dozen new snowflakes optimized for printing at Shapeways in White Strong & Flexible material, a set of Small Snowflake Ornaments and a set of Large Snowflake Ornaments:

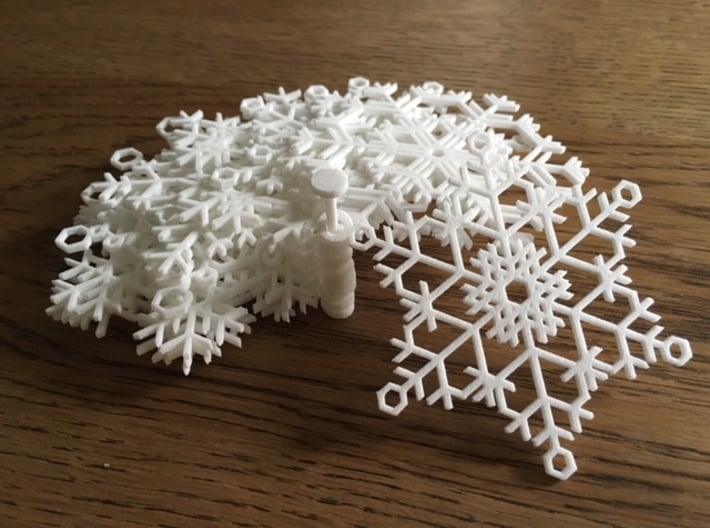
To save on per-part costs (which in White Strong & Flexible would be $1.50 for each disconnected piece of our print job), we used Tinkercad to arrange each dozen snowflakes on a thin rod, as shown in the pictures below. The rod can be easily snipped off after printing and shipping. Check out this past post for more tips on how to make models less costly. Tinkercad is a great tool for such simple modifications; for more on that see our Shapeways Tutorial Tuesday post Beginner 3D Design With Tinkercad. For more technical design tips on converting filament designs to SLS Nylon designs, check out our Hacktastic post From Prototype to Product: Snowflakes.

Printing Snowflake Earrings in Multiple Materials
Since holiday trees are only around for a little while but snowflakes can be fun all winter, we also decided to make some snowflake earrings. Earrings are basically just smaller ornaments, but if we simply scaled down our designs from above then their features would be too small, especially for printing in metals.
In the end, we decided to completely remake the flakes with different OpenSCAD parameters and seeds, and made six new designs. We tried to make them as delicate as possible while still having enough minimum thickness for printing in a wide variety of materials. The six designs we settled on were Flurry, Frost, Powder, Ice, Crystal, and Blizzard, shown here printed in six different materials:

Of course, we also need some hooks! After some experimenting we settled on what are called “Kidney wire” earring hooks, because the dangly snowflake prints can just slip around and onto the hooks without us having to deal with opening or closing any metal loops, as shown in the photo below left.
As a final step we altered our designs to be printable in metal; this involved closing up some of the smaller holes in each model so that it would pass the Shapeways Printability Checks for Precious Metals. With Shapeways’ new Variants feature, we were able to add new files to our existing product pages that would be used only when customers opted for printing in Precious Metals like Plated Rhodium.

Okay, that’s enough snowflakes for this winter! Let us know in the comments if you’ve used the Snowflake Machine to make any 3D-printable designs, or if you have questions about Variants, Printability Checks, design tips, or anything else. Or, leave a comment if you’ve ever turned one parametric model into a flurry of different prints and products; we’d love to see what you made.
Look so cute
Going to buy 3D printer on x-mas so I will try that, thanks