

BHDA — or black high definition acrylate has amazing detail, finish, durability, and color. It also has something that’s pretty unusual for Shapeways prints: Models are printed with support structures. Until recently, we removed the supports from all models during post-processing in our factory. But, this went beyond what many of our creators wanted. So, to give you more flexibility around the way your models look, you now have the option to receive your BHDA models with supports still attached. Below, we’ll show you how to finish your models to remove the tiny nubs that remain after support removal, and, if you’re the kind of creator who likes to DIY the post-process, we’ll show you how to remove supports.

The USS Arkansas 1/1800 model by C.O.B. Constructs and Miniatures with supports and after support removal
TECHNIQUES
Nub Removal
Once the large supports have been removed, small nubs will remain.
Nubs can be easily removed with tweezers, ≥ 600 grit sandpaper, and mineral oil. The tweezers are used to scrape off the larger nubs.
CAUTION: Be careful not to add excess pressure as this material can easily scratch. Cosmetic scratches can be removed, but deep scratches will need additional buffing.
≥ 600 grit sandpaper should gently rub off the remaining nubs. This should take just a few swipes back and forth to notice the nubs disappearing. This material, although strong, does polish quickly. Double check while you are polishing you are not rounding sharp edges or losing details while sanding.

USS Arkansas 1/1800 model by C.O.B. Constructs and Miniatures
Left side before polishing / right side after sanding for 1 minute with mineral oil
Final Finishing Step
Once you have sanded off those final nubs and are left with a smooth surface, a few small white marks from the tools may remain. This is where the mineral oil or lotion comes in. These can be gently painted on the material to moisturize and remove the superficial scratches and scrapes.

With all supports removed
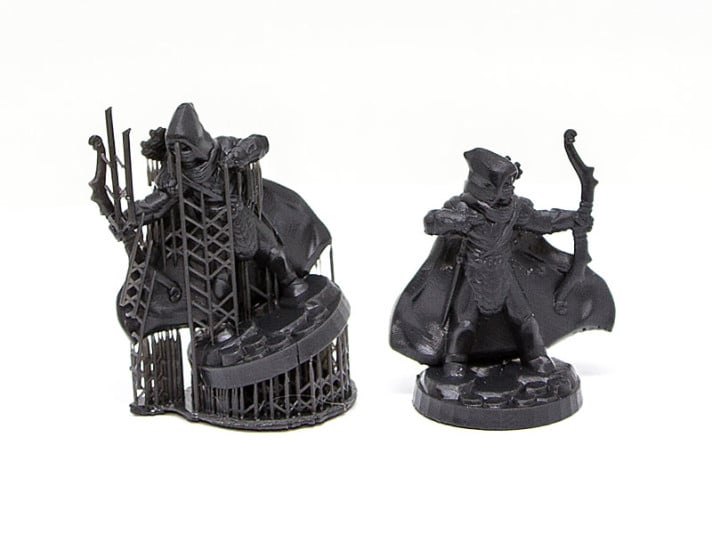
Ill Gotten Games’ Elf Ranger shown with supports and after support removal
Large Support Removal
TIP: Check the 3D file to avoid removing crucial parts of the model.
If your model has many wiry parts or fragile overhangs, it is best to use snippers to remove these supports. This will help to protect the model. When you have a wall that meets many supports, tweezers or metal spatulas may be used to remove multiple supports at one time. You can angle the tweezers or the spatula flush against the wall of the model and pull downward. This will “unzip” the supports from the actual structure. Ensure you are careful with the spatula as this can cause unintentional gashes.
How to hand-finish your products:
Initial Finishing Tools

- Snippers: Cut off supports
- Craft Spatula: Scrape off supports
- Tweezers: Pull off supports and scraping off nubs
Final Finishing Tools

- ≥ 600 grit sandpaper: sand off nubs
- Paint brush: apply finishing lotion or mineral oil
- Mineral oil or lotion: moisturize material to remove scratches
But, why does this material even have supports and nubs?
Supports and nubs exist due to the production process. Before printing the model, the 3D printing engineers will check the model to make sure it will make it through the production process. Next, support structures are added to the design file using a variety of pre-set supports which are selected based on your model’s geometry. If your design is particularly intricate, individual supports are added to delicate areas. These support structures hold the model to the build plate while they are printing, while offering strength to the product as it’s being printed. Once the models have had the supports added and are oriented in the build, the production team will load the models to the printer. The printers use direct light projection (DLP) technology, which includes a liquid resin, and light to cure the material. Each build is created layer by layer using light voxels to cure the resin to the previous layer.
Thanks for those tips. Very useful. Is there any particular kind/ grade of mineral oil that you would recommend?
Here’s an article about mineral oil: http://www.wisegeek.com/what-is-mineral-oil.htm
Hey Paul!
A white mineral oil (petroleum) would work perfectly well.
please tell me, Is it possible to print in BHDA the objects with open internal cavities?
Thanks for asking, Nikolay – You can print open internal cavities, but we recommend an escape hole of 10mm or 2 escape holes of 6mm each to properly clean it out. That said, there may be support structure inside that we are not able to remove.
It looks like the price per part is still the same for the new “With supports” material. As this should require quite a bit less handling than the “supports removed” material, can we expect a reduction in this cost?
Hi James! We decided to offer BHDA with supports in order to give more quality control to our customers. We chose not to make it a cheaper option at this time because we didn’t want price to be the driving force to purchase this option. Ultimately, we try to provide the best end products to our customers and absorb the post-processing cost and labor ourselves, but we also know that we have customers who prefer to do part of this process themselves. Overall, this is about enabling our customers to make the best-quality products.