
Tan Fine Detail Plastic


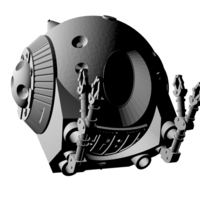
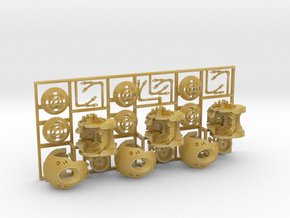
2001: an Odyssey. A trio of Discovery Pods 1:144
Made by
Print With Shapeways
 Choose Your Material
 Choose your color and finish
$31.60
Have a question about this product?
contact the designerYou must be logged in and verified to contact the designer.
Product Description
Superdetail your Moebius Models Discovery One with this fully lightable space pod! Or, if you want the coolest new version, check out my pods with full interiors!
“Really amazing work for such a small model. Congratulations.”
– Adam Johnson, designer of the Moebius Models Discovery XD-1 kit.
“These things are really, really good. Amazing little pods. And the great thing about these pods is that they actually fit through the doors the way they're supposed to!"
– Steve Neill, modelmaker extraordinaire.
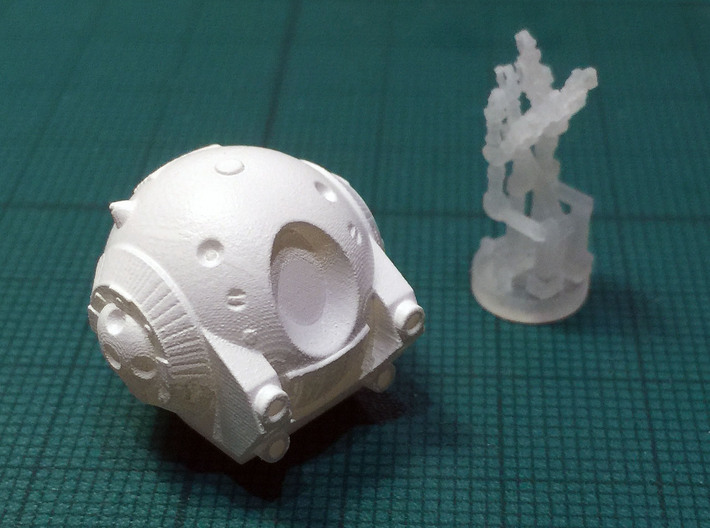
– A mere 17mm/0.66" tall to match the scale* of the Moebius kit. These correctly fit the pod bay doors!
– Based on both the full-size pod sets and the effects miniatures.
– Some inevitable compromises to scale, but compared to other 1:144 products I think they're the most accurate pods out there.
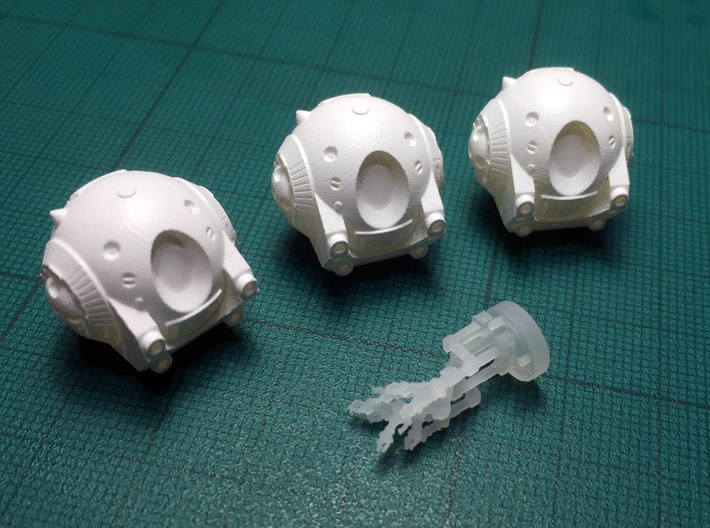
- The arms are INSIDE the pods for shipping. The bases must be cut off, removed, the arms detached, and then the bases should be glued back flush into the body of the pod.
– Contain light channels for optional fibre optic lighting. Yes, working headlights at this size!
– Include separate manipulator arms for three different configurations.
– Joined together on a single sprue to save you money over buying three individual pods, since Shapeways' complex pricing formula includes the number of parts.
– If you only need a single EVA pod, I have that available as well.
Arms and the Pod.
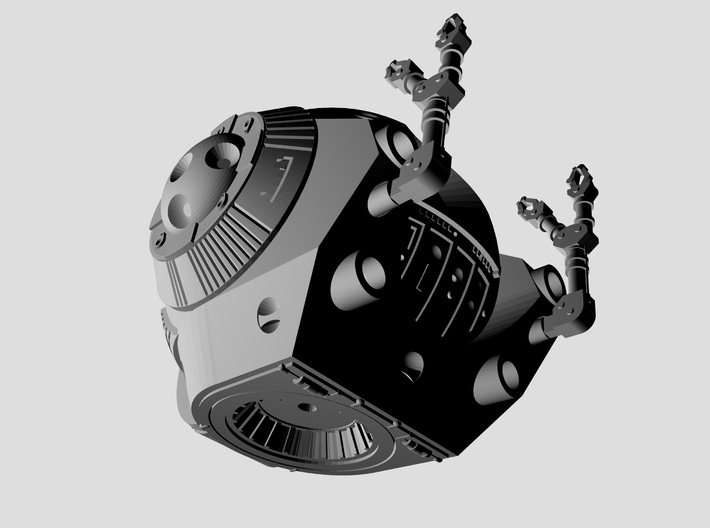
Each pod model has a separate bottom plate. Attached to this plate are five separate manipulator arms which can be cut from the sprues and glued into place. The arms are tucked away inside the pod for two reasons. First, it reduces the price of the product. And second, it protects the delicate arms from damage in shipping.
The choice of arms lets you display the pod in different ways.
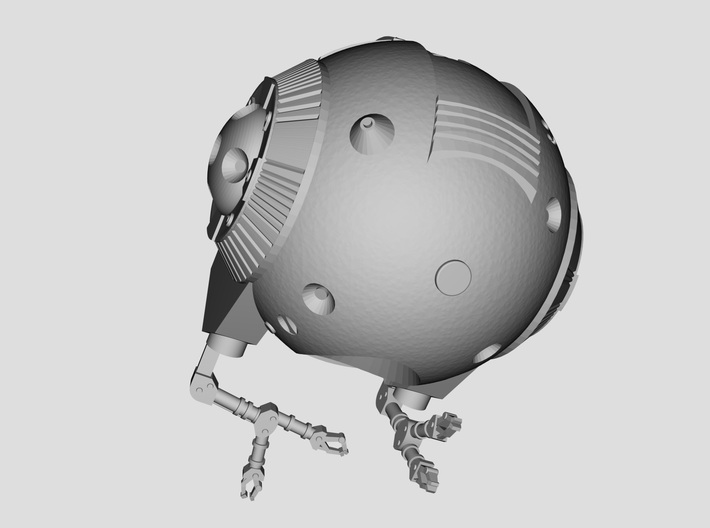
- One pair of arms is in the upright/parked position. Have each pod parked or emerging from the pod bay, or just flying around.
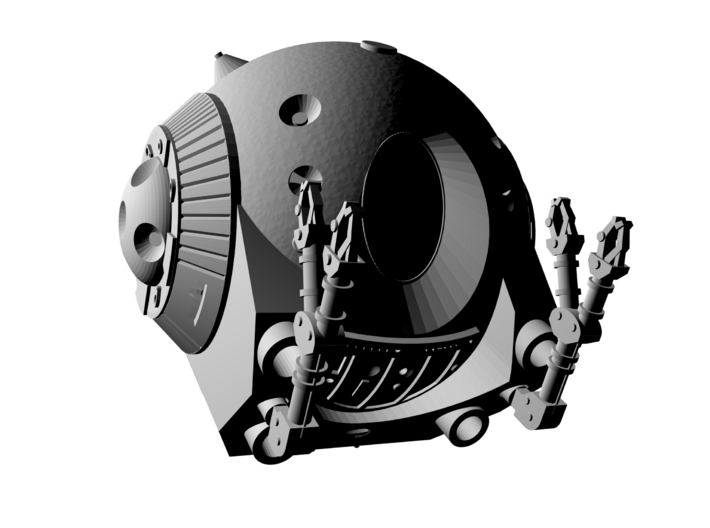
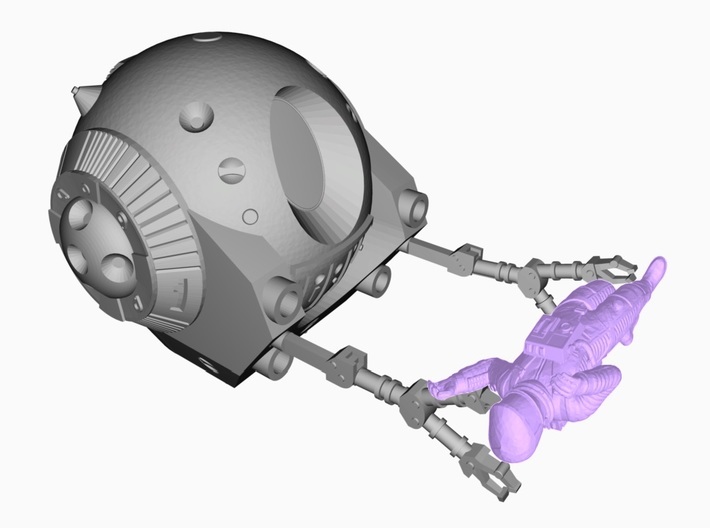
- The second pair of arms is outstretched, and in a position compatible with holding the body of Frank Poole. Or reaching out to commit his brutal coldblooded murder.
- Finally, there's a fifth arm angled in the position for opening an airlock. Since there isn't room inside the pod body for six arms, this fifth arm needs to be paired with one of the raised parked arms. The angled arm should be on the right and the raised arm on the left to match the look of the film.
Of course the arms aren't articulated, given the tiny size of the parts. They're also thicker than scale, just so they can be actually printed! In fact, I've had to simplify a fair bit of detail on this model, owing to the small size. One day 3D printing technology and materials will be able to produce super-fine details, but that day is not yet here. Even so, the thin arms are incredibly brittle and easy to break, so be careful!
A dead Poole.
I haven't produced a model of a murdered astronaut, but Max Grueter's Small Sculptures has. He has a fantastic group of astronauts scaled to 1:144, which includes Poole in his final pose:
https://www.shapeways.com/product/XER6XRT63/2001-astronauts-1-144-special-edition
Alternatively, Mr Grueter has kindly made the Poole model available to the world as a free download. It needs some modifications to be printable at 1:144 scale via Shapeways, so it does require some experience and access to 3D editing software.
https://www.thingiverse.com/thing:1458316
The sprues.
The procedure for cutting the sprues is simple, but very fiddly. You'll have to be extremely careful given the tiny size of the parts - it's really easy to damage things if you aren't cautious. 3D-printed acrylic plastic is quite brittle!
First, detach each pod from the main sprue. To do this, examine the sprues entering the pods. You'll notice that each of the outer four sprues is cylindrical (round in cross section). Cut these first using a sharp pair of sprue cutters or wire nippers. The pods can then be lifted off the main sprue.
Next, cut each arm off the square cross-section internal sprues. The idea is that each arm will terminate on a cylindrical section. This cylinder slides into a round hole located between each pair of lights. The very tip of this cylinder should protrude slightly, leaving the square section of the arm.
You'll have to glue each arm in position carefully, ensuring that they are correctly vertical. (except for the fifth airlock-opening arm, which should be rotated to the left/inward) There's a bit of a gap around the arms in order to accommodate paint and allow for glue. I'd probably use epoxy rather than superglue, to allow for adjustment of position.
Note: you may want the vertical square-cross section posts to remain in place on the round bottom disc, as you could use them as support brackets to glue an LED in place if you wanted. You'll also need to remove the rest of the cylindrical sprues so you can install the round bottom plate.
Lights.
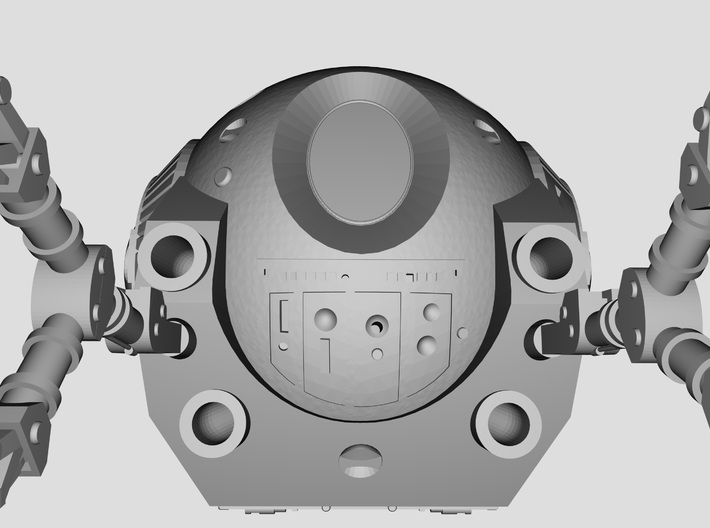
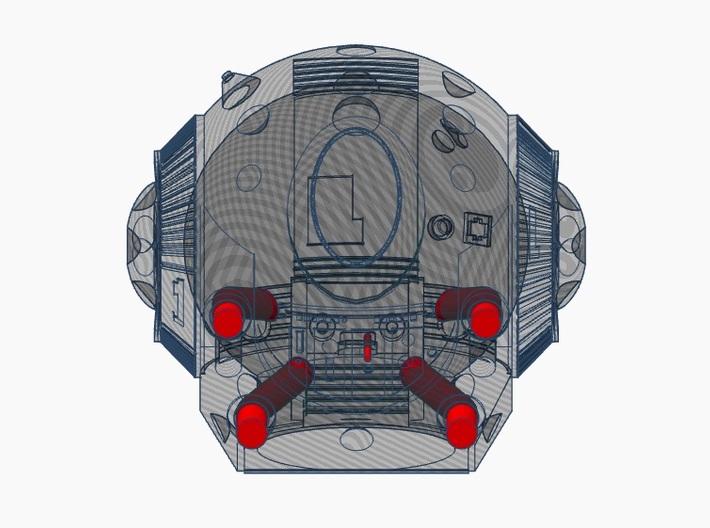
The four headlights in each pod have openings and channels to accommodate fibre optics. You can feed 1.0mm fibres through and drive them from a single white LED inside each pod.
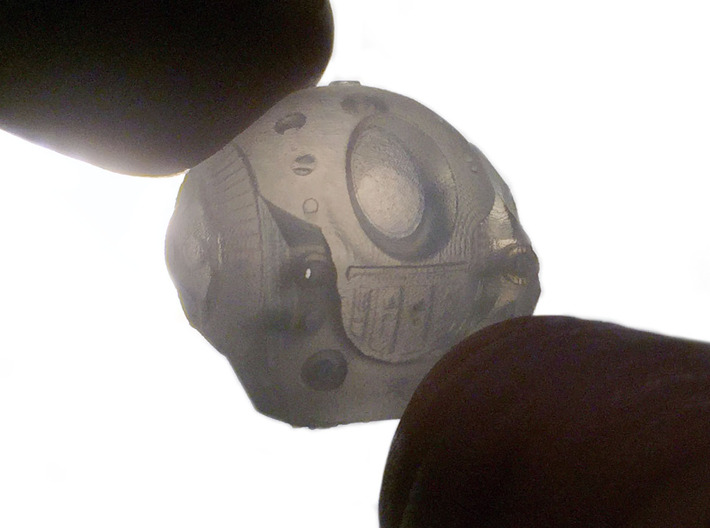
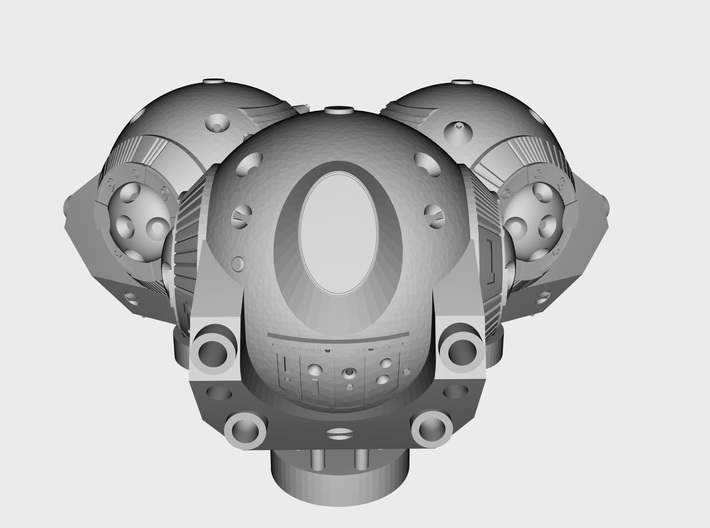
For extra fun I've added a fibre optic sized hole on the front panel, exactly where HAL's camera eye would be. (he had remote vision capabilities on the pod that he used to commit murder) This accommodates a 0.25mm fibre which, with a dot of transparent red paint at each end, will lend a touch of AI spookiness. However, there is a continuity error in the film. The pods parked in the bay seem to have small silver-rimmed tubes rather than black fisheye HAL lenses in them. Whether all the pods were supposed to be HAL-equipped or just one or two of them is not clear.
These lights are a good application of the lensing or mushrooming technique for fibres. Hold the fibre close to a flame and the tip will melt and form a perfect lens shape. It can take a few tries to get the lens in the exact size and shape you need. These, when fitted into the model, look like headlights. In fact, I'd use mushroomed fibres for headlights even for pods that aren't going to be illuminated, since they look more convincing than painting them silver.
Before installing the internal LED I would probably paint the interior of the pod with light-blocking paint to avoid the phoney-looking glow caused by light leaks. My suggestion is to paint the upper interior of the pod using metallic paint or black fabric paint, such as Tulip Slick brand opaque T-shirt paint. Paint up to the holes where the fibres emerge. Once that's done and the paint is dry, install the fibres and then finish up the painting. The reason why I suggest two stages is because the fibres get in the way of painting the upper section, but the paint can be a useful way of sealing the fibres in position. Once the paint is dry, you can snip the ends of the fibres to the correct length.
A 3mm LED will fit inside each pod, but it'll be a tight fit and require a sharp bend to the LED's wires. Another option could be an SMD LED with fine wires soldered on. You can use the base plate's square posts as supports for the light. I would recommend a warm white LED, since the actual film sets and props used tungsten light. Cool white LEDs are just too blue in colour.
Remember - NEVER use superglue or styrene cement to glue plastic fibre optics. These glues will destroy fibres! The paint solution above is a great way to hold the fibres in place, though not reversible. White glue/PVA is another approach.
The base.
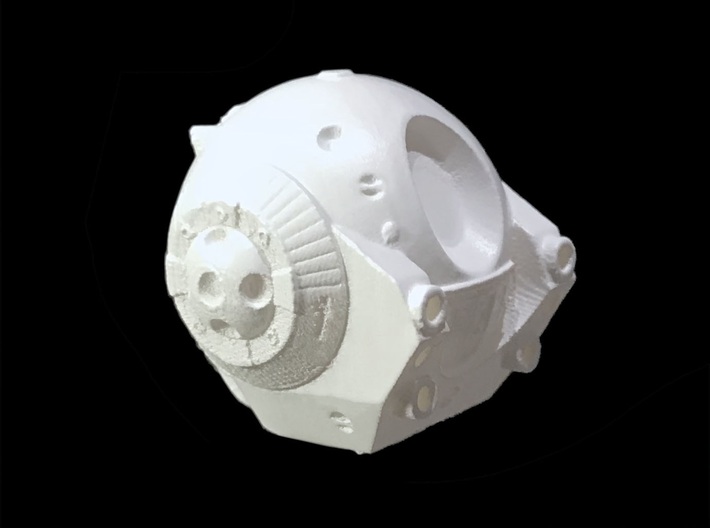
The base of the pods is never properly shown in the film, and photographic documentation on what the bottom was supposed to look like is hard to find. I've modelled a couple of greeblies on the bottom front edge, but haven't included much at the back since I don't have good reference material for it. If you plan on mounting the pod to a flat surface, such as the projecting tongue that emerges from the pod bay, you may need to file these greeblies off.
The circular base also has a small hole to run the wires. This is easily covered over if you don't need it. Or you could drill it out to enlarge it slightly, run a brass tube through it, and use it to support the pod plus supply power. (solder wire to the tube, and run a single insulated wire through it for two conductors with a minimum of diameter)
Incidentally, the Paragrafix pod bay etched brass fret is pretty cool for superdetailing, and can use two brass tubes for the pod launch platform. This means you can easily wire up the platform for power, thus electrifying the pod model for lighting!
Cleaning.
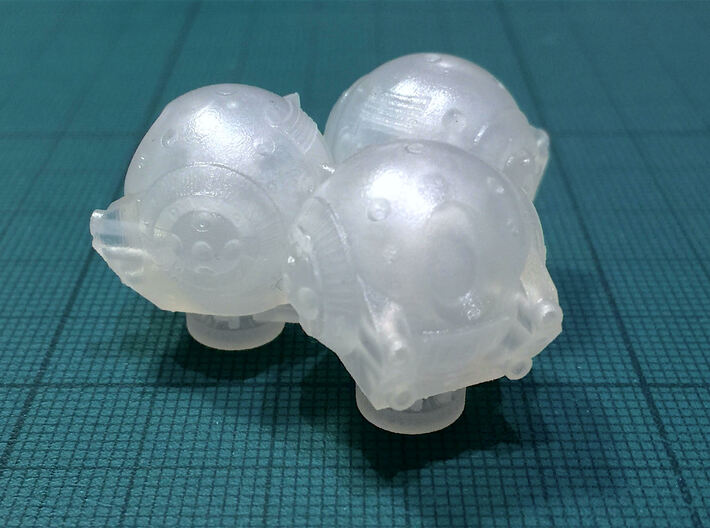
Shapeways' "Frosted Detail" plastics use an oily wax to support parts of the model during the printing process. Because the pods have a large internal space, and a bunch of finely detailed arms with lots of areas to hold wax, they tend to be noticeably greasy even after Shapeways has cleaned them. If you don't clean off this oil, paint won't stick very well, and you may get residue showing through.
So you'll need to spend some time with an ultrasonic cleaner, and/or a fine brush and hot water, to clean off all the oily residue. But remember - the arms are super brittle, and easily broken! You'll have to be extremely careful.
You'll probably also want to do a little filling and sanding in certain areas. The pods are so small that the stairstep print lines are quite visible, especially on the flat triangular sides and certain parts of the curved pods. There's also a rough wax texture on the top of the window that may need some cleaning up.
Painting.
As noted, one of the problems with 3D printing an object like this, which has a lot of curved surfaces, is that some print lines will be pretty obvious. One way to reduce the appearance of these lines is to prime the model and let it dry thoroughly. Then use a new and sharp knife blade to scrape the lined areas. Do so with the side of the blade only, and don't do this near any details, or you'll wipe them out. Same with sanding - don't go anywhere near areas with fine details, such as the radial grooves in the "ears" on the side of the pod.
Then clean the pod thoroughly of dust and paint chips, and repaint. This will reduce the stairsteps by letting the primer fill in the gaps.
Thanks.
The digital model making up these pods is entirely my own work. But I couldn't have made them as accurate as I could without the excellent prior research by Simon Atkinson, Thomas Reddie, Paul Bodensiek, UHU02, Eliot R. Brown and others. And not to mention Stanley Kubrick, Harry Lange, and the production crew of 2001 who made the original pods in the first place!
* Is this pod actually 1:144 scale? Probably not. But that's what the Moebius Discovery One kit says on the box, so I thought I'd label it the same way. Basically the pod was designed to look nice next to this particular kit.
“Really amazing work for such a small model. Congratulations.”
– Adam Johnson, designer of the Moebius Models Discovery XD-1 kit.
“These things are really, really good. Amazing little pods. And the great thing about these pods is that they actually fit through the doors the way they're supposed to!"
– Steve Neill, modelmaker extraordinaire.
– A mere 17mm/0.66" tall to match the scale* of the Moebius kit. These correctly fit the pod bay doors!
– Based on both the full-size pod sets and the effects miniatures.
– Some inevitable compromises to scale, but compared to other 1:144 products I think they're the most accurate pods out there.
- The arms are INSIDE the pods for shipping. The bases must be cut off, removed, the arms detached, and then the bases should be glued back flush into the body of the pod.
– Contain light channels for optional fibre optic lighting. Yes, working headlights at this size!
– Include separate manipulator arms for three different configurations.
– Joined together on a single sprue to save you money over buying three individual pods, since Shapeways' complex pricing formula includes the number of parts.
– If you only need a single EVA pod, I have that available as well.
Arms and the Pod.
Each pod model has a separate bottom plate. Attached to this plate are five separate manipulator arms which can be cut from the sprues and glued into place. The arms are tucked away inside the pod for two reasons. First, it reduces the price of the product. And second, it protects the delicate arms from damage in shipping.
The choice of arms lets you display the pod in different ways.
- One pair of arms is in the upright/parked position. Have each pod parked or emerging from the pod bay, or just flying around.
- The second pair of arms is outstretched, and in a position compatible with holding the body of Frank Poole. Or reaching out to commit his brutal coldblooded murder.
- Finally, there's a fifth arm angled in the position for opening an airlock. Since there isn't room inside the pod body for six arms, this fifth arm needs to be paired with one of the raised parked arms. The angled arm should be on the right and the raised arm on the left to match the look of the film.
Of course the arms aren't articulated, given the tiny size of the parts. They're also thicker than scale, just so they can be actually printed! In fact, I've had to simplify a fair bit of detail on this model, owing to the small size. One day 3D printing technology and materials will be able to produce super-fine details, but that day is not yet here. Even so, the thin arms are incredibly brittle and easy to break, so be careful!
A dead Poole.
I haven't produced a model of a murdered astronaut, but Max Grueter's Small Sculptures has. He has a fantastic group of astronauts scaled to 1:144, which includes Poole in his final pose:
https://www.shapeways.com/product/XER6XRT63/2001-astronauts-1-144-special-edition
Alternatively, Mr Grueter has kindly made the Poole model available to the world as a free download. It needs some modifications to be printable at 1:144 scale via Shapeways, so it does require some experience and access to 3D editing software.
https://www.thingiverse.com/thing:1458316
The sprues.
The procedure for cutting the sprues is simple, but very fiddly. You'll have to be extremely careful given the tiny size of the parts - it's really easy to damage things if you aren't cautious. 3D-printed acrylic plastic is quite brittle!
First, detach each pod from the main sprue. To do this, examine the sprues entering the pods. You'll notice that each of the outer four sprues is cylindrical (round in cross section). Cut these first using a sharp pair of sprue cutters or wire nippers. The pods can then be lifted off the main sprue.
Next, cut each arm off the square cross-section internal sprues. The idea is that each arm will terminate on a cylindrical section. This cylinder slides into a round hole located between each pair of lights. The very tip of this cylinder should protrude slightly, leaving the square section of the arm.
You'll have to glue each arm in position carefully, ensuring that they are correctly vertical. (except for the fifth airlock-opening arm, which should be rotated to the left/inward) There's a bit of a gap around the arms in order to accommodate paint and allow for glue. I'd probably use epoxy rather than superglue, to allow for adjustment of position.
Note: you may want the vertical square-cross section posts to remain in place on the round bottom disc, as you could use them as support brackets to glue an LED in place if you wanted. You'll also need to remove the rest of the cylindrical sprues so you can install the round bottom plate.
Lights.
The four headlights in each pod have openings and channels to accommodate fibre optics. You can feed 1.0mm fibres through and drive them from a single white LED inside each pod.
For extra fun I've added a fibre optic sized hole on the front panel, exactly where HAL's camera eye would be. (he had remote vision capabilities on the pod that he used to commit murder) This accommodates a 0.25mm fibre which, with a dot of transparent red paint at each end, will lend a touch of AI spookiness. However, there is a continuity error in the film. The pods parked in the bay seem to have small silver-rimmed tubes rather than black fisheye HAL lenses in them. Whether all the pods were supposed to be HAL-equipped or just one or two of them is not clear.
These lights are a good application of the lensing or mushrooming technique for fibres. Hold the fibre close to a flame and the tip will melt and form a perfect lens shape. It can take a few tries to get the lens in the exact size and shape you need. These, when fitted into the model, look like headlights. In fact, I'd use mushroomed fibres for headlights even for pods that aren't going to be illuminated, since they look more convincing than painting them silver.
Before installing the internal LED I would probably paint the interior of the pod with light-blocking paint to avoid the phoney-looking glow caused by light leaks. My suggestion is to paint the upper interior of the pod using metallic paint or black fabric paint, such as Tulip Slick brand opaque T-shirt paint. Paint up to the holes where the fibres emerge. Once that's done and the paint is dry, install the fibres and then finish up the painting. The reason why I suggest two stages is because the fibres get in the way of painting the upper section, but the paint can be a useful way of sealing the fibres in position. Once the paint is dry, you can snip the ends of the fibres to the correct length.
A 3mm LED will fit inside each pod, but it'll be a tight fit and require a sharp bend to the LED's wires. Another option could be an SMD LED with fine wires soldered on. You can use the base plate's square posts as supports for the light. I would recommend a warm white LED, since the actual film sets and props used tungsten light. Cool white LEDs are just too blue in colour.
Remember - NEVER use superglue or styrene cement to glue plastic fibre optics. These glues will destroy fibres! The paint solution above is a great way to hold the fibres in place, though not reversible. White glue/PVA is another approach.
The base.
The base of the pods is never properly shown in the film, and photographic documentation on what the bottom was supposed to look like is hard to find. I've modelled a couple of greeblies on the bottom front edge, but haven't included much at the back since I don't have good reference material for it. If you plan on mounting the pod to a flat surface, such as the projecting tongue that emerges from the pod bay, you may need to file these greeblies off.
The circular base also has a small hole to run the wires. This is easily covered over if you don't need it. Or you could drill it out to enlarge it slightly, run a brass tube through it, and use it to support the pod plus supply power. (solder wire to the tube, and run a single insulated wire through it for two conductors with a minimum of diameter)
Incidentally, the Paragrafix pod bay etched brass fret is pretty cool for superdetailing, and can use two brass tubes for the pod launch platform. This means you can easily wire up the platform for power, thus electrifying the pod model for lighting!
Cleaning.
Shapeways' "Frosted Detail" plastics use an oily wax to support parts of the model during the printing process. Because the pods have a large internal space, and a bunch of finely detailed arms with lots of areas to hold wax, they tend to be noticeably greasy even after Shapeways has cleaned them. If you don't clean off this oil, paint won't stick very well, and you may get residue showing through.
So you'll need to spend some time with an ultrasonic cleaner, and/or a fine brush and hot water, to clean off all the oily residue. But remember - the arms are super brittle, and easily broken! You'll have to be extremely careful.
You'll probably also want to do a little filling and sanding in certain areas. The pods are so small that the stairstep print lines are quite visible, especially on the flat triangular sides and certain parts of the curved pods. There's also a rough wax texture on the top of the window that may need some cleaning up.
Painting.
As noted, one of the problems with 3D printing an object like this, which has a lot of curved surfaces, is that some print lines will be pretty obvious. One way to reduce the appearance of these lines is to prime the model and let it dry thoroughly. Then use a new and sharp knife blade to scrape the lined areas. Do so with the side of the blade only, and don't do this near any details, or you'll wipe them out. Same with sanding - don't go anywhere near areas with fine details, such as the radial grooves in the "ears" on the side of the pod.
Then clean the pod thoroughly of dust and paint chips, and repaint. This will reduce the stairsteps by letting the primer fill in the gaps.
Thanks.
The digital model making up these pods is entirely my own work. But I couldn't have made them as accurate as I could without the excellent prior research by Simon Atkinson, Thomas Reddie, Paul Bodensiek, UHU02, Eliot R. Brown and others. And not to mention Stanley Kubrick, Harry Lange, and the production crew of 2001 who made the original pods in the first place!
* Is this pod actually 1:144 scale? Probably not. But that's what the Moebius Discovery One kit says on the box, so I thought I'd label it the same way. Basically the pod was designed to look nice next to this particular kit.
Details
What's in the box:
2001: Space Odyssey Three EVA Pods 1:144

Dimensions:
Success Rate:
First To try.
What's this?
Rating:
Mature audiences only.