Tan Fine Detail Plastic


Elco 80' Day Cabin Hatch 16th, Aft Hinged
Made by
Print With Shapeways
 Choose Your Material
 Choose your color and finish
$12.38
Have a question about this product?
contact the designerYou must be logged in and verified to contact the designer.
Product Description
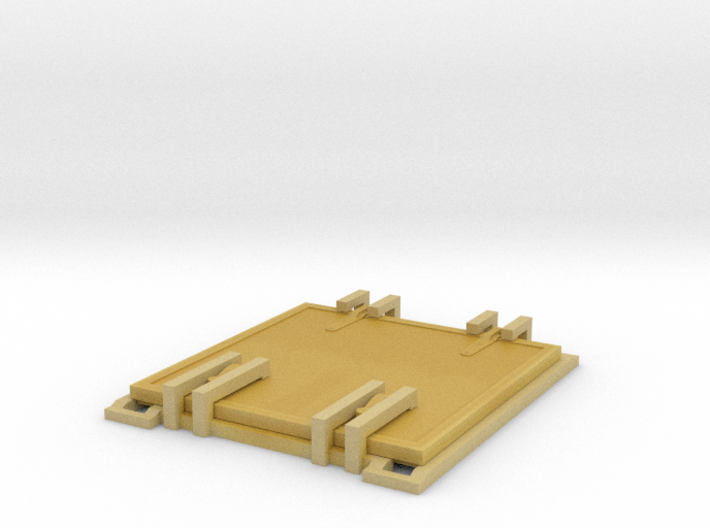
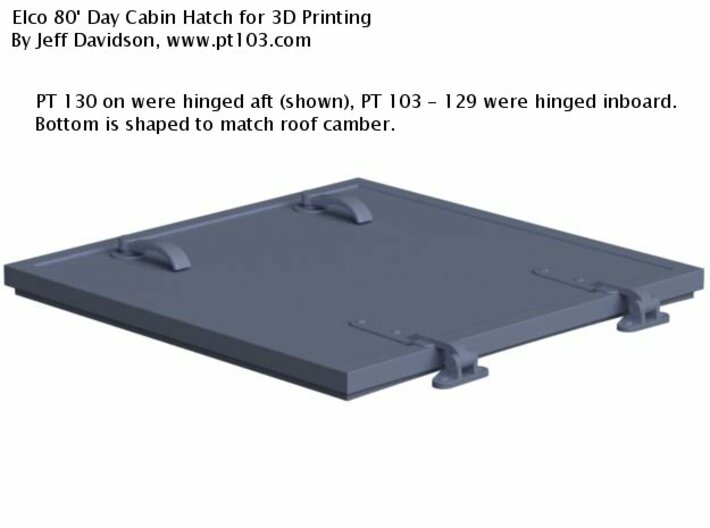
This model is based on detailed Elco drawings for all Elco 80' boats and is specific to PT's 130 on which opened to the aft. Hatches on PT's 103 - 129 were hinged inboard and opened towards the mast. Since the hatch and hinge bottoms are curved to match the roof camber for aft opening, and difficult to modify for side opening without breaking the hinges, they would not be strictly scale for these earlier boats.
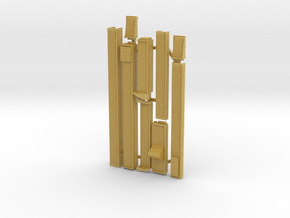
All outside surfaces are scale except for minimal thickening of the hinge bases and handles to meet printing minimums. The sprue cage is not attached to the hatch so no trimming will be needed. Be careful with the hinges and handles, they are thin and fragile.
Preparation
The first step is to clean all parts thoroughly. Handle very carefully as the plastic is brittle. Please see the guide and links here: http://www.pt103.com/3D_Printed_PT_Boat_Parts.html. For best painting results be sure to follow cleaning with a UV cure from a lamp with the correct output, or the sun.
Check that the hatch is slightly loose in the sprue cage and not "glued" in by leftover support wax used in the printing process. If you used an ultrasonic cleaner as recommended this should not be a problem.
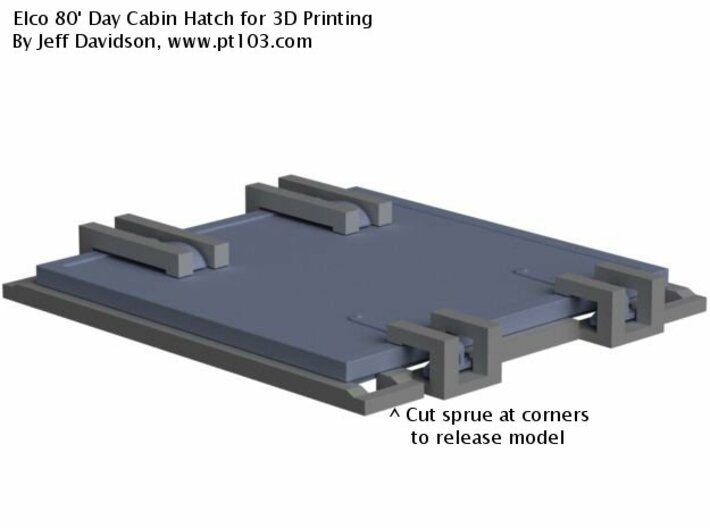
Cut the sprue on either side of the handles at the cut points indicated in the image above (with the Shapeways preview renders). Remove the cut piece carefully by sliding it out enough to clear the edge of the hatch top and lift off. Carefully slide the hatch out of the remaining sprue, cut the sprue at either side of the hinges if needed.
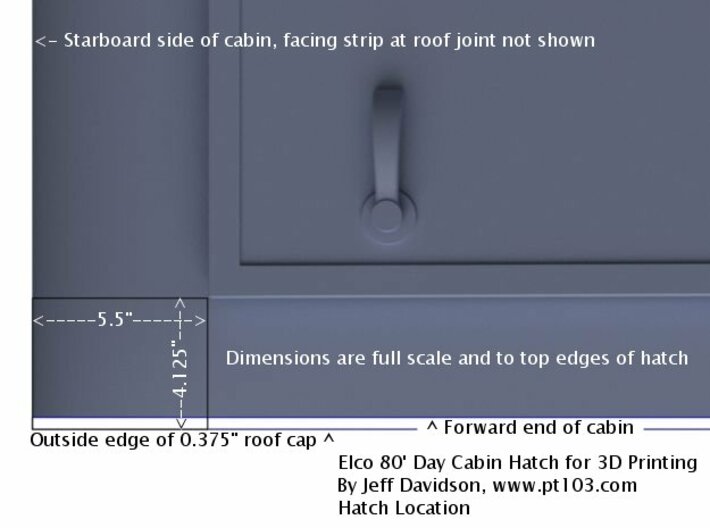
Location
See the image above that is included with the Shapeways preview renders. When attaching to your model, gluing the hinge bases also will help keep them from breaking.
For further details, please see this page: http://www.pt103.com/PT_Boat_Components_Day_Room_Cabin_Trunk.html.
All outside surfaces are scale except for minimal thickening of the hinge bases and handles to meet printing minimums. The sprue cage is not attached to the hatch so no trimming will be needed. Be careful with the hinges and handles, they are thin and fragile.
Preparation
The first step is to clean all parts thoroughly. Handle very carefully as the plastic is brittle. Please see the guide and links here: http://www.pt103.com/3D_Printed_PT_Boat_Parts.html. For best painting results be sure to follow cleaning with a UV cure from a lamp with the correct output, or the sun.
Check that the hatch is slightly loose in the sprue cage and not "glued" in by leftover support wax used in the printing process. If you used an ultrasonic cleaner as recommended this should not be a problem.
Cut the sprue on either side of the handles at the cut points indicated in the image above (with the Shapeways preview renders). Remove the cut piece carefully by sliding it out enough to clear the edge of the hatch top and lift off. Carefully slide the hatch out of the remaining sprue, cut the sprue at either side of the hinges if needed.
Location
See the image above that is included with the Shapeways preview renders. When attaching to your model, gluing the hinge bases also will help keep them from breaking.
For further details, please see this page: http://www.pt103.com/PT_Boat_Components_Day_Room_Cabin_Trunk.html.
Details
What's in the box:
Day Cabin Hatch 16th

Dimensions:
Success Rate:
First To try.
What's this?
Rating:
Mature audiences only.
