
Gray PA12

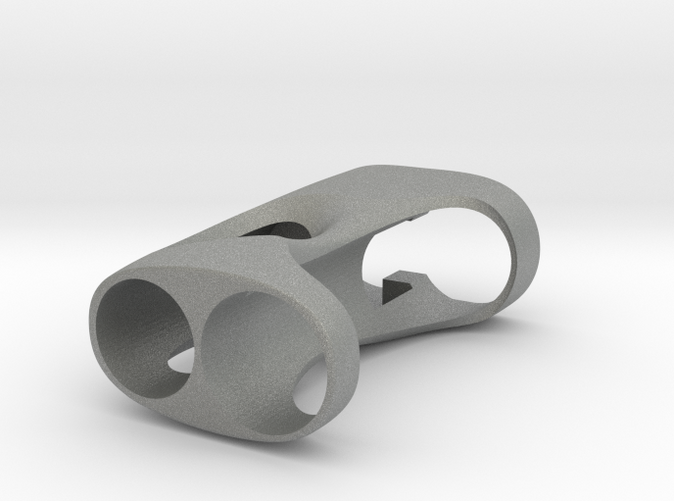
Y_mod_M V1.0 (Mosfet) Body Only
Made by
Print With Shapeways
 Choose Your Material
 Choose your color and finish
$39.33
Have a question about this product?
contact the designerYou must be logged in and verified to contact the designer.
Product Description
Ver 1.0 (18650 Battery / 16mm 510)
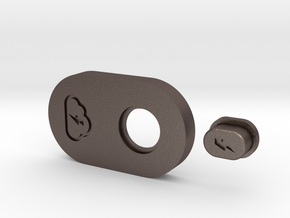
Y-mod_M is a self-build mosfet squonk mod that relies on off-the-shelf components. It is made up of four parts: the body, the top plate and the fire button. The top plate includes a mosfet tray for a board of your choosing. Only the body is included here so please see links below for other parts.
Dimensions: H77mm x W47mm x D27.5mm
Fits 18.5mm maximum diameter bottles (round)
FOR ADVANCED USERS ONLY – REFER TO OTHER SOURCES FOR UNDERSTANDING OHMS LAW AND BATTERY SAFETY. NOT FOR BEGINNERS. SOLDERING AND WIRING REQUIRED. SAFETY ALWAYS COMES FIRST!
WHAT IS INCLUDED
1. Body of the mod that holds battery and bottle
YOU WILL ALSO NEED
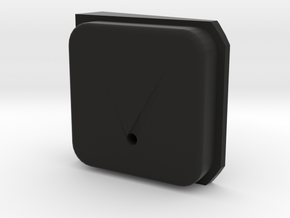
2. Top Plates (choose one):
- Y_mod_M V1.0 (Clickfet) Top Plate and Button for ModDog Nano V2 16mm
- Y_mod_M V1.0 (Switchfet) Top Plate and Button for ModDog Nano V2 16mm - SOON
- Y_mod_M V1.0 (BomberPro) Top Plate and Button for ModDog Nano V2 16mm - SOON
- Y_mod_M V1.0 (Titan) Top Plate and Button for ModDog Nano V2 16mm
3. Other Parts You Need (Third Party):
- ModDog Nano Series V2 510 Connector 16 BF OR ModMaker's MM510 Micro
- Solder Tabs for ModDog Nano Series V2 OR for MM510 Micro
– ModDog 18650 Battery Tube
- M2.5 Hex Machine Screws (8mm) AND Knurled Insert Nut (5mm) from Ebay OR from ModMaker (screw / nut)
- Helukabel SIF 18AWG Wire (Black + Red) OR any other 18AWG wire (see board manufacturer recomendations)
NOTE: If ModDog Nano V2 are not available in 16mm on their store, you can get any other size (22mm/18mm) and one of their top 16mm plates in Silver, Black or Gold.
Full bundle of parts also available for purchase from Stealthvape - SOON
4. Boards (Third Party):
- Clickfet V1 from ModMaker
- Switchfet V2.5 from ModMaker
- Bomber Pro from Tuttaltrofumo
- Titan V1
Recomended Bottles:
- Stealthvape Goldilocks Bottle 7.15ml - 46mm X 18.5mm Black
Optional:
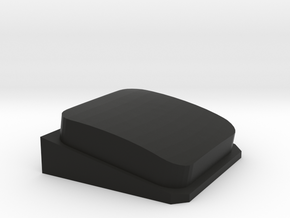
- Y_mod_M V1.0 (Mosfet) Button Only (if you want another colour or material)
BUILDING THE MOD
- Push screw inserts into the holes in the body of the mod (may need to use super glue if they don't stay in place).
- Solder wires to mosfet leaving enough wire to cut later
- Place the mosfet in the tray in position so the holes line up
- Solder ground from the board to the negative solder tab on the 510.
- Assemble 510 in the top plate with the negative solder tab in place
- Disasembe the ModDog tube so only the positive contact is by itself
- Feed the battery tube insulator through the wire before soldering both positive connection to positive on the battery tube
- Measure all the wires to ensure there is enough lengh and also for bend.
- Solder positive from the board to positive on the battery tube
- Solder positive from the battery tube to positive solder tab on the 510
- Solder Negative from the board to the negative on the battery tube (check orientation of the battery tube to ensure the grub screw is in the right position and it is the right negative solder point)
- Attach soldered positive solder tab onto the 510 and screw down the nut.
- You should now have all the parts soldered in the top plate with that battery tube also assembled.
- Locate the fire button in the body
- Insert the top plate with the battery tube into the body from the top
- Screw the top plate into the body (do not overtighten the screws since they'll pull the plugs out of their holes). Please also ensure there are no wires in the way of the screws.
- Fix the battery tube into place by using the grub screw provided.
- Your mod is now complete.
Making of photos and parts documentation is available here.
Need more help? Join the Facebook Group.
CAUTION/NOTES
TOLERANCES: If you find that there is some tolerances issues like for example the fire button doesn't smoothly go through the opening, please do not sand it, its just residue from the 3d printing and will smooth out after use. Simply running the button through the opening a few times will sort this out.
FIXING THE 510: I also recommend using MM 510 510 Tightening Kit or ModDog 510 Assembling Tool with 510 Connectors Wrench Keychain otherwise you may lock up your atty in 510 as you are screwing down the 510.
SAFETY: Even though there are locks on this mod safety always comes first. Liquid likes to get into places if your are not careful and can bridge contacts. Always REMOVE BATTERY FROM YOUR MOD WHEN NOT IN USE – which is the only way to ensure 100% safety.
Q/A
Q: Do I have to use ModDog 510 and their Battery Tubes?
A: Yes for the battery tubes, but you can try alternative 510s as long as they are M10 (the neck of the 510 is 10mm) and 16mm plate at the top. The space inside for the 510 is limited so larger 510s simply can't fit.
Q: Can I change the shell keeping all the electronics as they were
A: Yes. It was designed so it could be ported from shell to shell. 3D Printing is not very costly (not like C&C mill or hand work) so once you decide to change the mod design or colour you can do that w/o having to re-do your soldering, etc.
Q: Can I buy all the parts as one bundle?
A: We are working closley with Stealthvape to make these happen on regular bases. Please join the Cloud Laboratory Facebook Group for updates.
Q: The juice has gone inside the mod and into the board area. What do I do?
A: Remove battery, disasemble the mod by removing the top plate with the battery tube from the body of the mod. Rinse eveything including the electronics with warm water, leave to dry over night and put it all back together again. Should be good to go.
IMPROVEMENTS PLANNED
V1.1
- None at the moment
Y-mod_M is a self-build mosfet squonk mod that relies on off-the-shelf components. It is made up of four parts: the body, the top plate and the fire button. The top plate includes a mosfet tray for a board of your choosing. Only the body is included here so please see links below for other parts.
Dimensions: H77mm x W47mm x D27.5mm
Fits 18.5mm maximum diameter bottles (round)
FOR ADVANCED USERS ONLY – REFER TO OTHER SOURCES FOR UNDERSTANDING OHMS LAW AND BATTERY SAFETY. NOT FOR BEGINNERS. SOLDERING AND WIRING REQUIRED. SAFETY ALWAYS COMES FIRST!
WHAT IS INCLUDED
1. Body of the mod that holds battery and bottle
YOU WILL ALSO NEED
2. Top Plates (choose one):
- Y_mod_M V1.0 (Clickfet) Top Plate and Button for ModDog Nano V2 16mm
- Y_mod_M V1.0 (Switchfet) Top Plate and Button for ModDog Nano V2 16mm - SOON
- Y_mod_M V1.0 (BomberPro) Top Plate and Button for ModDog Nano V2 16mm - SOON
- Y_mod_M V1.0 (Titan) Top Plate and Button for ModDog Nano V2 16mm
3. Other Parts You Need (Third Party):
- ModDog Nano Series V2 510 Connector 16 BF OR ModMaker's MM510 Micro
- Solder Tabs for ModDog Nano Series V2 OR for MM510 Micro
– ModDog 18650 Battery Tube
- M2.5 Hex Machine Screws (8mm) AND Knurled Insert Nut (5mm) from Ebay OR from ModMaker (screw / nut)
- Helukabel SIF 18AWG Wire (Black + Red) OR any other 18AWG wire (see board manufacturer recomendations)
NOTE: If ModDog Nano V2 are not available in 16mm on their store, you can get any other size (22mm/18mm) and one of their top 16mm plates in Silver, Black or Gold.
Full bundle of parts also available for purchase from Stealthvape - SOON
4. Boards (Third Party):
- Clickfet V1 from ModMaker
- Switchfet V2.5 from ModMaker
- Bomber Pro from Tuttaltrofumo
- Titan V1
Recomended Bottles:
- Stealthvape Goldilocks Bottle 7.15ml - 46mm X 18.5mm Black
Optional:
- Y_mod_M V1.0 (Mosfet) Button Only (if you want another colour or material)
BUILDING THE MOD
- Push screw inserts into the holes in the body of the mod (may need to use super glue if they don't stay in place).
- Solder wires to mosfet leaving enough wire to cut later
- Place the mosfet in the tray in position so the holes line up
- Solder ground from the board to the negative solder tab on the 510.
- Assemble 510 in the top plate with the negative solder tab in place
- Disasembe the ModDog tube so only the positive contact is by itself
- Feed the battery tube insulator through the wire before soldering both positive connection to positive on the battery tube
- Measure all the wires to ensure there is enough lengh and also for bend.
- Solder positive from the board to positive on the battery tube
- Solder positive from the battery tube to positive solder tab on the 510
- Solder Negative from the board to the negative on the battery tube (check orientation of the battery tube to ensure the grub screw is in the right position and it is the right negative solder point)
- Attach soldered positive solder tab onto the 510 and screw down the nut.
- You should now have all the parts soldered in the top plate with that battery tube also assembled.
- Locate the fire button in the body
- Insert the top plate with the battery tube into the body from the top
- Screw the top plate into the body (do not overtighten the screws since they'll pull the plugs out of their holes). Please also ensure there are no wires in the way of the screws.
- Fix the battery tube into place by using the grub screw provided.
- Your mod is now complete.
Making of photos and parts documentation is available here.
Need more help? Join the Facebook Group.
CAUTION/NOTES
TOLERANCES: If you find that there is some tolerances issues like for example the fire button doesn't smoothly go through the opening, please do not sand it, its just residue from the 3d printing and will smooth out after use. Simply running the button through the opening a few times will sort this out.
FIXING THE 510: I also recommend using MM 510 510 Tightening Kit or ModDog 510 Assembling Tool with 510 Connectors Wrench Keychain otherwise you may lock up your atty in 510 as you are screwing down the 510.
SAFETY: Even though there are locks on this mod safety always comes first. Liquid likes to get into places if your are not careful and can bridge contacts. Always REMOVE BATTERY FROM YOUR MOD WHEN NOT IN USE – which is the only way to ensure 100% safety.
Q/A
Q: Do I have to use ModDog 510 and their Battery Tubes?
A: Yes for the battery tubes, but you can try alternative 510s as long as they are M10 (the neck of the 510 is 10mm) and 16mm plate at the top. The space inside for the 510 is limited so larger 510s simply can't fit.
Q: Can I change the shell keeping all the electronics as they were
A: Yes. It was designed so it could be ported from shell to shell. 3D Printing is not very costly (not like C&C mill or hand work) so once you decide to change the mod design or colour you can do that w/o having to re-do your soldering, etc.
Q: Can I buy all the parts as one bundle?
A: We are working closley with Stealthvape to make these happen on regular bases. Please join the Cloud Laboratory Facebook Group for updates.
Q: The juice has gone inside the mod and into the board area. What do I do?
A: Remove battery, disasemble the mod by removing the top plate with the battery tube from the body of the mod. Rinse eveything including the electronics with warm water, leave to dry over night and put it all back together again. Should be good to go.
IMPROVEMENTS PLANNED
V1.1
- None at the moment
Details
What's in the box:
Y_mod_M_V1_b2_Body
Dimensions:
Success Rate:
First To try.
What's this?
Rating:
Mature audiences only.

More From This Shop
$35.00