Clear Ultra Fine Detail Plastic

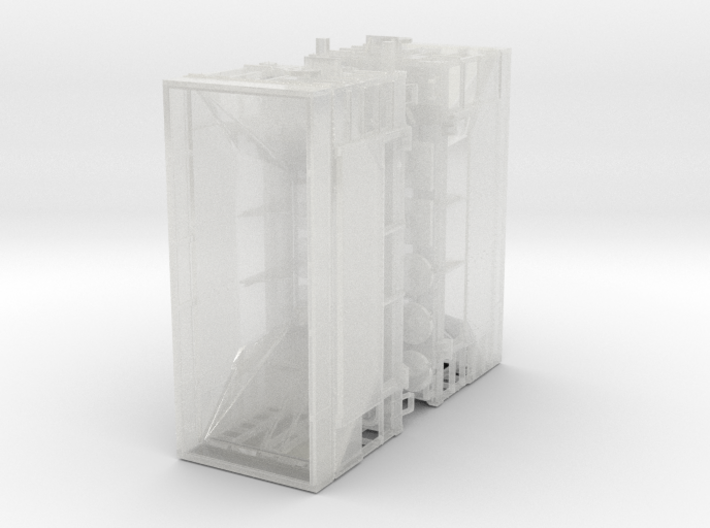
MILW Ore Car Two Pack, N Scale
Made by
Print With Shapeways
 Choose Your Material
 Choose your color and finish
$38.85
Have a question about this product?
contact the designerYou must be logged in and verified to contact the designer.
Product Description
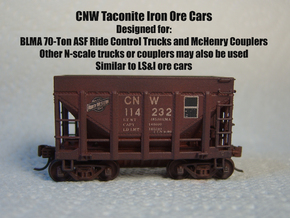
These are Milwaukee Road ore cars with taconite extensions. Used on the haul between the Groveland Mine and the port at Escanaba MI. The Milwaukee Road would interchange this train with the CNW at Antoine yard in Iron Mountain MI. MILW and CNW ore cars would be mixed in the train together. These cars often ended up on the Marquette Range as well during this era.
Trucks and couplers must be purchased separately. BLMA 70-Ton ASF A-3 Ride Control N-scale trucks or Micro Trains Dalman trucks are recommended. The Dalman trucks are the most correct but will require the truck mounted coupler to be trimmed. This listing is for two cars. They come attached to a sprue along with coupler covers and truck attachment pegs. A spare coupler cover and truck peg for each car are included.
Cleaning, Painting, and Assembly:
1. Using a small plastic container, immerse in a "Purple Brand" engine degreaser (brand names: Purple Power, Super Clean, etc). Wear gloves and eye protection. Allow to sit for one hour. Gently brush sides with soft brush. Remove and carefully rise with fresh water. Allow to dry for 24 hours.
2. Remove cars from sprue by carefully snipping or cutting near the bolsters. Trim or file bolster smooth. Remove sprues with coupler covers and truck pegs and set aside.
3. Apply a drop or two of very thin CA glue to each stirrup, allow to soak in. This will help prevent breakage during handling. You can also use the same technique for corner posts or other fine details. It is very important to do this especially if your model was printed vertically as the model sits. You will be able to tell because the print lines will be horizontal. This tends to make vertical details more fragile. Think of it as the grain in a piece of wood. A long detail like a ladder or a stirrup is stronger when its length is with the grain, weaker when the length is across the grain. By impregnating the detail with thin CA glue you create a composite material by bonding the layers (or "grain") more tightly together. Dimples have been provided on the two corners above the ladders. If you wish, these can be drilled out with a #80 drill and separate wire grab irons can be glued in place. There are four grabs on each corner. See photo. The grabs are a scale 18 inches wide.
4. Lightly apply primer and allow to dry. Examine car and carefully sand or trim any flashing or roughness. Prime again, paint, and apply decals. Paint truck peg and coupler cover sprue at this time.
5. Remove truck pegs and coupler covers from sprue. Install couplers and covers. Apply thick CA to corners to secure coupler cover. Before securing trucks in place, test them to ensure free movement. Wheels with large flanges may contact the frame. Low-profile wheels will work better. Once good operation has been ensured, position trucks and press peg in place. Do not press all the way in, leave a small gap for side to side and rotational movement. No glue is needed for truck pegs, friction will hold them in place. If there is paint in the hole and the peg will not fit, gently wallow it out with a tooth-pick or an appropriately sized small drill bit.
Note: If you find the car is too light, secure lead shot in bottom of hopper. Low temperature cerro type alloys can also be poured into the hopper. Only use as much as necessary to provide good operation.
Details
What's in the box:
MILW Ore Car Two Pack, N Scale

Dimensions:
Success Rate:
First To try.
What's this?
Rating:
Mature audiences only.

More From This Shop

$119.73

