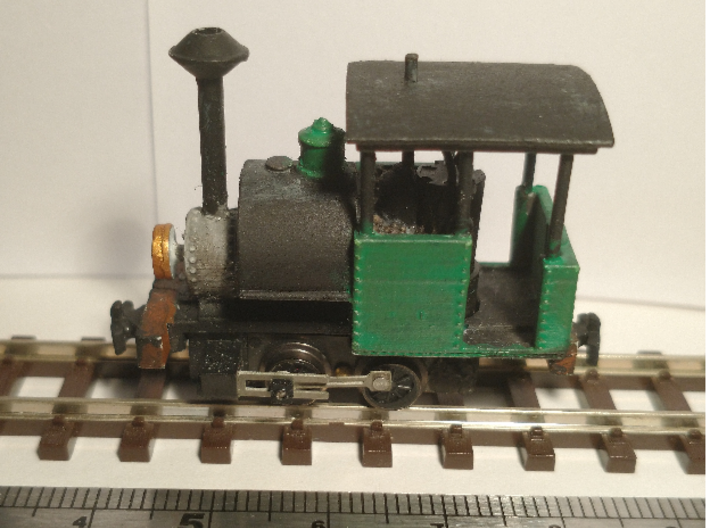

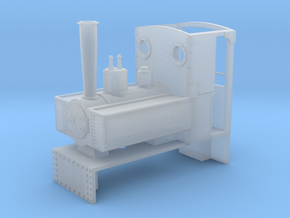
Product Description
This is a model kit for a plantation style porter locomotive for US outline narrow gauge railways. The model features an open walled cab and smoke arrester type chimney. The kit requires additional parts for a complete running locomotive.
The kit additionally requires :
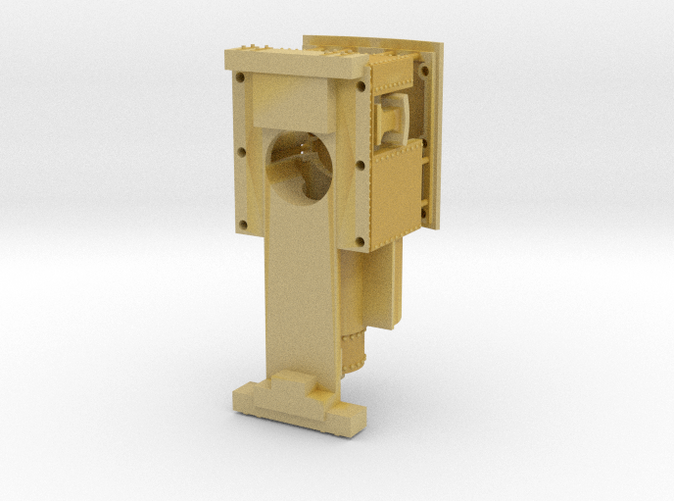
The kit requires the removal of the roof, couplers and chimney top from the suports within the supplied kit. remove the supports completly and file them down flush .
The couplers included are slightly oversized and can be reduced with a file to suit your needs. Or if you prefer you can use your own.
Once the parts are removed, cut a 18mm legth of 2mm diameter tube. fit one end into the spark arrester, and the other into the smokebox hole. secure with super glue/CA glue. the entire chimney should measure 18mm from the top of the smokebox to the top of the spark arester.
test fit the chassis. you will notice that the front clip will need to be removed, during the test fitting mark where the front clip of the chassis need cutting, remove and cut on the mark with clippers. File to smooth the end. The hole in the cab may need also widening, dependant on how and if you fitted the resistor. Use modelling files to increase the motor hole if neccisarry.
Turn the chassis on its front face so that you can see down into the boiler cavity. Use liquid gravity or liquid lead and fill the boiler cavity level to the edge of the motor hole. secure with super glue. DO NOT use PVA glue as it can react with lead products. Ensure that hands are washed and surfaces cleaned when using lead products.
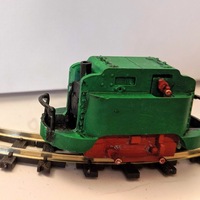
Cut 5x 12mm legths and 2 x 14mm legths of 1mm rod. fit into the holes on the cab walls with the 2 14mm rods in the back wall. the holes may need drilling or reaming out. Dry fit the roof ensuring that it is level. if it is not level adjust the depth of the holes in the cab walls or trim the rods. i set mine so that the apex of the roof is 13mm from the back wall of the cab. once happy with teh height and level, secure with super glue.
The couplers can be glued to the buffer beams at your preffered hight. these are designed to be oversized to that you can file them down to fit your requirements.
If you do not choose to fit a resistor to the chassis, check the voltages before you run the locomotive.
Aditional recomended modifications for improved running:
The kit additionally requires :
- a U-KOPPEL A - Tsugawa Yokou #14036 chassis
- approximatly 15cm of 1mm metal wire (steel or brass)
- 2cm of 2mm metal tube
- Liquid gravity or liquid lead.
The kit requires the removal of the roof, couplers and chimney top from the suports within the supplied kit. remove the supports completly and file them down flush .
The couplers included are slightly oversized and can be reduced with a file to suit your needs. Or if you prefer you can use your own.
Once the parts are removed, cut a 18mm legth of 2mm diameter tube. fit one end into the spark arrester, and the other into the smokebox hole. secure with super glue/CA glue. the entire chimney should measure 18mm from the top of the smokebox to the top of the spark arester.
test fit the chassis. you will notice that the front clip will need to be removed, during the test fitting mark where the front clip of the chassis need cutting, remove and cut on the mark with clippers. File to smooth the end. The hole in the cab may need also widening, dependant on how and if you fitted the resistor. Use modelling files to increase the motor hole if neccisarry.
Turn the chassis on its front face so that you can see down into the boiler cavity. Use liquid gravity or liquid lead and fill the boiler cavity level to the edge of the motor hole. secure with super glue. DO NOT use PVA glue as it can react with lead products. Ensure that hands are washed and surfaces cleaned when using lead products.
Cut 5x 12mm legths and 2 x 14mm legths of 1mm rod. fit into the holes on the cab walls with the 2 14mm rods in the back wall. the holes may need drilling or reaming out. Dry fit the roof ensuring that it is level. if it is not level adjust the depth of the holes in the cab walls or trim the rods. i set mine so that the apex of the roof is 13mm from the back wall of the cab. once happy with teh height and level, secure with super glue.
The couplers can be glued to the buffer beams at your preffered hight. these are designed to be oversized to that you can file them down to fit your requirements.
If you do not choose to fit a resistor to the chassis, check the voltages before you run the locomotive.
Aditional recomended modifications for improved running:
- to add a resistior in series with the motor. i have used 220OHM but you should double check
- (advanced) to replace the motor wit a 12v coreless motor (0615S) from tramfabrik https://tramfabriek.nl/motors.html
Details
What's in the box:
porter plantation cab shapeways v2
Dimensions:
porter plantation cab shapeways
Dimensions:
Success Rate:
First To try.
What's this?
Rating:
Mature audiences only.
More From This Shop
$20.18
$29.32