Gray PA12


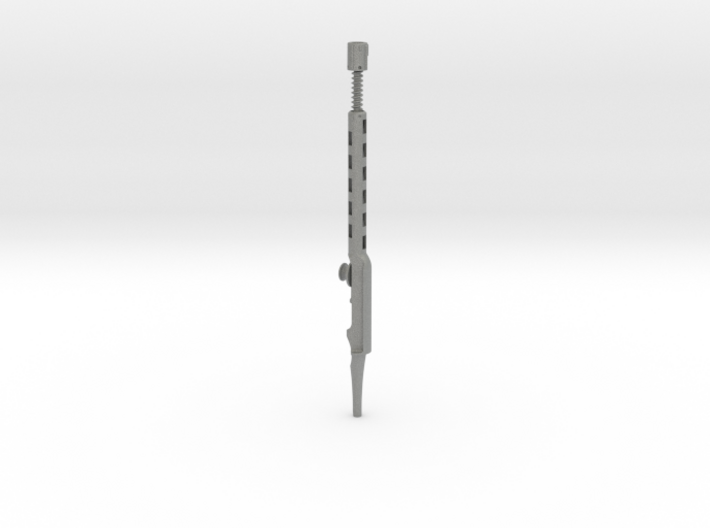
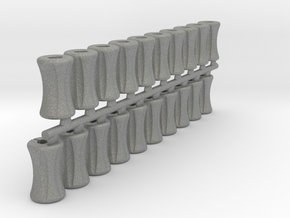
04: Fragment Removal Loop-Holder "Csögör"
Made by
Print With Shapeways
 Choose Your Material
 Choose your color and finish
$61.14
Have a question about this product?
contact the designerYou must be logged in and verified to contact the designer.
Product Description
Fragment Removal Loop Holder "Csögör"
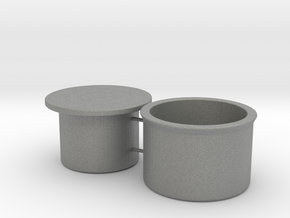
One not dismountalbe Instrument of three movable parts; (Colour gray)
Further information about the accessories in this shop available can be found on my homepage in German:
https://www.csoegoer.de/fragmententfernung-griff-nach-csoegoer
Please separate the three nested parts from each other by breaking the two thin intern connecting bars. (Remove them e.g. with a fingernail clipper and overcast these areas.)
Please don't try to break the three moving and nested parts into three separate pieces. So the three parts can then move against each other, but are not lost.
Please watch my YouTube-Video for correct ergonomic preparation.
Please watch these YouTube-videos for correct treatment. Since I don't have any videos of my own on removing fragments using the loop technique, I recommend the following cases / videos:
http://www.fragremover.com/deutsch/faelle/
https://www.youtube.com/watch?v=ptpVlHPVo8U
Required or optional accessories listed below are not included:
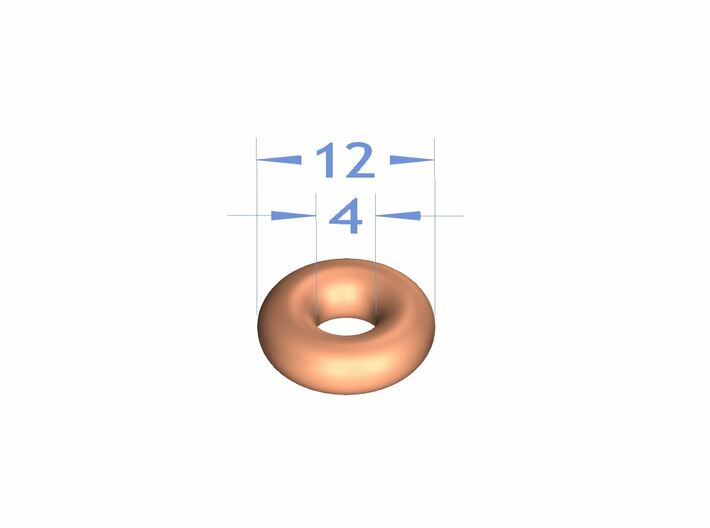
Sealing ring / O-ring 4x4
At least You need one sealing ring 4-4 for fixation (not included).
technical O-rings, 4x4: extern:
e.g.: 8-9 pieces a € 0,70:
https://www.hug-technik.com/shop/product_info.php?info=p20040
food safe O-rings, 4x4: extern:
e.g.: https://www.o-ring.de/search.html?searchStr=191888 (exkl. VAT, Shipping, 13.01.2021)
5 pieces: € 20,00
10 pieces: € 26.16
100 pieces: € 98,98
-----------------------------------------------------------------------------------
1 Sealing Ring 3 € + shipping (within Germany) 8 €
4 Sealing Ring 10 € + shipping (within Germany) 8 €
8 Sealing Ring 16 € + shipping (within Germany) 8 €
(excl. VAT) --- Only for these food-safe O-rings: Please feel free to contact me.
-----------------------------------------------------------------------------------
Wire-Loops
per fragment removal exercise You need one pre-mounted or one self-mounted canulla-holded wire-loop:
In the "FragRemover" (R) you need a good 90 cm of wire, in the fragment removal handle "Csögör" only 35 cm!
pre-mounted Wire-Loops:
https://fragteam.myshopify.com/collections/all
self-mounted Wirel-Loops - necessary equipment:
Wire:
0,150 mm for Canulla 6012 https://fragteam.myshopify.com/products/wirespool-heavy
0,100 mm for Canulla 6030 https://fragteam.myshopify.com/products/copy-of-wirespool-thin
0,075 mm for Canulla 6031 ----
https://fragteam.myshopify.com/collections/all
Heating wire for exercise on extracted teeth - at the suggestion of Dr. U. Wesselowsky and D. Calenberg.
Wires (V4A stainless steel, 317L) can be obtained from e.g. zivipf.com. But they are softer and bend, stretch, tear more easily and behave differently than the harder drawn original wires.
Relevant diameters are (mm): 0.08, 0.10, 0.12, 0.16
Canulla:
https://www.sulzer.com/en/shared/products/blunt-endo-needles
23G 0,6 mm x 23 mm (blue) 6012
https://www.aera-online.de/Asps/Artikel.asp?ArtikelID=541814&gRetURL=620962980
27G 0,4 mm x 23 mm (blue) 6030
https://www.aera-online.de/Asps/Artikel.asp?gArtikelID=491966&gRetURL=620967592
30G 0,3 mm x 23 mm (green) 6031
https://www.aera-online.de/Asps/Artikel.asp?gArtikelID=491967&gRetURL=620966889
You might want to use the loop holders
04: Storage for Canula-Wire-Loop, 3 pieces (2ZHXPASJC) by acs_sw (shapeways.com)
04: Storage for Canula-Wire-Loop, 7 pieces (YC5MDBTAB) by acs_sw (shapeways.com)
04: Storage for "FR" Canula-Wire-Loop, 3 pieces (T9NPVN64F) by acs_sw (shapeways.com)
04: Storage for "FR" Canula-Wire-Loop, 7 pieces (5JWLJG6EF) by acs_sw (shapeways.com)
If you do not order the loop holder, please hang a paper clip in the needle-wire loop combination. This prevents the wire loop from being drawn into the cannula due to the required wire tension during assembly on the handle.
and other accessories too.
04: Threading Core for Cannula-Wire-Loop (D7EDCYQNH) by acs_sw (shapeways.com)
04: Handles for self-centering bolt cutter (HLR86WXJW) by acs_sw (shapeways.com)
assembly Instructions
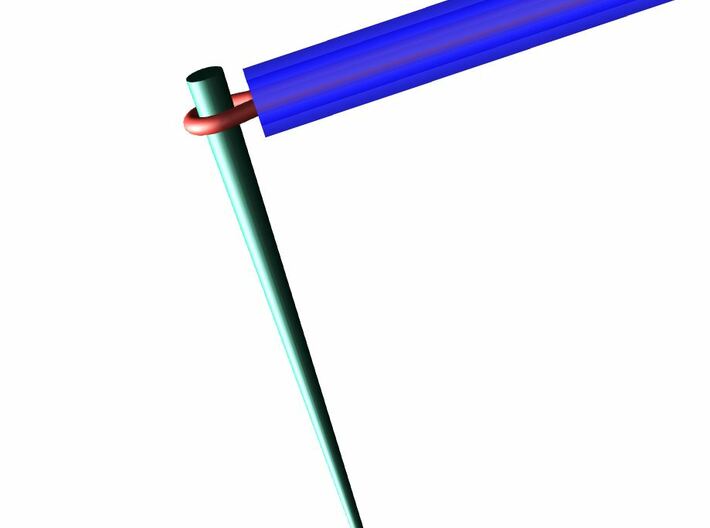
Before you can mount the wire loop / cannula combination on the fragment removal handle, the loop must be secured before the wire can be tightened to prevent it from slipping into the cannula. Ideally with the loop holder available here, which also protects the wire from kinking and ensures it can be unhooked from the loop safety device.
(You can also put a round toothpick or old diamond drill shaft into the loop, but you have to secure it there again and the wire could be easily kinked during further assembly.)
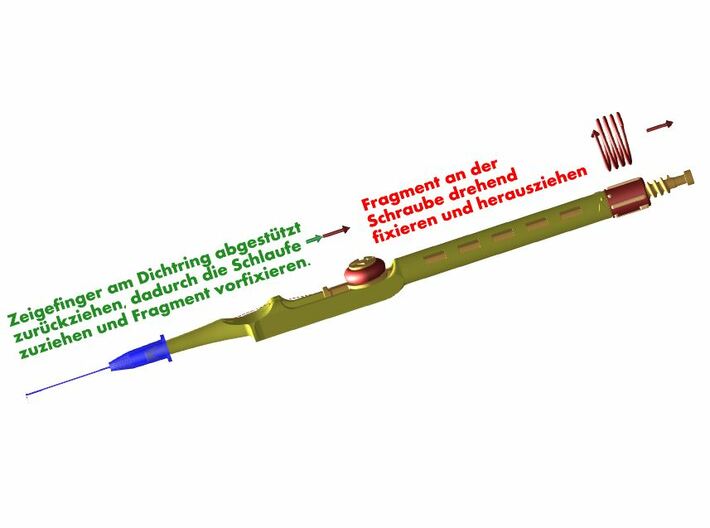
- To assemble, attach the cannula-wire combination to the front of the handle without pinching the wire, which should therefore lie loosely in the longitudinal groove.
- Grasp the free end of the wire (ideally on the light-cured retaining button), tighten slightly, align it in the longitudinal groove and hang it under the hook (at the front of the threaded rod).
- While under tension, wrap it around the shaft of the sealing ring taut under the sealing ring at least four times in an anti-clockwise direction until the wire ends no longer stick out.
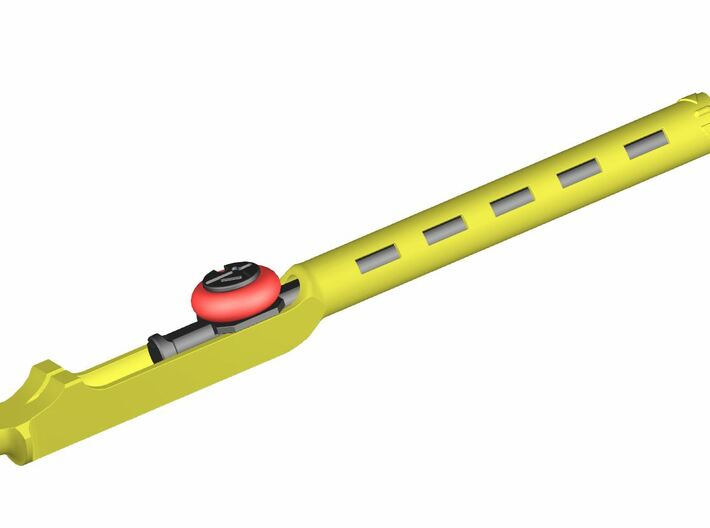
Handling
In the course of the fragment removal, the tension of the wire loop on the fragment can be checked on the exposed wire (in the area of the hollow) by pressing or plucking like a guitar string and corrected by adjusting the screw at the rear end of the handle. One turn of the screw corresponds to 2 mmand can also be dosed very precisely by the assistant with marks every 1/8 turn.
Further information about the accessories here in the shop can be found on my homepage:
https://www.csoegoer.de/fragmententfernung-griff-nach-csoegoer
One not dismountalbe Instrument of three movable parts; (Colour gray)
Further information about the accessories in this shop available can be found on my homepage in German:
https://www.csoegoer.de/fragmententfernung-griff-nach-csoegoer
Please separate the three nested parts from each other by breaking the two thin intern connecting bars. (Remove them e.g. with a fingernail clipper and overcast these areas.)
Please don't try to break the three moving and nested parts into three separate pieces. So the three parts can then move against each other, but are not lost.
Please watch my YouTube-Video for correct ergonomic preparation.
Please watch these YouTube-videos for correct treatment. Since I don't have any videos of my own on removing fragments using the loop technique, I recommend the following cases / videos:
http://www.fragremover.com/deutsch/faelle/
https://www.youtube.com/watch?v=ptpVlHPVo8U
Required or optional accessories listed below are not included:
Sealing ring / O-ring 4x4
At least You need one sealing ring 4-4 for fixation (not included).
technical O-rings, 4x4: extern:
e.g.: 8-9 pieces a € 0,70:
https://www.hug-technik.com/shop/product_info.php?info=p20040
food safe O-rings, 4x4: extern:
e.g.: https://www.o-ring.de/search.html?searchStr=191888 (exkl. VAT, Shipping, 13.01.2021)
5 pieces: € 20,00
10 pieces: € 26.16
100 pieces: € 98,98
-----------------------------------------------------------------------------------
1 Sealing Ring 3 € + shipping (within Germany) 8 €
4 Sealing Ring 10 € + shipping (within Germany) 8 €
8 Sealing Ring 16 € + shipping (within Germany) 8 €
(excl. VAT) --- Only for these food-safe O-rings: Please feel free to contact me.
-----------------------------------------------------------------------------------
Wire-Loops
per fragment removal exercise You need one pre-mounted or one self-mounted canulla-holded wire-loop:
In the "FragRemover" (R) you need a good 90 cm of wire, in the fragment removal handle "Csögör" only 35 cm!
pre-mounted Wire-Loops:
https://fragteam.myshopify.com/collections/all
self-mounted Wirel-Loops - necessary equipment:
Wire:
0,150 mm for Canulla 6012 https://fragteam.myshopify.com/products/wirespool-heavy
0,100 mm for Canulla 6030 https://fragteam.myshopify.com/products/copy-of-wirespool-thin
0,075 mm for Canulla 6031 ----
https://fragteam.myshopify.com/collections/all
Heating wire for exercise on extracted teeth - at the suggestion of Dr. U. Wesselowsky and D. Calenberg.
Wires (V4A stainless steel, 317L) can be obtained from e.g. zivipf.com. But they are softer and bend, stretch, tear more easily and behave differently than the harder drawn original wires.
Relevant diameters are (mm): 0.08, 0.10, 0.12, 0.16
Canulla:
https://www.sulzer.com/en/shared/products/blunt-endo-needles
23G 0,6 mm x 23 mm (blue) 6012
https://www.aera-online.de/Asps/Artikel.asp?ArtikelID=541814&gRetURL=620962980
27G 0,4 mm x 23 mm (blue) 6030
https://www.aera-online.de/Asps/Artikel.asp?gArtikelID=491966&gRetURL=620967592
30G 0,3 mm x 23 mm (green) 6031
https://www.aera-online.de/Asps/Artikel.asp?gArtikelID=491967&gRetURL=620966889
You might want to use the loop holders
04: Storage for Canula-Wire-Loop, 3 pieces (2ZHXPASJC) by acs_sw (shapeways.com)
04: Storage for Canula-Wire-Loop, 7 pieces (YC5MDBTAB) by acs_sw (shapeways.com)
04: Storage for "FR" Canula-Wire-Loop, 3 pieces (T9NPVN64F) by acs_sw (shapeways.com)
04: Storage for "FR" Canula-Wire-Loop, 7 pieces (5JWLJG6EF) by acs_sw (shapeways.com)
If you do not order the loop holder, please hang a paper clip in the needle-wire loop combination. This prevents the wire loop from being drawn into the cannula due to the required wire tension during assembly on the handle.
and other accessories too.
04: Threading Core for Cannula-Wire-Loop (D7EDCYQNH) by acs_sw (shapeways.com)
04: Handles for self-centering bolt cutter (HLR86WXJW) by acs_sw (shapeways.com)
assembly Instructions
Before you can mount the wire loop / cannula combination on the fragment removal handle, the loop must be secured before the wire can be tightened to prevent it from slipping into the cannula. Ideally with the loop holder available here, which also protects the wire from kinking and ensures it can be unhooked from the loop safety device.
(You can also put a round toothpick or old diamond drill shaft into the loop, but you have to secure it there again and the wire could be easily kinked during further assembly.)
- To assemble, attach the cannula-wire combination to the front of the handle without pinching the wire, which should therefore lie loosely in the longitudinal groove.
- Grasp the free end of the wire (ideally on the light-cured retaining button), tighten slightly, align it in the longitudinal groove and hang it under the hook (at the front of the threaded rod).
- While under tension, wrap it around the shaft of the sealing ring taut under the sealing ring at least four times in an anti-clockwise direction until the wire ends no longer stick out.
Handling
In the course of the fragment removal, the tension of the wire loop on the fragment can be checked on the exposed wire (in the area of the hollow) by pressing or plucking like a guitar string and corrected by adjusting the screw at the rear end of the handle. One turn of the screw corresponds to 2 mmand can also be dosed very precisely by the assistant with marks every 1/8 turn.
Further information about the accessories here in the shop can be found on my homepage:
https://www.csoegoer.de/fragmententfernung-griff-nach-csoegoer

Details
What's in the box:
9-3-Sch2-SWs4-032021-V3

Dimensions:
Success Rate:
First To try.
What's this?
Rating:
Mature audiences only.
