

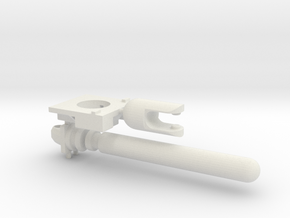
Trigger Extension - ASCU3
Made by
Print With Shapeways
 Choose Your Material
 Choose your color and finish
$7.81
Have a question about this product?
contact the designerYou must be logged in and verified to contact the designer.
Product Description
Deutsch
Einbau:
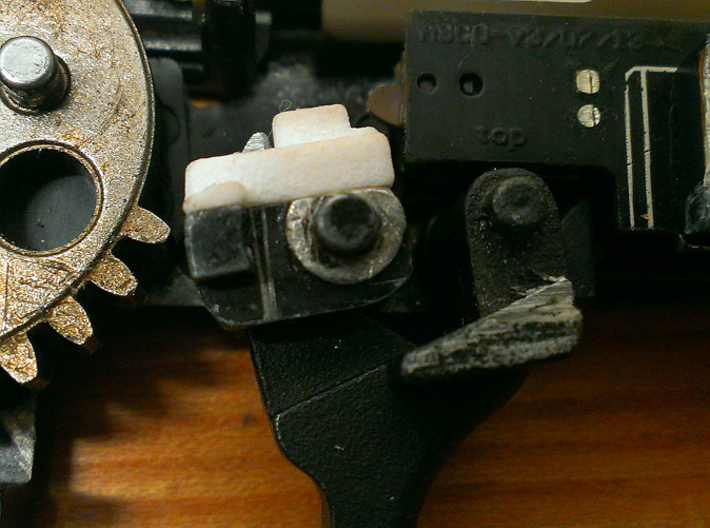
Achtung: Auf den Bildern sieht es aus als wäre ein Spalt zwischen innerem Trigger und dem ASCU Taster. Dies ist nur im bei geöffneter Gearbox der Fall. Wenn die Gearbox geschlossen wird, ist dieser Abstand nicht existent. In manchen Fällen kann es passieren, dass die Extension den Taster bereits unmittelbar nach dem Einbau drückt. Dies ist zu verstehen, imdem die ASCU ihren Kontroll Beep nach dem Anstecken an den Akku nicht von sich gibt. In diesem Fall ist die Gearbox nochmals zu zerlegen und die Extension vorsichtig zu kürzen bis dies nicht mehr der Fall ist. Ein erfahrener Airsoft-Techniker wird wissen was wie zu tun ist.
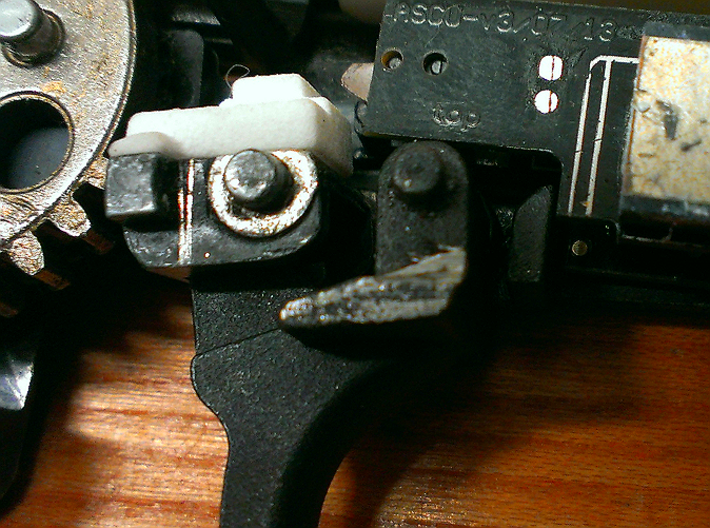
Ich verwende diesen Bauteil in meiner my E&L Version 2 AKSU in Kombination mit einer ASCU3 Gen3+ und er passte ohne Nachbearbeitung.
English
Installation:
Attention: In my pictures it looks like there is a gap between the extension and the ASCU's push-button, but when the gearboxshell is assembled, there will not be a gap any more. In some cases it can happen, that the extension already pushes the push-button after reassembling. You will understand this situation, when the ASCU does no more do its controll beep, when beeing attached to the accumulator. In this case, disassemble the gearbox again and gradually file down the trigger extension in its length until the push-button of the ASCU is no more already being pushed when assembling the gearbox shell. An experienced airsoft technician will understand how things need to be done.
I am using this on my E&L Version 2 AKSU in combination with an ASCU3 Gen3+ and it fitted immediately without the need of filing.
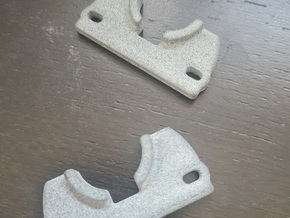
Dieser Bauteil hilft euch den Triggerweg eurer AK in Kombination mit einer ASCU auf ein Minimum zu reduzieren ohne dabei auf die mechanische Sicherung verzichten zu müssen.Nur für erfahrene Airsoft Techniker - Einpassen ggf. notwendig
Einbau:
- Flach feilen der Klebefläche des inneren Triggers.
- Reinigung der abgefeilten Oberfläche mit Bremsenreiniger.
- Reinigung der Unterseite der Triggerextension ebenso mit Bremsenreiniger.
- Zusammenkleben mittels Sekundenkleber, wie auf meinen Bildern zu sehen.
Achtung: Auf den Bildern sieht es aus als wäre ein Spalt zwischen innerem Trigger und dem ASCU Taster. Dies ist nur im bei geöffneter Gearbox der Fall. Wenn die Gearbox geschlossen wird, ist dieser Abstand nicht existent. In manchen Fällen kann es passieren, dass die Extension den Taster bereits unmittelbar nach dem Einbau drückt. Dies ist zu verstehen, imdem die ASCU ihren Kontroll Beep nach dem Anstecken an den Akku nicht von sich gibt. In diesem Fall ist die Gearbox nochmals zu zerlegen und die Extension vorsichtig zu kürzen bis dies nicht mehr der Fall ist. Ein erfahrener Airsoft-Techniker wird wissen was wie zu tun ist.
Ich verwende diesen Bauteil in meiner my E&L Version 2 AKSU in Kombination mit einer ASCU3 Gen3+ und er passte ohne Nachbearbeitung.
English
This part improves your AK's trigger response in combination with an ASCU to the minimum without losing the possibilty of using your AK's mechanical safety.Only for experienced Airsoft technicians - adaption may be necessary
Installation:
- File down the glue surface of the inner Trigger for a smooth and flat surface.
- Clean this surface thoroughly with brake cleaner.
- Clean the trigger extension's glue surface with brake cleaner.
- Use super glue and combine both parts like shown in my pictures.
Attention: In my pictures it looks like there is a gap between the extension and the ASCU's push-button, but when the gearboxshell is assembled, there will not be a gap any more. In some cases it can happen, that the extension already pushes the push-button after reassembling. You will understand this situation, when the ASCU does no more do its controll beep, when beeing attached to the accumulator. In this case, disassemble the gearbox again and gradually file down the trigger extension in its length until the push-button of the ASCU is no more already being pushed when assembling the gearbox shell. An experienced airsoft technician will understand how things need to be done.
I am using this on my E&L Version 2 AKSU in combination with an ASCU3 Gen3+ and it fitted immediately without the need of filing.
Details
What's in the box:
Trigger Extension - ASCU3
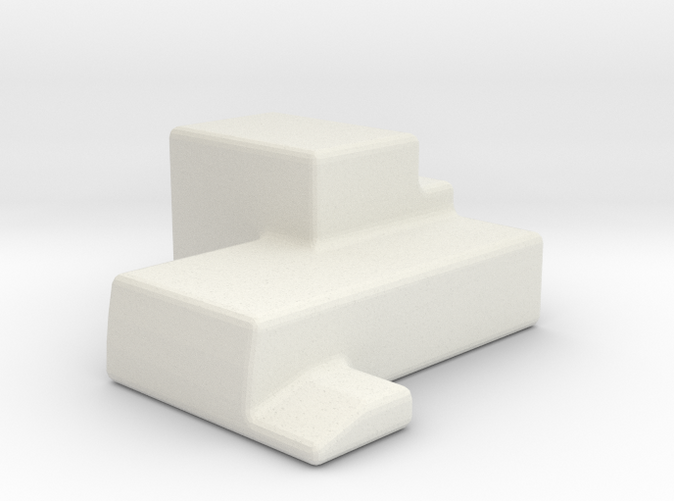
Dimensions:
Success Rate:
First To try.
What's this?
Rating:
Mature audiences only.
