Black PA12

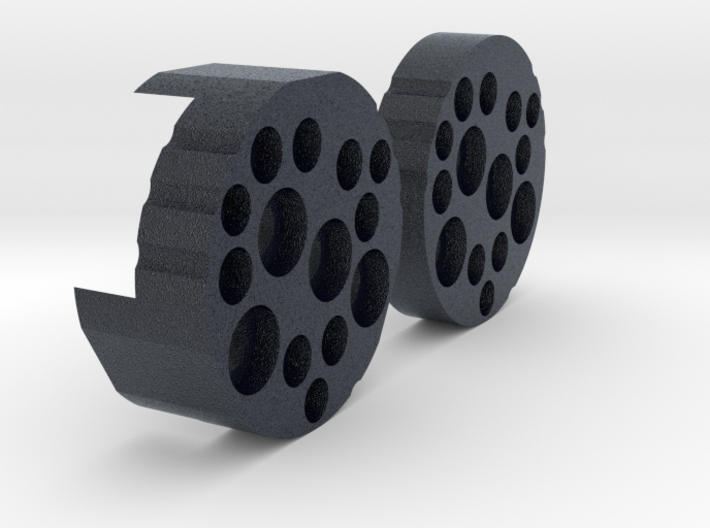
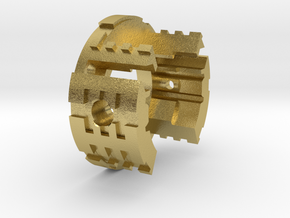
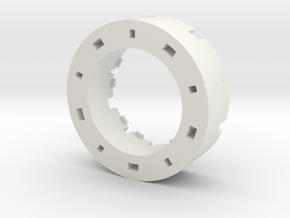
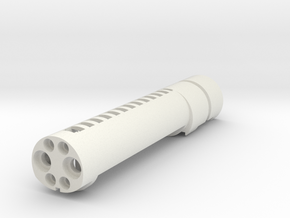
ForceLock Connector Master
Made by
Print With Shapeways
 Choose Your Material
 Choose your color and finish
$43.98
Have a question about this product?
contact the designerYou must be logged in and verified to contact the designer.
Product Description
This product is in the Beta testing phase. Become a part of the future! Share the tests you have conducted to our facebook page! Lets innovate together! https://www.facebook.com/DaviniumCustoms/
This is made to fit in a Graflex, vintage or replica, shell. This will fit the Solo's Hold Master Bladeholder, but it'll be up to you to design an innovative chassis system of your own to work in conjuction with these connectors. Awaken your inner innovator and get cracking!
You will need the following to create your ForceLock Connector (per side):
--4x Large Magnets. I recommend getting double what is required if this is your first time soldering onto magnets. https://www.kjmagnetics.com/proddetail.asp?prod=D5H1
--7x Small Magnets. I recommend getting double what is required if this is your first time soldering onto magnets. https://www.kjmagnetics.com/proddetail.asp?prod=D3H1
--3x Socket Screws 4-40 thread. I have purchased off of this seller in the past with great results. 1/2" thread length works perfectly. https://www.ebay.ca/usr/northenmoi?_trksid=p2057872.m2749.l2754
--1x e6000 glue
Instructions for soldering onto magnets:
HEAT WILL DESTROY THE MAGNETIC POTENTIAL ENERGY OF YOUR MAGNETS!!! USE CAUTION AND READ BELOW!!!
1. Prep the magnet. It is important to note which side you take note of the polarity, especially when creating the second half of your connector. You want the connectors to pull, not push.
2. Position the magnet in a tight holder. I prefer to use helping hands. This is especially important, since your soldering iron is ferrous, and the magnet will want to stick to it!
3. Dab a small amount of flux onto the center of the magnet. If your solder pools across the surface of the magnet, it will make the fit in the printed connector imperfect. If one magnet sticks out too far, it can jeopardize
the connection of other magnets.
4. Turn your soldering iron up to FULL HEAT. The goal here is like sticking your hand in a fire: it doesn't matter how hot the fire is, so long as your hand passes through for a mere moment.
5. Pre-tin your wires, and pre-tin your iron.
6. Get a glob of solder on the tip of your iron. If you attempt to solder the wire to the magnet conventionally using the spool of solder, it will likely cause trouble.
7. Position the wire on top of the flux. Line your iron directly above, making sure to hold a firm grip so that the magnet does not attract it. Quickly, and I mean VERY quickly, dab the iron onto the flux and immediately yank it off. Check the connection of the wire to the magnet.
8. Check that the magnet is still exerting a powerful magnetic force. If it isn't, best practice is to try again.
9. Once the magnet is soldered, get your e6000 ready. I use e6000 since it isn't brittle and is removable when necessary.
10. Run your wire through the hole in the connector. Dab a bit of e6000 around the rim of the hole. Place the magnet in the hole.
11. Holding the magnet down firmly, grab a business card or something of the like, and quickly swap it in place of your finger. Then, lay the holder on a table, applying firm pressure from the top, and slide the card out. Apply a generous amount of e6000 to the back of the hole where your magnet is. Allow it to sit AT LEAST 2hr until the glue is dry. The more magnets you have placed in the holder, the more difficult this will be.
12. Repeat steps 10-11 with all the magnets you have soldered. Note that you do not need to solder a wire to each magnet in the connector: work out how many wires you'll need, using the large magnets for your LEDs, and any extra magnets will be installed for retention purposes.
13. Repeat step 11 with any retention magnets.
14. Allow the e000 to cure for 72 hours before attempting to use your connector. The glue requires this time to cure and may not hold strong if put under stress before it is cured.
15. Wire it up to your board!
Although this part is recommended for professional installers, there's nothing wrong with stepping out of your comfort zone and giving it a go! With enough patience and practice, anyone can accomplish this job!
***Please note that the ForceLock connector is in Beta Testing. Although minor tests have been done regarding the effectiveness of magnets, it is unknown how different soundboards, speakers, and LEDs will react in conjuction with neodynium magnets. Test at your own risk***
Details
What's in the box:
ForceLock Connector Master

Dimensions:
Success Rate:
First To try.
What's this?
Rating:
Mature audiences only.

More From This Shop
$138.35
$9.00
$18.85