Front Pilot


MTH SD90MAC Pilot Set
Made by
Print With Shapeways
 Choose Your Material
 Choose your color and finish
$72.28
Have a question about this product?
contact the designerYou must be logged in and verified to contact the designer.
Product Description
Description:
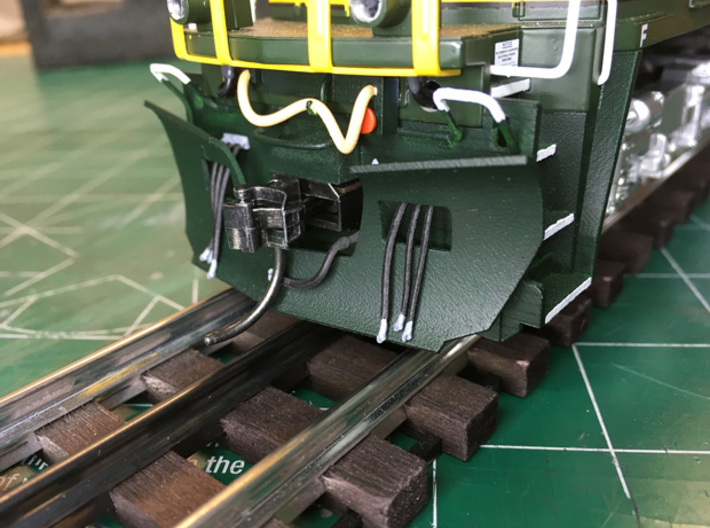
This is a fixed pilot, Kadee coupler conversion parts set for an MTH SD90MAC. Front and rear pilots, coupler mounts, and detail parts are included.
Details:
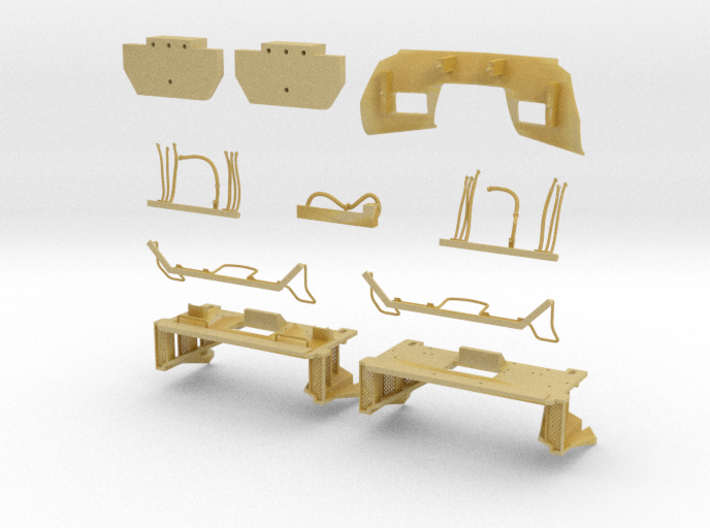
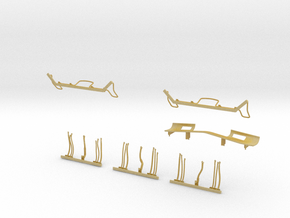
This parts set consists of front and rear pilots, front and rear coupler mounts, and various detail parts. The pilots are intended to be bonded to the body shell, so that the joints can be made seamless, and so that full length handrails can be permanently attached to them (0.020" mounting holes are provided for this). Once installed, the pilots are part of the body shell, and remain with it when it is removed from the chassis. The various air hoses are separate parts, to facilitate painting and weathering. The cut levers are part of the pilots and are fixed. The main air hoses are modeled as though they are suspended below the couplers by a chain or lanyard. The MU cable and junction box for the front is a separate part that can be added if desired.
The coupler mount is separate from the pilot, and is designed to be bonded directly to the engine chassis. It can also be installed using screws instead of adhesive, if desired (the mount has reference marks on it for suggested locations that avoid some features in the original body shell). The engine can be run, tested, etc. without the body shell installed, but with the couplers in place. Note that it is necessary to remove the couplers in order to separate the body and chassis (see the exploded view above).
Please note that due to their small size and intricate details, the pilots and detail parts are fairly delicate, and should be handled carefully. The coupler mounts, which handle the actual load, are quite sturdy.
Application:
This parts set is designed for an MTH SD90MAC model number 20-2370-1. It should fit different road names of the same model. It may fit other more recent models as well. Please see the detailed dimension drawing here to verify that it will fit your model. In particular, please verify that the chassis height is within +/- 0.025” of the indicated value, as this will ensure the correct height of the couplers once they are installed. Note that while it is necessary to remove the original couplers and pilots, no further modification of the trucks or chassis is required.
The coupler mount and the coupler position relative to the pilot are designed for a Kadee 740 coupler. Other couplers using the same mounting pattern should also work. I recommend bonding the coupler gearbox and cover together to ease installation and removal. Minor coupler height adjustments are possible using shims. The height of the mount is designed so that a nominal installation will require one Micromark O gauge Kadee shim (or equivalent 0.025” shim).
Preparation:
The Frosted Ultra Detail and Frosted Extreme Detail materials utilize a waxy support material that is dissolved after printing is completed. Because the support material slightly changes the texture of the product, and isn’t applied to the entire product, you may see some slight variability in texture over the surface of the model. Also, although the parts are ultrasonically cleaned by Shapeways prior to shipment, not all of the support material is removed. This may obscure fine details and results in poor paint adhesion. I recommend a 10 minute bath in acetone, followed by gently blowing fine holes and details dry with an air nozzle or empty airbrush. This will remove the wax substrate and provide a good surface for painting.
Next, check that the front and rear ends of the chassis are flat and level, and that the they are flush with the underside of the body shell. The stamped steel chassis is quite flexible and may not be true. Take measurements longitudinally and laterally at each end of the chassis. True it by bending gently or, if you have the engine completely disassembled, by putting it on a flat surface. The coupler mounts will not bond well otherwise and will not match the height of the coupler mount extension on the pilots.
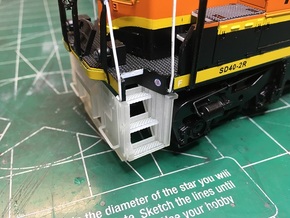
Finally, check the fit of the pilots to the body shell before painting and assembly. If they don't fit readily, please don't force anything! I have provided several features on the parts to locate them on the body. These are intentionally a close fit to the body shell, in order to minimize looseness or gaps. However, due to manufacturing tolerances of both the original body shell and the Shapeways part, it may be necessary to make some minor adjustments before installation. If so, use a small needle file on the surfaces shown in the last image above to adjust the fit.
Installation:
The pilots are intended to be bonded to the body shell first, and then serve to locate the coupler mounts on the chassis during their bonding, to ensure reliable alignment of everything. The detailed assembly sequence is as follows:
Revision History:
V1: Initial release.
This is a fixed pilot, Kadee coupler conversion parts set for an MTH SD90MAC. Front and rear pilots, coupler mounts, and detail parts are included.
Details:
This parts set consists of front and rear pilots, front and rear coupler mounts, and various detail parts. The pilots are intended to be bonded to the body shell, so that the joints can be made seamless, and so that full length handrails can be permanently attached to them (0.020" mounting holes are provided for this). Once installed, the pilots are part of the body shell, and remain with it when it is removed from the chassis. The various air hoses are separate parts, to facilitate painting and weathering. The cut levers are part of the pilots and are fixed. The main air hoses are modeled as though they are suspended below the couplers by a chain or lanyard. The MU cable and junction box for the front is a separate part that can be added if desired.
The coupler mount is separate from the pilot, and is designed to be bonded directly to the engine chassis. It can also be installed using screws instead of adhesive, if desired (the mount has reference marks on it for suggested locations that avoid some features in the original body shell). The engine can be run, tested, etc. without the body shell installed, but with the couplers in place. Note that it is necessary to remove the couplers in order to separate the body and chassis (see the exploded view above).
Please note that due to their small size and intricate details, the pilots and detail parts are fairly delicate, and should be handled carefully. The coupler mounts, which handle the actual load, are quite sturdy.
Application:
This parts set is designed for an MTH SD90MAC model number 20-2370-1. It should fit different road names of the same model. It may fit other more recent models as well. Please see the detailed dimension drawing here to verify that it will fit your model. In particular, please verify that the chassis height is within +/- 0.025” of the indicated value, as this will ensure the correct height of the couplers once they are installed. Note that while it is necessary to remove the original couplers and pilots, no further modification of the trucks or chassis is required.
The coupler mount and the coupler position relative to the pilot are designed for a Kadee 740 coupler. Other couplers using the same mounting pattern should also work. I recommend bonding the coupler gearbox and cover together to ease installation and removal. Minor coupler height adjustments are possible using shims. The height of the mount is designed so that a nominal installation will require one Micromark O gauge Kadee shim (or equivalent 0.025” shim).
Preparation:
The Frosted Ultra Detail and Frosted Extreme Detail materials utilize a waxy support material that is dissolved after printing is completed. Because the support material slightly changes the texture of the product, and isn’t applied to the entire product, you may see some slight variability in texture over the surface of the model. Also, although the parts are ultrasonically cleaned by Shapeways prior to shipment, not all of the support material is removed. This may obscure fine details and results in poor paint adhesion. I recommend a 10 minute bath in acetone, followed by gently blowing fine holes and details dry with an air nozzle or empty airbrush. This will remove the wax substrate and provide a good surface for painting.
Next, check that the front and rear ends of the chassis are flat and level, and that the they are flush with the underside of the body shell. The stamped steel chassis is quite flexible and may not be true. Take measurements longitudinally and laterally at each end of the chassis. True it by bending gently or, if you have the engine completely disassembled, by putting it on a flat surface. The coupler mounts will not bond well otherwise and will not match the height of the coupler mount extension on the pilots.
Finally, check the fit of the pilots to the body shell before painting and assembly. If they don't fit readily, please don't force anything! I have provided several features on the parts to locate them on the body. These are intentionally a close fit to the body shell, in order to minimize looseness or gaps. However, due to manufacturing tolerances of both the original body shell and the Shapeways part, it may be necessary to make some minor adjustments before installation. If so, use a small needle file on the surfaces shown in the last image above to adjust the fit.
Installation:
The pilots are intended to be bonded to the body shell first, and then serve to locate the coupler mounts on the chassis during their bonding, to ensure reliable alignment of everything. The detailed assembly sequence is as follows:
- Remove the body shell from the chassis.
- Fit check the front and rear pilots against the body shell.
- Remove the original couplers, hardware, wiring, and pilots from the trucks.
- Clean the parts in the kit as described above.
- Prime/paint and install detail parts on the pilots as desired.
- Prepare the mating surfaces of the pilot and body shell by cleaning with acetone.
- Bond the front and rear pilots to the body shell. Standard CA glue works well.
- Prepare the coupler mounts by tapping the four holes in each mount using an M2x0.4mm tap. (A #2-56 tap may be used instead, if preferred.)
- Wire brush and clean the mating surfaces of the coupler mounts and chassis.
- Assemble the body shell to the chassis as usual.
- Check the fit of the coupler mounts against the chassis and pilots.
- Apply gap-filling CA glue to the coupler mounts. Apply only to the surface of the mount that mates with the chassis. Do not bond to the pilots!
- Using the features on the front and rear pilots as guides, position the coupler mounts on the chassis and allow the adhesive to cure.
- Install each Kadee coupler and its shim using four M2x0.4mm screws. Ensure that the screws are long enough to provide substatial thread engagement in the mount.
- Check the coupler height and adjust shims if necessary.
Revision History:
V1: Initial release.
Details
What's in the box:
SD90MAC Pilot Set, MTH

Dimensions:
Success Rate:
First To try.
What's this?
Rating:
Mature audiences only.

More From This Shop

$66.27
$64.80
$26.06

$29.61