Black Smooth PA12

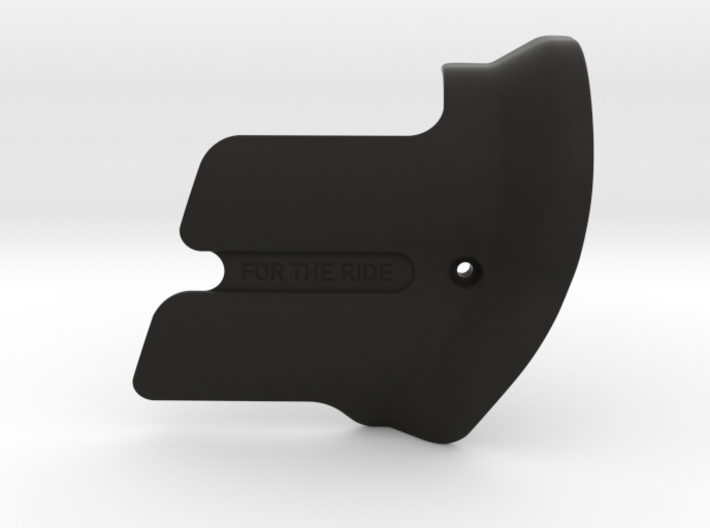
Scrambler XC/XE Leg Saver MAX Plus v2
Made by
Print With Shapeways
 Choose Your Material
 Choose your color and finish
$116.75
Have a question about this product?
contact the designerYou must be logged in and verified to contact the designer.
Product Description
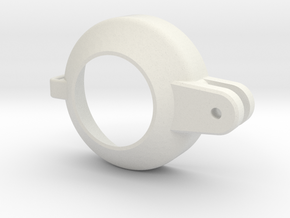
Full coverage leg protector for model year 2019-2023 Triumph Scrambler 1200 XC and XE models.
I know this is a lot of text, but please try to read the entire FAQ.
Frequently Asked Questions (FAQ)
Do I need a "Leg Saver"?
For many Triumph Scrambler 1200 riders, it is possible for the inner part of your upper calf to touch the catalytic converter heat shield when "squeezing the tank" or riding off-road. This is at the very least uncomfortable, and at its worst can result in painful burns. If you have never "felt the pain" then there is no need to read more, you probably dont need this.
If you have felt the pain, attaching the "MAX Leg Saver" will keep your inner calf from coming into direct contract with the exhaust heat shields. The design also helps shield your leg from the boundary layer of air being heated by the catalytic converter and provides protection from the heat radiating through the screens in the centre heat shield. The new MAX version covers both the upper and lower exhaust sections and provides better heat isolation for normal height riders.
What material should I choose?
Shapeways offers many materials to choose from. Many of them are too expensive for this applicatiton (if you really want it, Shapeways can print you one out of Aluminium for about $1000) so I have selected materials that are cost effective and resitant to the heat from the exhaust. Here are the options:
Does it come with all the nessesary hardware?
Unfortunatly Shapeways does not offer screws and washers. You will need to purchase the following from your local hardware store or any online source:
How do I install it?
WARNING: DO NOT MOUNT WITHOUT THE WASHERS!
The screw hole in the centre heat shield has a brass bushing that conducts a high amount of heat to a very small area. It will eventually melt the plastic without the washers in place to act as heat sinks.
WARNING: DO NOT USE A SCREW THAT IS LONGER THEN 25MM
Screws longer then 25mm can cause the screw absorb too much heat and cause the Leg Saver to melt arounf the mounting screw hole.
CAUTION: The mounting screw must be retightened after a few rides
The heat from the exhaust combined with the pressure from the mounting screw will cause the sintered material to compress slightly. After a few rides it is very important to retighten the screw to 6 Nm (about hand tight). ONLY TIGHTEN THE SCREW ONCE THE EXHAUST HAS FULLY COOLED DOWN.
Have you actually tested this?
I have put about 12000km on the various prototypes riding the secondary roads in Germany (Vogelsberg, the Black Forest, Eifel) and France (Vosges). I have also ridden rush hour traffic in 38°C (100°F) temperatures with my legs tight against the tank while wearing motorcycle jeans (Rev'it Philly if any one cares) with no problems. It has also survived several hours on German Autobahn at high speeds with no problems. I feel confident this will work "as advertised" and will not get anyone killed.
Can I get the .STL file and print this myself?
Sure! If you would prefer to print the item yourself or use a local printing service, you may download the .STL file by clicking on the "Download Product" button. If you dont see the download butten, you need to register with shapeways as a user first and log in. Be advised that normal PLA is not a suitable material as it will deform due to the heat of the exhaust. Only Nylon 12 MJF and SLS materials have been tested and confirmed to withstand the temperatures.
Can I sue you if I still got burns on my calf while wearing shorts in 40°C (104°F) weather?
Please don't, this is just a hobby, not my job. Use common sense and always dress for the slide, not for the ride.
The legal stuff:
THE USE OF THIS DESIGN OR ANY DERIVATIVES THEREOF IS AT YOUR OWN RISK. THE DESIGN IS PROVIDED "AS IS" WITHOUT WARRANTIES OF ANY KIND. THE LICENSOR MAKES NO REPRESENTATIONS OR WARRANTIES REGARDING THE USE OR PERFORMANCE OF THE DESIGN. THE LICENSOR EXPRESSLY DISCLAIMS THE WARRANTEES OF MERCHANTABILITY AND FITNESS FOR ANY PARTICULAR PURPOSE. THE LICENSOR SHALL HAVE NO LIABILITY TO ANY PARTY FOR ANY LOSS OR DAMAGE, CAUSED DIRECTLY OR INDIRECTLY BY THE DESIGN OR ANY DERIVATIVES THEREOF, INCLUDING, BUT NOT LIMITED TO, ANY CONSEQUENTIAL OR INCIDENTAL DAMAGES.
The design for this item is released under the Creative Commons Attribution 4.0 International License (CC-BY-NC) license. You must give appropriate credit, provide a link to the license, and indicate if changes were made. You may do so in any reasonable manner, but not in any way that suggests the licensor endorses you or your use. You may not use the material for commercial purposes. You may not apply legal terms or technological measures that legally restrict others from doing anything the license permits. https://creativecommons.org/licenses/by-nc/4.0/
I know this is a lot of text, but please try to read the entire FAQ.
Frequently Asked Questions (FAQ)
Do I need a "Leg Saver"?
For many Triumph Scrambler 1200 riders, it is possible for the inner part of your upper calf to touch the catalytic converter heat shield when "squeezing the tank" or riding off-road. This is at the very least uncomfortable, and at its worst can result in painful burns. If you have never "felt the pain" then there is no need to read more, you probably dont need this.
If you have felt the pain, attaching the "MAX Leg Saver" will keep your inner calf from coming into direct contract with the exhaust heat shields. The design also helps shield your leg from the boundary layer of air being heated by the catalytic converter and provides protection from the heat radiating through the screens in the centre heat shield. The new MAX version covers both the upper and lower exhaust sections and provides better heat isolation for normal height riders.
What material should I choose?
Shapeways offers many materials to choose from. Many of them are too expensive for this applicatiton (if you really want it, Shapeways can print you one out of Aluminium for about $1000) so I have selected materials that are cost effective and resitant to the heat from the exhaust. Here are the options:
- Black PA12 - (default) Offeres the best bang for the buck. Stepping and roughness is slightly noticable. Also available in gray and a mechanically polished smooth version. When in doubt, select this :-)
- Black Natural Versatil Plastic - Finish is slightely smoother then the Black PA12 but stepping may still be noticable. They also offer a Black Premium finish that is mechanically polished.
- PA12 Glass Beads - This is PA12 infused with 40% glass beads which makes it stronger - and more importantly - more resistant to heat deformation. It is only offered in a dark or light gray material which means you must paint it yourself if you want it to be black or any other color. Use normal flat or semi-gloss black acrylic for best results.
Does it come with all the nessesary hardware?
Unfortunatly Shapeways does not offer screws and washers. You will need to purchase the following from your local hardware store or any online source:
- One (1) M5x25 stainless steel button head hex screw (DIN/ISO 7380, see pictures)
- WARNING: Screws longer then 25mm can cause the screw absorb too much heat and cause the LegSaver to melt around the mounting screw hole.
- Two (2) 5.3x10mm (M5) stainless steel washers.
- WARNING: Since the washers are recessed, the outer diameter of the washers may not be larger then 10mm.
How do I install it?
- Remove the front M5 retaining screw from the centre heat shield.
- Put one 5.3x10mm washer on the M5x25 screw.
- Insert the screw and washer into the Leg Saver ensuring the washer is positioned between the head of the screw and the Leg Saver.
- Put the second 5.3x10mm washer onto the screw so it will be between the Leg Saver and centre heat shield (see pictures). You can also glue it in place with a drop of super glue to make mounting easier.
- Position the Leg Saver so that the top tab is hooked behind the rear edge of the centre heat shield.
- Lower the Leg Saver so that the screw can be inserted into the mounting hole while ensuring the washer remains between the Leg Saver and the heat shield.
- Tighten the screw only until it is just barely finger tight.
- Give the Leg Saver a good wiggle while lightly applying pressure to ensure the positioning tabs and washers are properly seated.
- Tighten the screw to 6 Nm. (thats about hand tight I guess)
- Now go for a ride!
- If you're happy, please let your Scrambler riding friends know :-)
WARNING: DO NOT MOUNT WITHOUT THE WASHERS!
The screw hole in the centre heat shield has a brass bushing that conducts a high amount of heat to a very small area. It will eventually melt the plastic without the washers in place to act as heat sinks.
WARNING: DO NOT USE A SCREW THAT IS LONGER THEN 25MM
Screws longer then 25mm can cause the screw absorb too much heat and cause the Leg Saver to melt arounf the mounting screw hole.
CAUTION: The mounting screw must be retightened after a few rides
The heat from the exhaust combined with the pressure from the mounting screw will cause the sintered material to compress slightly. After a few rides it is very important to retighten the screw to 6 Nm (about hand tight). ONLY TIGHTEN THE SCREW ONCE THE EXHAUST HAS FULLY COOLED DOWN.
Have you actually tested this?
I have put about 12000km on the various prototypes riding the secondary roads in Germany (Vogelsberg, the Black Forest, Eifel) and France (Vosges). I have also ridden rush hour traffic in 38°C (100°F) temperatures with my legs tight against the tank while wearing motorcycle jeans (Rev'it Philly if any one cares) with no problems. It has also survived several hours on German Autobahn at high speeds with no problems. I feel confident this will work "as advertised" and will not get anyone killed.
Can I get the .STL file and print this myself?
Sure! If you would prefer to print the item yourself or use a local printing service, you may download the .STL file by clicking on the "Download Product" button. If you dont see the download butten, you need to register with shapeways as a user first and log in. Be advised that normal PLA is not a suitable material as it will deform due to the heat of the exhaust. Only Nylon 12 MJF and SLS materials have been tested and confirmed to withstand the temperatures.
Can I sue you if I still got burns on my calf while wearing shorts in 40°C (104°F) weather?
Please don't, this is just a hobby, not my job. Use common sense and always dress for the slide, not for the ride.
The legal stuff:
THE USE OF THIS DESIGN OR ANY DERIVATIVES THEREOF IS AT YOUR OWN RISK. THE DESIGN IS PROVIDED "AS IS" WITHOUT WARRANTIES OF ANY KIND. THE LICENSOR MAKES NO REPRESENTATIONS OR WARRANTIES REGARDING THE USE OR PERFORMANCE OF THE DESIGN. THE LICENSOR EXPRESSLY DISCLAIMS THE WARRANTEES OF MERCHANTABILITY AND FITNESS FOR ANY PARTICULAR PURPOSE. THE LICENSOR SHALL HAVE NO LIABILITY TO ANY PARTY FOR ANY LOSS OR DAMAGE, CAUSED DIRECTLY OR INDIRECTLY BY THE DESIGN OR ANY DERIVATIVES THEREOF, INCLUDING, BUT NOT LIMITED TO, ANY CONSEQUENTIAL OR INCIDENTAL DAMAGES.
The design for this item is released under the Creative Commons Attribution 4.0 International License (CC-BY-NC) license. You must give appropriate credit, provide a link to the license, and indicate if changes were made. You may do so in any reasonable manner, but not in any way that suggests the licensor endorses you or your use. You may not use the material for commercial purposes. You may not apply legal terms or technological measures that legally restrict others from doing anything the license permits. https://creativecommons.org/licenses/by-nc/4.0/
Details
What's in the box:
XE Leg Saver MAX Plus V2

Dimensions:
Success Rate:
First To try.
What's this?
Rating:
Mature audiences only.
