White Natural Versatile Plastic


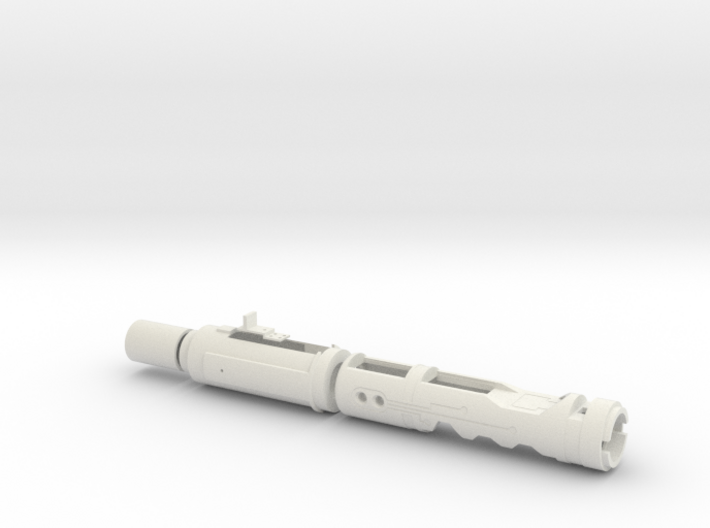
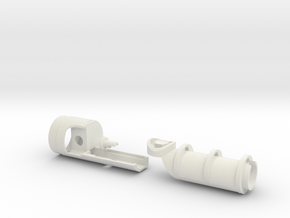
Ben Solo Legacy Lightsaber Chassis (Proffie)
Made by
Print With Shapeways
 Choose Your Material
 Choose your color and finish
$120.89
Have a question about this product?
contact the designerYou must be logged in and verified to contact the designer.
Product Description
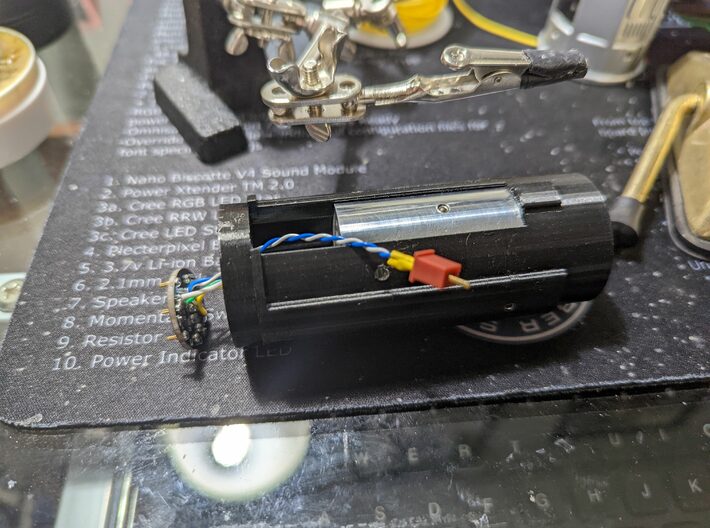
This includes all the printed parts you'll need to convert your Ben Solo Legacy saber to a proffie / neopixel, single-button setup (blade holder sleeve, switch holder, NPXL holder, blade plug, and main chassis)! The chassis is designed for a removable 18650 battery, Bluetooth module, accent LEDS, and a 28mm speaker. You'll need some additional parts to complete build once everything is printed. Those parts are as follows:
-1.25 inch blade holder from TCSS: https://www.thecustomsabershop.com/125-OD-LEDBlade-holder--P591.aspx
-A NPXL hilt-side connector with short pins (various sellers, works with CCSabers and all Shtok models)
-Shtok Rotary Chassis PCB: https://www.saberbay.com/collections/shtokcustomworx/products/shtokcustomworx-rotary-chassis-pcb-set-41920
-6x6x4.3mm momentary switch: https://www.digikey.com/en/products/detail/te-connectivity-alcoswitch-switches/1825910-6/1632536
-Shtok BT909 Bluetooth module with breakout board: https://www.saberbay.com/collections/shtokcustomworx/products/scw-bt909-bluetooth-module
-2 5mm accent LEDS (optional)
-Proffie v1.5 or 2.2: various sellers
-Battery contacts: https://www.digikey.com/en/products/detail/keystone-electronics/5223/316374 and https://www.digikey.com/en/products/detail/keystone-electronics/1017-1/4499386
-Kill switch: https://www.saberbay.com/collections/power-supplies/products/high-amperage-kill-switch
-28mm bass speaker: various sellers
-18650 high drain battery (non-prewired): various sellers
-10mm length M3 set screw
-3x 10mm length M3 button head screws
-3x 4mm length M3 set screws
Tools you'll need: M3 drill and tap set, hand drill or drill press, Dremel rotary tool with a grinding drum, center punch, E6000
MAKE SURE TO KEEP ALL THE STOCK PARTS AFTER DISASSEMBLY! YOU'LL NEED SOME OF THEM.
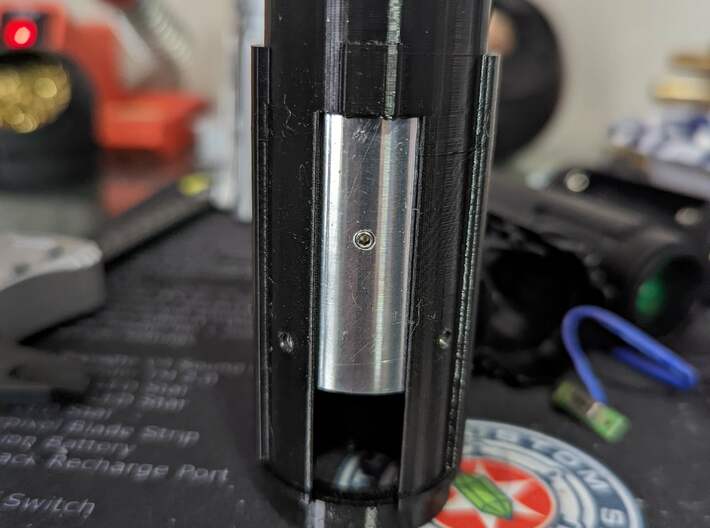
Instructions: The blade holder sleeve has two holes in it, use those holes and drill and tap a M3 holes in to the TCSS blade holder. Then insert two 4mm M3 set screws in to your new holes so that they will hold the blade holder in the blade holder sleeve. You'll also need to drill and tap a hole to provide retention on the NPXL holder. Drill and tap that hole just above the "shelf" in the blade holder then insert the last 4mm M3 set screw. You won't tighten that until your NPXL connector is wired up and in its holder. Now insert the sleeve and blade holder in to the saber's emitter. If the fit is too snug, sand it gently until it fits. You want a tight fit so the blade doesn't wobble when you swing it. With the sleeve/holder inserted in the emitter, drill and tap three holes for the M3 button head screws. These three screws will hold everything in the emitter. I placed two on either side of the switch hole and the other one on the back side of the emitter. Make sure the place these holes in an area that will be covered by the emitter shroud. Now remove the sleeve/holder and wire up the NPXL connector and then one side of the Shtok rotary connector. Make sure to wire switch leads at this time too. Its totally optional but I wired a connector to my switch so I could remove it easily if necessary (see photos in the listing). I used E6000 glue to keep the rotary PCB in place. Now insert the sleeve/holder into the emitter again and screw in the button head screws.
Switch solution: Mount and wire the 6x6x4.3mm switch on the switch holder. The switch plate on the outside of the hilt needs to be unscrewed enough to have some play in it so that it will depress the switch. You're going to want screw in the switch holder where the old latching switch was mounted (use the screws that held the old switch in place again). Test everything by pressing the switch plate. If you get a good click, you're all set. If not, loosen or tighten the switch plate screw above the switch until you do. The switch holder will also prevent the switch plate from sliding back and forth.
Finally, you'll use the dremel to trim down the three screws that secure the emitter, emitter shroud and body so that they don't penetrate in to the inner cavity. Same with the two screws that hold on the belt clip assembly. Then wire up the chassis as you would another saber! Make sure to glue the bottom engine piece to the chassis after the speaker is secured. The main chassis may require some sanding as well.
-1.25 inch blade holder from TCSS: https://www.thecustomsabershop.com/125-OD-LEDBlade-holder--P591.aspx
-A NPXL hilt-side connector with short pins (various sellers, works with CCSabers and all Shtok models)
-Shtok Rotary Chassis PCB: https://www.saberbay.com/collections/shtokcustomworx/products/shtokcustomworx-rotary-chassis-pcb-set-41920
-6x6x4.3mm momentary switch: https://www.digikey.com/en/products/detail/te-connectivity-alcoswitch-switches/1825910-6/1632536
-Shtok BT909 Bluetooth module with breakout board: https://www.saberbay.com/collections/shtokcustomworx/products/scw-bt909-bluetooth-module
-2 5mm accent LEDS (optional)
-Proffie v1.5 or 2.2: various sellers
-Battery contacts: https://www.digikey.com/en/products/detail/keystone-electronics/5223/316374 and https://www.digikey.com/en/products/detail/keystone-electronics/1017-1/4499386
-Kill switch: https://www.saberbay.com/collections/power-supplies/products/high-amperage-kill-switch
-28mm bass speaker: various sellers
-18650 high drain battery (non-prewired): various sellers
-10mm length M3 set screw
-3x 10mm length M3 button head screws
-3x 4mm length M3 set screws
Tools you'll need: M3 drill and tap set, hand drill or drill press, Dremel rotary tool with a grinding drum, center punch, E6000
MAKE SURE TO KEEP ALL THE STOCK PARTS AFTER DISASSEMBLY! YOU'LL NEED SOME OF THEM.
Instructions: The blade holder sleeve has two holes in it, use those holes and drill and tap a M3 holes in to the TCSS blade holder. Then insert two 4mm M3 set screws in to your new holes so that they will hold the blade holder in the blade holder sleeve. You'll also need to drill and tap a hole to provide retention on the NPXL holder. Drill and tap that hole just above the "shelf" in the blade holder then insert the last 4mm M3 set screw. You won't tighten that until your NPXL connector is wired up and in its holder. Now insert the sleeve and blade holder in to the saber's emitter. If the fit is too snug, sand it gently until it fits. You want a tight fit so the blade doesn't wobble when you swing it. With the sleeve/holder inserted in the emitter, drill and tap three holes for the M3 button head screws. These three screws will hold everything in the emitter. I placed two on either side of the switch hole and the other one on the back side of the emitter. Make sure the place these holes in an area that will be covered by the emitter shroud. Now remove the sleeve/holder and wire up the NPXL connector and then one side of the Shtok rotary connector. Make sure to wire switch leads at this time too. Its totally optional but I wired a connector to my switch so I could remove it easily if necessary (see photos in the listing). I used E6000 glue to keep the rotary PCB in place. Now insert the sleeve/holder into the emitter again and screw in the button head screws.
Switch solution: Mount and wire the 6x6x4.3mm switch on the switch holder. The switch plate on the outside of the hilt needs to be unscrewed enough to have some play in it so that it will depress the switch. You're going to want screw in the switch holder where the old latching switch was mounted (use the screws that held the old switch in place again). Test everything by pressing the switch plate. If you get a good click, you're all set. If not, loosen or tighten the switch plate screw above the switch until you do. The switch holder will also prevent the switch plate from sliding back and forth.
Finally, you'll use the dremel to trim down the three screws that secure the emitter, emitter shroud and body so that they don't penetrate in to the inner cavity. Same with the two screws that hold on the belt clip assembly. Then wire up the chassis as you would another saber! Make sure to glue the bottom engine piece to the chassis after the speaker is secured. The main chassis may require some sanding as well.
Details
What's in the box:
Ben Solo Legacy

Dimensions:
Success Rate:
First To try.
What's this?
Rating:
Mature audiences only.
