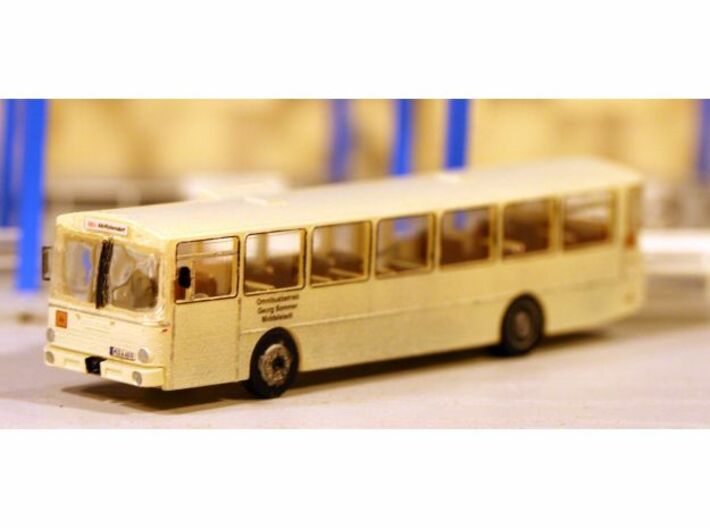


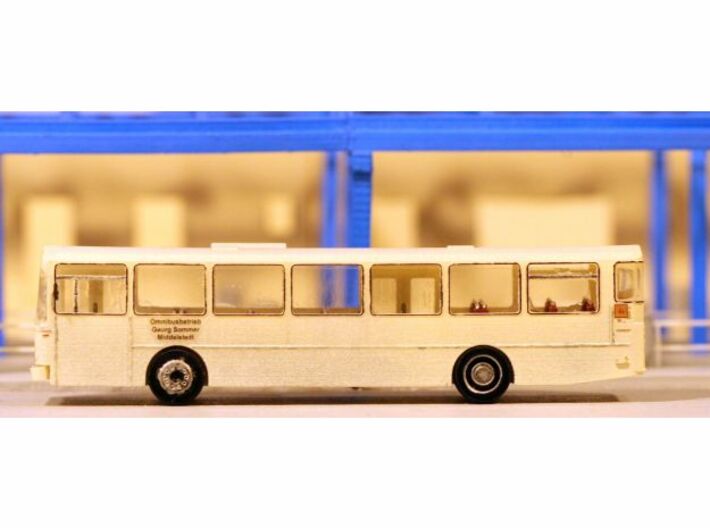


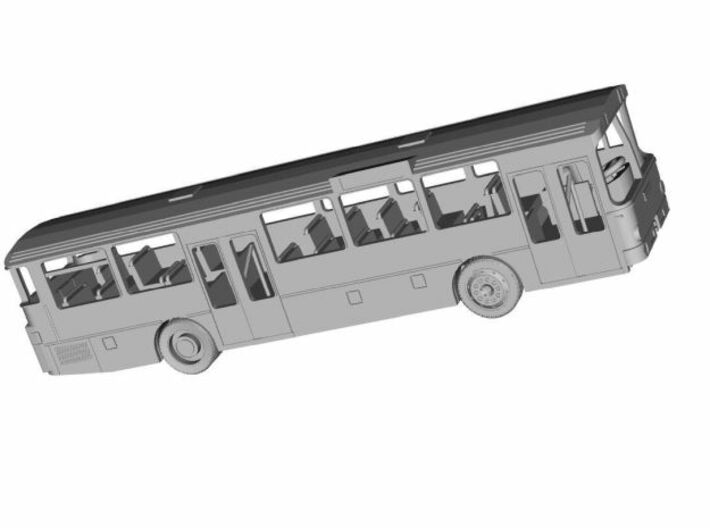

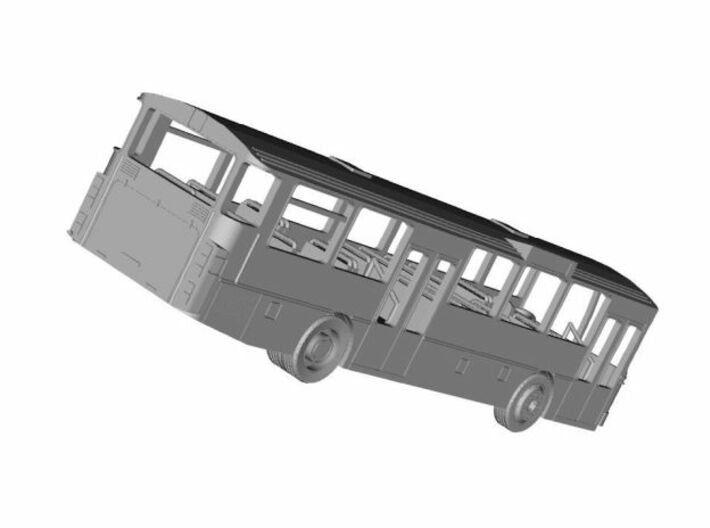

VÖV-Stadtbus mit Stülb-Front
Made by
Print With Shapeways
 Choose Your Material
 Choose your color and finish
$52.38
Have a question about this product?
contact the designerYou must be logged in and verified to contact the designer.
Product Description
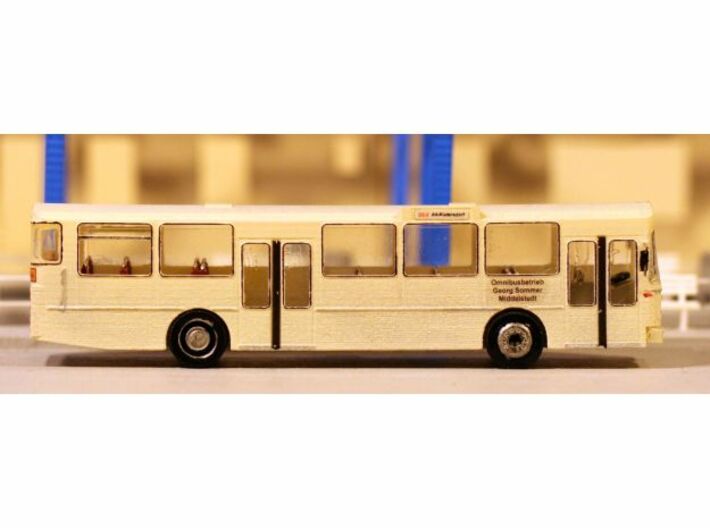
DE: Dies ist ein Modell des VÖV-Stadtbusses mit der sogenannten Stülb-Front, wie er ab den 70er Jahren bis weit in die 90er Jahre den Nahverkehr der deutschen Städte geprägt hat.
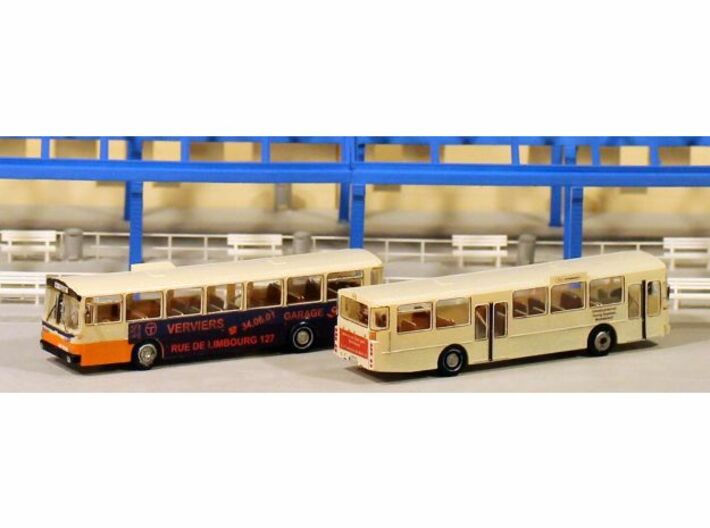
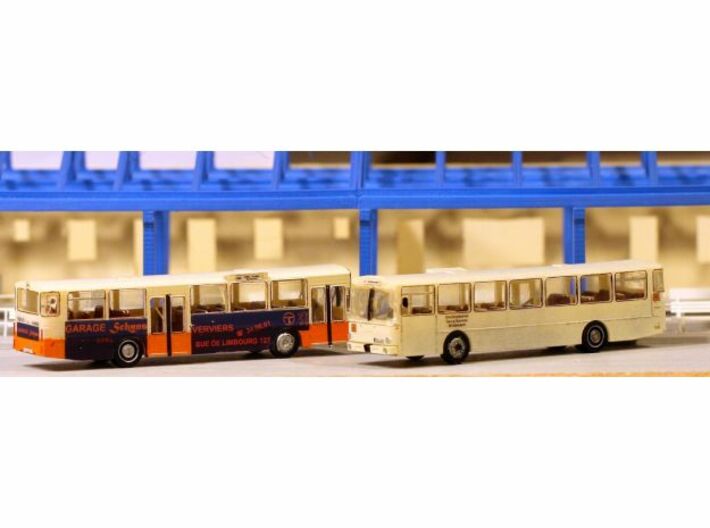
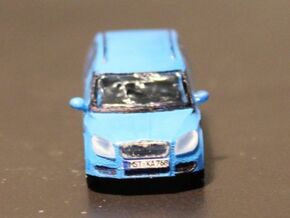
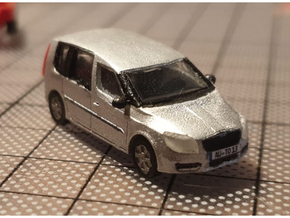
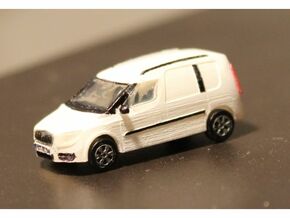
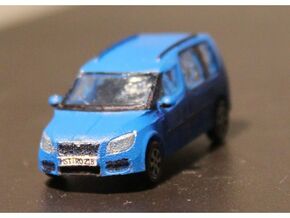
Nicht enthalten in diesem Modell sind Fenster, Nasschiebebilder, Kennzeichen aus Papier oder Zurüstteile aus Metall. Bilder mit mehreren Fahrzeugen oder Gebäuden dienen der Illustration.
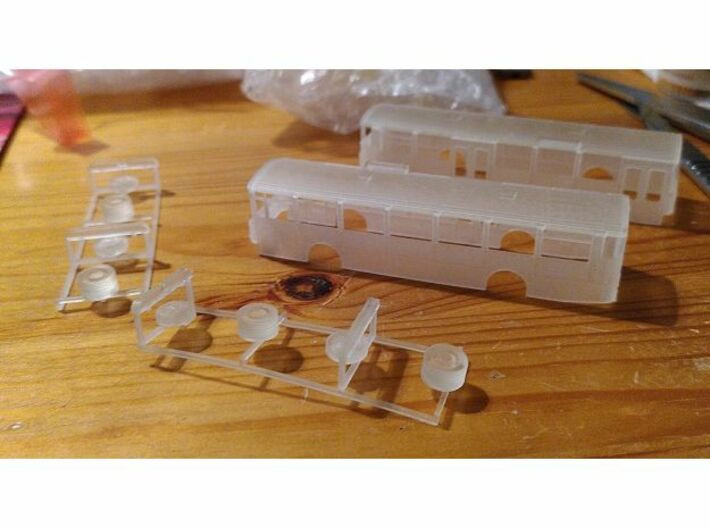
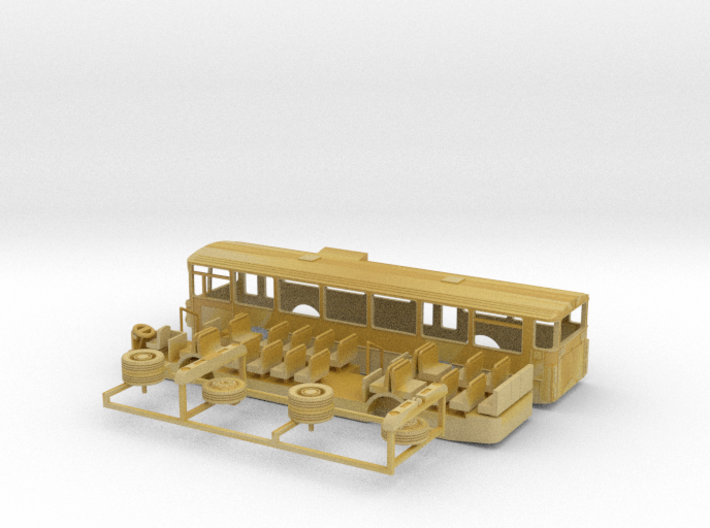
Das Modell wird unlackiert und als Bausatz geliefert.
Bauanleitung: Trennen Sie zunächst alle Teile vom Träger und voneinander. Entfetten Sie die Teile gut, indem Sie sie z.B. einen Tag lang in mit nichtparfümiertem Spülmittel angereicherten Wasser liegen lassen und anschließend gut spülen sowie z.B. mit einer Zahnbürste sorgfältig abbürsten.
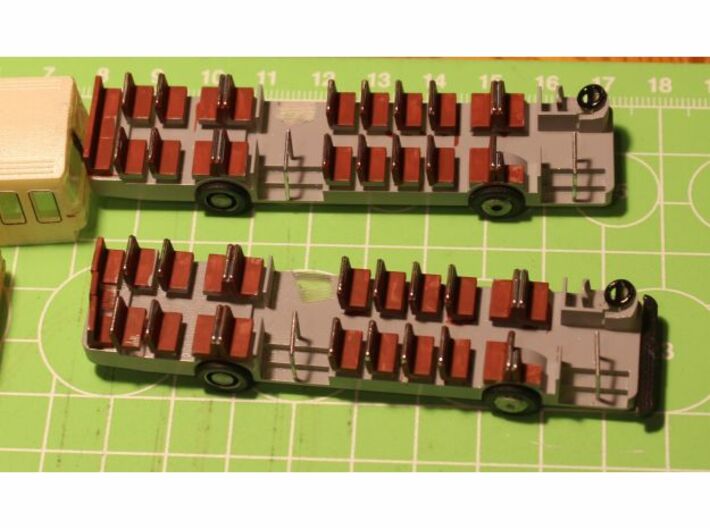
Stecken Sie die Teile vor dem Lackieren zusammen, um die Passform zu prüfen. Die Teile sind maßgenau entworfen, aber Fertigungstoleranzen, Überbleibsel des Stützmaterials oder Grate können dazu führen, dass Nacharbeit mit Schleifpapier und Feile nötig wird. Wenn die Druckschichten zu stark sichtbar sind, kann man auch hier mit feinem Schleifpapier nacharbeiten. Lackieren Sie das Fahrwerk und den Innenraum grau, die Karosserieteile je nach gewünschtem Einsatzzeitzweck und die Räder schwarz. Details wie Scheinwerfer, Blinklichter, Begrenzungsleuchten und die Felgen können anschließend mit feinem Permanent-Marker eingefärbt werden. Details des Interieurs wie Sitzbezüge, Armaturenbrett usw. können mit feinem Pinsel in der gewünschten Farbe gestaltet werden. Für das Erstellen von Fenstern empfehle ich transparente Folie, für die Krümmung der Frontscheibe Micro Kristal Klear. Sollten Sie Decals verwenden, empfiehlt es sich, diese, nachdem sie gründlich getrocknet sind, mit Klarlack zu überziehen. Dieser Arbeitsschritt muss vor dem Einsetzen der Fenster erfolgen, wenn nicht, sind die Fenster während des Auftragens des Klarlacks abzudecken. Um die Hinterräder zu befestigen, empfiehlt es sich, die Öffnung im Chassis auszubohren, da sich in ihnen noch Stützmaterial befinden kann. Die Vorderräder und zugehörigen Radaufhängungen sind so gestaltet, dass die Räder bei korrekter Montage eingeschlagen werden können. Im gedruckten Zustand passen die Räder nicht auf die Radaufhängungen. Um Fertigungstoleranzen auszugleichen haben beide Teile leichtes Übermaß. Feilen Sie in die Befestigungselemente am Rad leichte u-förmige Kerben, die zum Chassis hinzeigen. Feilen Sie die halbkugelförmigen Teile an der Radaufhängung am Chassis ein wenig herunter. Überprüfen Sie, ob sich das Rad mit sanftem Druck auf die Aufhängung schieben lässt. Ist dies nicht der Fall, wenden Sie keinesfalls Gewalt an, da die Teile leicht brechen, sondern feilen Sie erneut an beiden Teilen überschüssiges Material weg.
Bitte beachten: Der Bausatz enthält zwei Varianten des vorderen Stoßfängers, und zwar mit offenliegendem oder verdeckten Abschlepphaken.
EN: This is a model of the VÖV city bus with the front of the standardized regional bus. This bus and its relatives that were manufactured by four German companies and a number of European companies dominated public transport in most German towns and cities from the 1970s through the 1990s.
Windows, decals, paper number plates, or brass add-ons are not included. The model is delivered unpainted and as a kit. Images with several vehicles or buildings in them merely serve as illustrations in which settings the model could be used. Building instructions:
Please remove all parts carefully from the sprue or separate them from each other with a scalpel. Carefully clean an decrease the surfaces, suggested method is by bathing them in unscented detergent for 24 hours, then thoroughly rinsing them and lightly brushing them with a toothbrush.
Before painting assemble the kit without glue. The parts are designed to fit, but production tolerances, residue of support material or protruding burr might prevent them from fitting properly. Correct this by filing or sanding off excess material. You might also find it necessary to lightly sand the body in order to get a smoother surface.
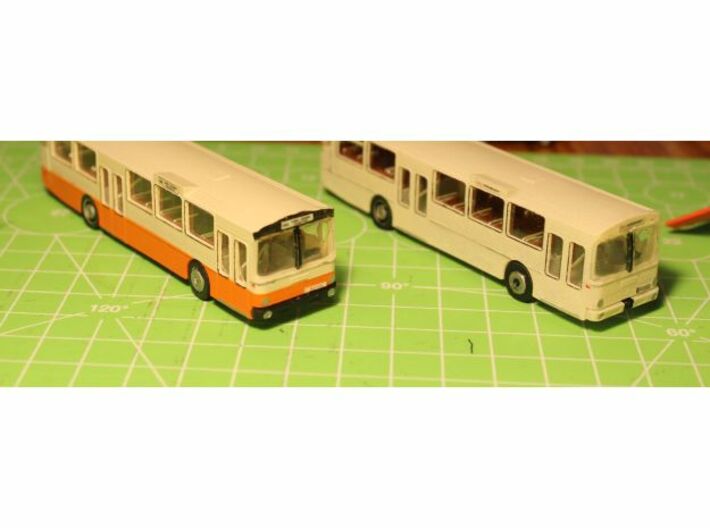
Paint the chassis and interior grey, the body the colour that best reflects your chosen era and area, and the wheels black. Details such as head- and rear lights, indicators and rims can be painted using fine point permanent markers. Interior details such as seats or the dashboard can be painted using a very fine brush. I suggest clear plastic sheets such as overhead transparencies for window panes, Micro Kristal Klear for curved glazing. In case you want to use decals seal them after they have thoroughly dried using the appropriate transparent varnish, but do so BEFORE you put in the windows (or cover them with masking tape). In order to attach the rear wheels to the chassis it is suggested to bore out the appropriate holes in the chassis since there might be some residue of the support material. The front wheels and corresponding suspension at the chassis are designed in a way that if correctly mounted the wheels can be turned left and right. Note: The wheels don't fit onto the suspnsion. In order to make up for production tolerances there is excess material. File a u-shaped notch into the parts of the joints on the wheel making the u-shape point towards the chassis. File off some material of the hemispherical parts on the suspension at the chassis. Now check if the wheel can be attached to the suspension by applying slight pressure. If this is not the case remove slightly more material from the suspension and the aforementioned part of the wheel.
Please note: The kit contains two versons of the front bumper, one with open tow hook and one with covered tow hook.
Nicht enthalten in diesem Modell sind Fenster, Nasschiebebilder, Kennzeichen aus Papier oder Zurüstteile aus Metall. Bilder mit mehreren Fahrzeugen oder Gebäuden dienen der Illustration.
Das Modell wird unlackiert und als Bausatz geliefert.
Bauanleitung: Trennen Sie zunächst alle Teile vom Träger und voneinander. Entfetten Sie die Teile gut, indem Sie sie z.B. einen Tag lang in mit nichtparfümiertem Spülmittel angereicherten Wasser liegen lassen und anschließend gut spülen sowie z.B. mit einer Zahnbürste sorgfältig abbürsten.
Stecken Sie die Teile vor dem Lackieren zusammen, um die Passform zu prüfen. Die Teile sind maßgenau entworfen, aber Fertigungstoleranzen, Überbleibsel des Stützmaterials oder Grate können dazu führen, dass Nacharbeit mit Schleifpapier und Feile nötig wird. Wenn die Druckschichten zu stark sichtbar sind, kann man auch hier mit feinem Schleifpapier nacharbeiten. Lackieren Sie das Fahrwerk und den Innenraum grau, die Karosserieteile je nach gewünschtem Einsatzzeitzweck und die Räder schwarz. Details wie Scheinwerfer, Blinklichter, Begrenzungsleuchten und die Felgen können anschließend mit feinem Permanent-Marker eingefärbt werden. Details des Interieurs wie Sitzbezüge, Armaturenbrett usw. können mit feinem Pinsel in der gewünschten Farbe gestaltet werden. Für das Erstellen von Fenstern empfehle ich transparente Folie, für die Krümmung der Frontscheibe Micro Kristal Klear. Sollten Sie Decals verwenden, empfiehlt es sich, diese, nachdem sie gründlich getrocknet sind, mit Klarlack zu überziehen. Dieser Arbeitsschritt muss vor dem Einsetzen der Fenster erfolgen, wenn nicht, sind die Fenster während des Auftragens des Klarlacks abzudecken. Um die Hinterräder zu befestigen, empfiehlt es sich, die Öffnung im Chassis auszubohren, da sich in ihnen noch Stützmaterial befinden kann. Die Vorderräder und zugehörigen Radaufhängungen sind so gestaltet, dass die Räder bei korrekter Montage eingeschlagen werden können. Im gedruckten Zustand passen die Räder nicht auf die Radaufhängungen. Um Fertigungstoleranzen auszugleichen haben beide Teile leichtes Übermaß. Feilen Sie in die Befestigungselemente am Rad leichte u-förmige Kerben, die zum Chassis hinzeigen. Feilen Sie die halbkugelförmigen Teile an der Radaufhängung am Chassis ein wenig herunter. Überprüfen Sie, ob sich das Rad mit sanftem Druck auf die Aufhängung schieben lässt. Ist dies nicht der Fall, wenden Sie keinesfalls Gewalt an, da die Teile leicht brechen, sondern feilen Sie erneut an beiden Teilen überschüssiges Material weg.
Bitte beachten: Der Bausatz enthält zwei Varianten des vorderen Stoßfängers, und zwar mit offenliegendem oder verdeckten Abschlepphaken.
EN: This is a model of the VÖV city bus with the front of the standardized regional bus. This bus and its relatives that were manufactured by four German companies and a number of European companies dominated public transport in most German towns and cities from the 1970s through the 1990s.
Windows, decals, paper number plates, or brass add-ons are not included. The model is delivered unpainted and as a kit. Images with several vehicles or buildings in them merely serve as illustrations in which settings the model could be used. Building instructions:
Please remove all parts carefully from the sprue or separate them from each other with a scalpel. Carefully clean an decrease the surfaces, suggested method is by bathing them in unscented detergent for 24 hours, then thoroughly rinsing them and lightly brushing them with a toothbrush.
Before painting assemble the kit without glue. The parts are designed to fit, but production tolerances, residue of support material or protruding burr might prevent them from fitting properly. Correct this by filing or sanding off excess material. You might also find it necessary to lightly sand the body in order to get a smoother surface.
Paint the chassis and interior grey, the body the colour that best reflects your chosen era and area, and the wheels black. Details such as head- and rear lights, indicators and rims can be painted using fine point permanent markers. Interior details such as seats or the dashboard can be painted using a very fine brush. I suggest clear plastic sheets such as overhead transparencies for window panes, Micro Kristal Klear for curved glazing. In case you want to use decals seal them after they have thoroughly dried using the appropriate transparent varnish, but do so BEFORE you put in the windows (or cover them with masking tape). In order to attach the rear wheels to the chassis it is suggested to bore out the appropriate holes in the chassis since there might be some residue of the support material. The front wheels and corresponding suspension at the chassis are designed in a way that if correctly mounted the wheels can be turned left and right. Note: The wheels don't fit onto the suspnsion. In order to make up for production tolerances there is excess material. File a u-shaped notch into the parts of the joints on the wheel making the u-shape point towards the chassis. File off some material of the hemispherical parts on the suspension at the chassis. Now check if the wheel can be attached to the suspension by applying slight pressure. If this is not the case remove slightly more material from the suspension and the aforementioned part of the wheel.
Please note: The kit contains two versons of the front bumper, one with open tow hook and one with covered tow hook.
Details
What's in the box:
o305voll

Dimensions:
Success Rate:
First To try.
What's this?
Rating:
Mature audiences only.
More From This Shop
$16.44
$16.07