Tan Fine Detail Plastic


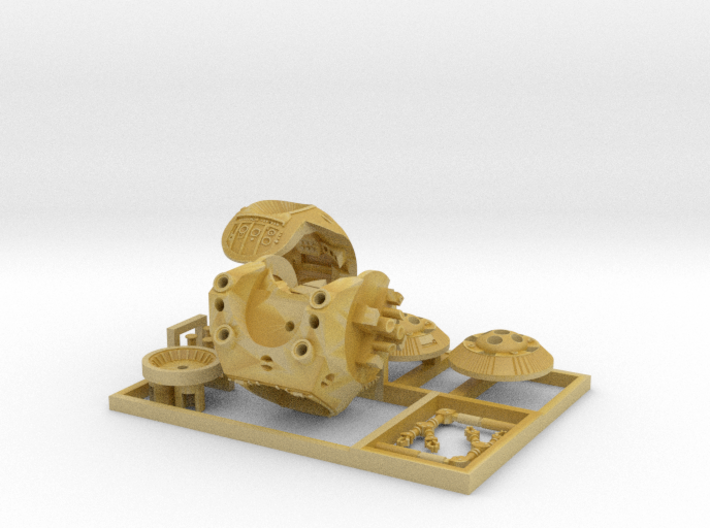
2001: an Odyssey. EVA Pod 1:144, vers D, closed
Made by
Print With Shapeways
 Choose Your Material
 Choose your color and finish
$18.23
Have a question about this product?
contact the designerYou must be logged in and verified to contact the designer.
Product Description
Superdetail your Moebius Models Discovery One with this fully lightable space pod with complete interior!
“Really amazing work for such a small model. Congratulations.”
– Adam Johnson, designer of the Moebius Models Discovery XD-1 kit.
“These things are really, really good. Amazing little pods. And the great thing about these pods is that they actually fit through the doors the way they're supposed to!"
– Steve Neill, modelmaker extraordinaire.
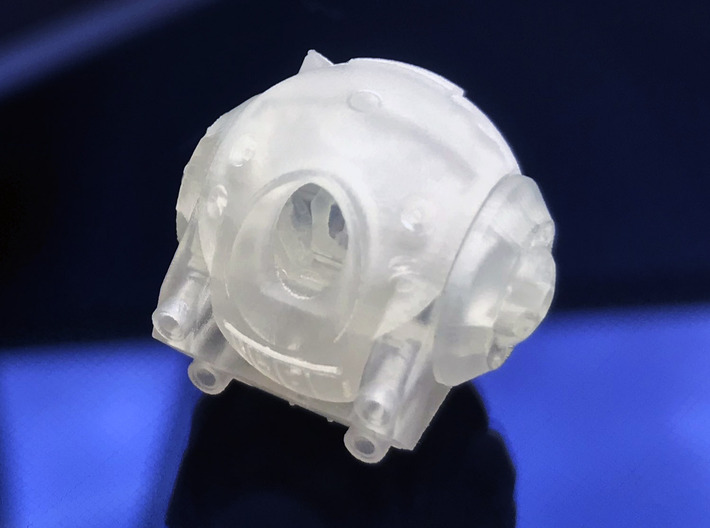
Want a pod with an open window and full interior? Check out the best super-tiny model of the 2001 EVA pod ever made! How can I make this bold claim? Well:
- despite its minuscule 17mm height, it’s as accurate to the original miniatures as can be 3D printed.
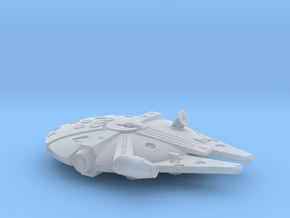
- it fits perfectly through the pod bay doors of Moebius Models’ Discovery kit (billed as 1:144* scale).
- it has an open window (optionally glazed) with full interior details. I’m not kidding: an interior at this size!
- it’s got special holders for prewired SMD LEDs. You can add fibre optic headlights, a HAL camera eye, and even internal panel lighting!
- it’s carefully designed for painting and assembly. For example, the black areas of the “earmuffs” are separate parts from the white areas, so you can get razor-sharp black details without screwing around with masking! The top and bottom halves of the sphere fit perfectly together.
- This version comes with manipulator arms in a parked position.
- its layout is optimized for the highest print quality possible. This means it’s a bit more expensive than one optimized for cost, but there are fewer areas of wax residue.
This model took me over a year to design, and I have to say I’m pretty damn proud of it. Here's a great video by modelmaker Ken Spriggs showing how to paint and light it, and here are some more details on the thing.
Five pod versions
There are five different products here, tailored to match different modelling goals.
Version A:
Open-door pod with two astronauts. Includes a helmeted pilot and a floating astronaut with an AE-35 unit. Six different arms in different positions.
The pilot can play either Poole or Bowman, depending on what colours you paint the suit. Owing to the print size the helmet is solid - the visor will need to be painted shiny black. Sadly he's missing his lower legs, so that the LEDs and fibres can fit.
The floating astronaut, with AE-35 in hand, can play either Bowman taking the AE-35 back to the Discovery, or Poole trying to put it back. The idea is you can float the astronaut and pod on wires near the Discovery’s antenna assembly. The open pod door is retracted to a tiny triangle in the upper corner, just like the original full-size pods.
Version B:
Closed-door pod with two astronauts. Includes a helmet-less pilot and a dead floating astronaut. Six different arms in different positions.
The seated pilot has no helmet, and so can play Bowman in the famous “open the pod bay door” scene, or for the rescue attempt scene.
The other figure is a floating dead Poole.
Version C:
Closed-door pod with one helmeted pilot. Two arms in stowed position. For general scenes of the pod flying through space.
Version D (this version):
Closed-door pod with no astronauts. Two arms in stowed position. For scenes of the pod parked in the bay.
This version lacks the square recess in the seat used for positioning the pilot. (though you can't really see this through the window anyway)
Version E:
This is just 3 copies of version D, grouped together for cost savings. I've also included an extra pod arm in case of breakage.
Installing LEDs
The bottom base has two hollow cylinders, each of which can hold a prewired SMD LEDs: ultra-tiny rectangular LEDs to which hair-thin wires have been soldered. The cylinders are designed around 0603 LEDs but of course 0401 LEDs work too.
Use warm white LEDs since the original movie headlights were tungsten. The base also has a central hole for wires or, if you want to display the pod hovering, brass tube. Solder one wire to the brass, and run insulated “magnet” wire down the interior of the tube.
The cylindrical holders have openings in the front so that the LEDs can tilt back and shine right into the headlight fibres. I would recommend installing the diodes by feeding the wires through the bottom first, then fitting the LEDs into the cylinders. Add a tiny drop of white glue, make sure they’re perfectly lined up, then let the glue harden. This protects the fragile solder joints by minimizing bending. I suggest ordinary white glue (PVA, Elmer’s, etc) because it holds well but can be removed if you have to make changes. Epoxy or superglue won’t let you do that.
Headlights
The lower half has internal tunnels for four 1mm fibre optic strands. These tunnels all turn inwards and toward the LEDs. I would probably fit and cut the fibres, test them carefully, but only install them at the very end of the process, once everything is assembled. (thus avoiding getting paint on them)
Note that the round disc-shaped base fits very snugly into the lower half of the sphere, and it’s difficult to remove. I’d probably put a temporary bit of wire into the hole at the centre of the disc, or install the mounting tube, if you need to test-fit it so you can pull it out.
Expose each outer fibre tip to heat from a flame (a candle or lighter or whatever) to “lens” or “mushroom” it. Alternatively a tiny drop of clear epoxy on each headlight, once the fibres are in place and tested, can give a lens effect, but is harder to control.
If you don't want to install fibres I've also included four cylindrical rods with rounded ends that you can put in to serve as unlit headlights. These don't look as good as fibres, but look okay, especially if a drop of varnish is placed on the rounded tip.
HAL eye
There was a HAL camera installed on the front of each pod, below the window. (some pods anyway - there are continuity errors in the film in this regard)
People like the red light, so this model has a hole for a 0.25mm fibre optic if you want to give HAL his implacable digital eye. There’s also an internal tunnel inside the lower body to guide the fibre towards an LED. Make sure it’s not too bright - HAL’s eye shouldn’t be as bright as the headlights! You can whittle the interior end slightly to reduce the transmitted light. You'll also need to dip each end in clear red paint, such as Tamiya transparent paint, to tint it.
Interior lighting
Control panels
The idea is to backlight the controls by letting LED light shine through the translucent body of the pod.
First, fill the underside of the model, where the circular base goes, with some removable putty. White poster-hanging putty works well. If you don’t do this, and paint gets in there, then you’ll block light from the LEDs. The putty also gives you a place to put a rod or skewer to hold the component while painting.
Next, prime the pod black and then lightly paint the pod with additional light-blocking paint. Aluminium paint works well, owing to the metal powder, and is closer to white than black primer. Then lightly paint the control panels and back walls black, and the curved wall interiors red.
Once it’s all painted, take a fine craft knife and carefully scrape the paint off the raised lights and screens, revealing bare plastic. A #16 offset blade might give you a better scraping angle than the pointier #11 type.
This is why most interior details are raised, even those which were recessed in the movie. Remember that not every control is lit in the film, so scrape off the paint in an arrangement that looks good to you. For printability reasons I couldn’t replicate the tiny lights on each panel exactly, but followed the general arrangement of lamps and screens in each area.
Scraping complete, you can put tiny spots of colour paint on the lights to tint them, or clear varnish where they’re supposed to be white. Or just cover the whole thing with some form of clear coat, since at this time we don’t know if bare 3D-printed acrylic has any longevity issues.
There are a couple of recessed areas, such as the rectangular red lights at the base of the rear walls, which are hard to light this way. You could paint those areas with latex masking paint, paint the final colour over the top, and then peel off the masks, but i find such paint fiddly to apply.
Ceiling light
You can also put a 0401 prewired LED into the ceiling. This optional light is for illuminating the pilot, such as the scene when Bowman arrives in the alien bedroom. There are grooves for the wires, and holes along the port side walls so you can run power down to the base of the pod. The grooves aren’t exactly true to prototype, but they’re also not visible from outside.
Again, I’d put the wiring in and then hold it in place with a tiny dot of white glue. Paint can then conceal the wiring. It’s best to install the LED over top of the light-blocking paint, to reduce the amount of light shining upwards.
Window
There is a recessed oval area, with a flat notch at the bottom, around the inside of the window area. Very very thin plastic sheet can be cut and installed for glazing. Don’t use superglue - it can run and mess up the plastic, or cause it to fog or craze. I’d probably just use a tiny dot or two of white glue owing to the removability factor. Apply thin masking tape to the plastic before cutting and fitting, to reduce scratches.
Note one small area of 2001 controversy is the shape of the pod window - was the glazing flat, or curved like a large cylinder, or a curved like a bubble? I believe the film props had slightly cylindrical glazing (with said cylinder horizontal) as there are photos of ceiling lights reflected as straight lines, but also other objects squashed vertically. However this model has a flat window, since it’s easier to install, plus at this tiny size you can’t tell anyway.
Of course you might want to leave the glazing out altogether. The reflections look good, but also obscure the interior details. Test and see what works for you!
Window visibility
All the flying pods in the movie had blacked-out windows. This is for practical reasons: the pods contained mechanisms for the arms, and didn’t have room for an interior with a pilot. The in-story justification might be that the pods had their windows polarized, like the astronaut helmets earlier in the film. However that only makes sense if the pod is facing the sun.
So it’s up to you if you want to black out the windows or allow the glorious interior detail to be visible! Since it’s tricky to paint the tiny window gloss black and the window frame matte black, it’s probably easier to use this model with its interior and use gloss black window material, than to use a one-piece version of the pod.
Cleaning
The pod components have a lot of nooks and crannies where support wax and cleaning oils, used by the 3D printers, will lurk. It’s absolutely essential that you clean all parts thoroughly before painting. Paint can only stick to bare plastic, so don’t miss this vital step!
Unlike my solid pod design, which was designed as a single object for lowest printing costs, this version is optimized for highest quality. So it comes in pieces that are at different orientations to the direction of printing. Nonetheless you will need to smooth areas that rested on the support wax during printing. Those sections will be slightly rougher and textured.
The main areas that need attention are the back of the upper sphere, the curved sides of the lower section, and the flat plane beneath the lower front headlights.
I find that scraping those areas gently with the side of a flat knife blade got the main bits smooth, followed by some 1000 grade emery paper. Even scratching gently with a fingernail works surprisingly well. Just be sure not to sand over any areas with detail, such as recessed grooves, and heed the word “gently”!
Check out this page for further cleaning advice.
Painting
The key point, if you’re planning on installing lighting, is to paint the pod with light-blocking paint first, so that the whole thing doesn’t glow unconvincingly like a frosted light bulb. But you also want to make sure the layers are lightly applied so that the details aren’t obscured by gobs of paint. A tricky balance, since the pods are meant to be pristine white, and you have to cover dark primer and/or light-blocking paint.
I recommend using black primer (sadly Tamiya don’t make any. Citadel Chaos Black is pretty smooth and light-blocking, though) and then some “silver” paint. Black absorbs light and the metal powder in the silvery paint blocks it. Paint lightly and test the LEDs after coats. You want the thinnest coat possible on outer surfaces. Multiple light coats are better than one heavy one, and airbrushes give you more control than rattlecans.
If you fill the underside interior with putty, as I suggested earlier, you should be able to keep paint off the underside interior of the control panels. But take your time - examine and mask each area carefully before painting!
I don’t recommend thicker and more opaque paint, such as black t-shirt paint, even on interior surfaces that aren’t visible. This is because you don’t want to mess up the tight joins. In particular, the upper half of the model fits extremely tightly over the lower half. In fact, because of the sphere curvature the upper half has to expand and bend slightly to fit. So don’t try too many dry run test fits, because you could end up weakening the upper sphere!
Painting details
The pods were mostly just a moderately shiny, but not glossy, white. They were supposed to be pristine vehicles that never saw anything other than the pod bay and space. There are relatively few areas, at least at this tiny scale, that weren’t white (though see the section below on earmuffs)
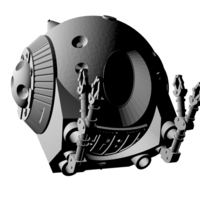
Earmuffs
The “earmuffs” are the two flattened cones on either side of the pod. Note that the black sections of the earmuffs are actually built into the lower sphere. The idea is to prime or paint these sections black, mask them with tape or weakly-adhering putty, paint the rest of the model white, and then glue the white earmuffs into place. This yields sharper and more precise results than masking off and painting the tiny black areas by hand.
Sadly it wasn’t possible to do this around the window opening. You might want to prime the pod black, mask the inner window frame, and then paint the exterior white. Again, don’t apply too many layers as then the earmuffs won’t fit. Black primer is sufficient.
The two earmuffs are not identical, as per the original vehicles. The back of each earmuff is marked with small triangles pointing up. They’re also labelled P and S for port and starboard, so it’s easy to tell which goes where. (port being the pilot’s left side)
Note: cut off the protruding runner completely after removing the part from the sprue, or else the earmuff won’t fit!
The arms
These are extremely fragile owing to their size. They’re boxed with protective sprues to help shield them in shipping, but you still have to exercise extreme caution when cutting them off and handling them. They’re slightly thicker than they should be for scale, but any thinner and they’d be unprintable using Shapeways’ acrylic processes!
This pod comes with both arms up for pod bay stowage and general flight. The arms all have straight cylindrical extensions that you keep intact when cutting off the sprues. You can then glue the painted arms into position, or you could just put them in and rely on friction. The latter approach also avoids the problem of glue oozing out, and lets you change arms.
Finally, did I mention that the arms are fragile and easily broken?
Drawbacks
Is this pod design 100% perfect? Well, no. There are a few compromises in detailing, especially the interior controls and lower exterior panel, that were necessary to make the design printable. The arms are unavoidably thicker. And the resin print process can result in tiny stairsteps or striped lines. But those are technological limitations at this point in time. Fortunately most are hard for the naked eye to see, and are only obvious in macro photographs.
So there you have it. The best teeny-tiny EVA pod ever. I’m looking forward to seeing what you can do with it!
Thanks.
The digital model making up this pod is entirely my own work. But I couldn't have made it as accurate as I could without the excellent prior research by Simon Atkinson, Thomas Reddie, Paul Bodensiek, UHU02, Eliot R. Brown and others. And not to mention Stanley Kubrick, Harry Lange, and the production crew of 2001 who made the original pods in the first place!
* Are these pods actually 1:144 scale? Probably not. But that's what the Moebius Discovery One kit says on the box, so I thought I'd label them the same way. Basically the pods were designed to look nice next to this particular kit.
“Really amazing work for such a small model. Congratulations.”
– Adam Johnson, designer of the Moebius Models Discovery XD-1 kit.
“These things are really, really good. Amazing little pods. And the great thing about these pods is that they actually fit through the doors the way they're supposed to!"
– Steve Neill, modelmaker extraordinaire.
Want a pod with an open window and full interior? Check out the best super-tiny model of the 2001 EVA pod ever made! How can I make this bold claim? Well:
- despite its minuscule 17mm height, it’s as accurate to the original miniatures as can be 3D printed.
- it fits perfectly through the pod bay doors of Moebius Models’ Discovery kit (billed as 1:144* scale).
- it has an open window (optionally glazed) with full interior details. I’m not kidding: an interior at this size!
- it’s got special holders for prewired SMD LEDs. You can add fibre optic headlights, a HAL camera eye, and even internal panel lighting!
- it’s carefully designed for painting and assembly. For example, the black areas of the “earmuffs” are separate parts from the white areas, so you can get razor-sharp black details without screwing around with masking! The top and bottom halves of the sphere fit perfectly together.
- This version comes with manipulator arms in a parked position.
- its layout is optimized for the highest print quality possible. This means it’s a bit more expensive than one optimized for cost, but there are fewer areas of wax residue.
This model took me over a year to design, and I have to say I’m pretty damn proud of it. Here's a great video by modelmaker Ken Spriggs showing how to paint and light it, and here are some more details on the thing.
Five pod versions
There are five different products here, tailored to match different modelling goals.
Version A:
Open-door pod with two astronauts. Includes a helmeted pilot and a floating astronaut with an AE-35 unit. Six different arms in different positions.
The pilot can play either Poole or Bowman, depending on what colours you paint the suit. Owing to the print size the helmet is solid - the visor will need to be painted shiny black. Sadly he's missing his lower legs, so that the LEDs and fibres can fit.
The floating astronaut, with AE-35 in hand, can play either Bowman taking the AE-35 back to the Discovery, or Poole trying to put it back. The idea is you can float the astronaut and pod on wires near the Discovery’s antenna assembly. The open pod door is retracted to a tiny triangle in the upper corner, just like the original full-size pods.
Version B:
Closed-door pod with two astronauts. Includes a helmet-less pilot and a dead floating astronaut. Six different arms in different positions.
The seated pilot has no helmet, and so can play Bowman in the famous “open the pod bay door” scene, or for the rescue attempt scene.
The other figure is a floating dead Poole.
Version C:
Closed-door pod with one helmeted pilot. Two arms in stowed position. For general scenes of the pod flying through space.
Version D (this version):
Closed-door pod with no astronauts. Two arms in stowed position. For scenes of the pod parked in the bay.
This version lacks the square recess in the seat used for positioning the pilot. (though you can't really see this through the window anyway)
Version E:
This is just 3 copies of version D, grouped together for cost savings. I've also included an extra pod arm in case of breakage.
Installing LEDs
The bottom base has two hollow cylinders, each of which can hold a prewired SMD LEDs: ultra-tiny rectangular LEDs to which hair-thin wires have been soldered. The cylinders are designed around 0603 LEDs but of course 0401 LEDs work too.
Use warm white LEDs since the original movie headlights were tungsten. The base also has a central hole for wires or, if you want to display the pod hovering, brass tube. Solder one wire to the brass, and run insulated “magnet” wire down the interior of the tube.
The cylindrical holders have openings in the front so that the LEDs can tilt back and shine right into the headlight fibres. I would recommend installing the diodes by feeding the wires through the bottom first, then fitting the LEDs into the cylinders. Add a tiny drop of white glue, make sure they’re perfectly lined up, then let the glue harden. This protects the fragile solder joints by minimizing bending. I suggest ordinary white glue (PVA, Elmer’s, etc) because it holds well but can be removed if you have to make changes. Epoxy or superglue won’t let you do that.
Headlights
The lower half has internal tunnels for four 1mm fibre optic strands. These tunnels all turn inwards and toward the LEDs. I would probably fit and cut the fibres, test them carefully, but only install them at the very end of the process, once everything is assembled. (thus avoiding getting paint on them)
Note that the round disc-shaped base fits very snugly into the lower half of the sphere, and it’s difficult to remove. I’d probably put a temporary bit of wire into the hole at the centre of the disc, or install the mounting tube, if you need to test-fit it so you can pull it out.
Expose each outer fibre tip to heat from a flame (a candle or lighter or whatever) to “lens” or “mushroom” it. Alternatively a tiny drop of clear epoxy on each headlight, once the fibres are in place and tested, can give a lens effect, but is harder to control.
If you don't want to install fibres I've also included four cylindrical rods with rounded ends that you can put in to serve as unlit headlights. These don't look as good as fibres, but look okay, especially if a drop of varnish is placed on the rounded tip.
HAL eye
There was a HAL camera installed on the front of each pod, below the window. (some pods anyway - there are continuity errors in the film in this regard)
People like the red light, so this model has a hole for a 0.25mm fibre optic if you want to give HAL his implacable digital eye. There’s also an internal tunnel inside the lower body to guide the fibre towards an LED. Make sure it’s not too bright - HAL’s eye shouldn’t be as bright as the headlights! You can whittle the interior end slightly to reduce the transmitted light. You'll also need to dip each end in clear red paint, such as Tamiya transparent paint, to tint it.
Interior lighting
Control panels
The idea is to backlight the controls by letting LED light shine through the translucent body of the pod.
First, fill the underside of the model, where the circular base goes, with some removable putty. White poster-hanging putty works well. If you don’t do this, and paint gets in there, then you’ll block light from the LEDs. The putty also gives you a place to put a rod or skewer to hold the component while painting.
Next, prime the pod black and then lightly paint the pod with additional light-blocking paint. Aluminium paint works well, owing to the metal powder, and is closer to white than black primer. Then lightly paint the control panels and back walls black, and the curved wall interiors red.
Once it’s all painted, take a fine craft knife and carefully scrape the paint off the raised lights and screens, revealing bare plastic. A #16 offset blade might give you a better scraping angle than the pointier #11 type.
This is why most interior details are raised, even those which were recessed in the movie. Remember that not every control is lit in the film, so scrape off the paint in an arrangement that looks good to you. For printability reasons I couldn’t replicate the tiny lights on each panel exactly, but followed the general arrangement of lamps and screens in each area.
Scraping complete, you can put tiny spots of colour paint on the lights to tint them, or clear varnish where they’re supposed to be white. Or just cover the whole thing with some form of clear coat, since at this time we don’t know if bare 3D-printed acrylic has any longevity issues.
There are a couple of recessed areas, such as the rectangular red lights at the base of the rear walls, which are hard to light this way. You could paint those areas with latex masking paint, paint the final colour over the top, and then peel off the masks, but i find such paint fiddly to apply.
Ceiling light
You can also put a 0401 prewired LED into the ceiling. This optional light is for illuminating the pilot, such as the scene when Bowman arrives in the alien bedroom. There are grooves for the wires, and holes along the port side walls so you can run power down to the base of the pod. The grooves aren’t exactly true to prototype, but they’re also not visible from outside.
Again, I’d put the wiring in and then hold it in place with a tiny dot of white glue. Paint can then conceal the wiring. It’s best to install the LED over top of the light-blocking paint, to reduce the amount of light shining upwards.
Window
There is a recessed oval area, with a flat notch at the bottom, around the inside of the window area. Very very thin plastic sheet can be cut and installed for glazing. Don’t use superglue - it can run and mess up the plastic, or cause it to fog or craze. I’d probably just use a tiny dot or two of white glue owing to the removability factor. Apply thin masking tape to the plastic before cutting and fitting, to reduce scratches.
Note one small area of 2001 controversy is the shape of the pod window - was the glazing flat, or curved like a large cylinder, or a curved like a bubble? I believe the film props had slightly cylindrical glazing (with said cylinder horizontal) as there are photos of ceiling lights reflected as straight lines, but also other objects squashed vertically. However this model has a flat window, since it’s easier to install, plus at this tiny size you can’t tell anyway.
Of course you might want to leave the glazing out altogether. The reflections look good, but also obscure the interior details. Test and see what works for you!
Window visibility
All the flying pods in the movie had blacked-out windows. This is for practical reasons: the pods contained mechanisms for the arms, and didn’t have room for an interior with a pilot. The in-story justification might be that the pods had their windows polarized, like the astronaut helmets earlier in the film. However that only makes sense if the pod is facing the sun.
So it’s up to you if you want to black out the windows or allow the glorious interior detail to be visible! Since it’s tricky to paint the tiny window gloss black and the window frame matte black, it’s probably easier to use this model with its interior and use gloss black window material, than to use a one-piece version of the pod.
Cleaning
The pod components have a lot of nooks and crannies where support wax and cleaning oils, used by the 3D printers, will lurk. It’s absolutely essential that you clean all parts thoroughly before painting. Paint can only stick to bare plastic, so don’t miss this vital step!
Unlike my solid pod design, which was designed as a single object for lowest printing costs, this version is optimized for highest quality. So it comes in pieces that are at different orientations to the direction of printing. Nonetheless you will need to smooth areas that rested on the support wax during printing. Those sections will be slightly rougher and textured.
The main areas that need attention are the back of the upper sphere, the curved sides of the lower section, and the flat plane beneath the lower front headlights.
I find that scraping those areas gently with the side of a flat knife blade got the main bits smooth, followed by some 1000 grade emery paper. Even scratching gently with a fingernail works surprisingly well. Just be sure not to sand over any areas with detail, such as recessed grooves, and heed the word “gently”!
Check out this page for further cleaning advice.
Painting
The key point, if you’re planning on installing lighting, is to paint the pod with light-blocking paint first, so that the whole thing doesn’t glow unconvincingly like a frosted light bulb. But you also want to make sure the layers are lightly applied so that the details aren’t obscured by gobs of paint. A tricky balance, since the pods are meant to be pristine white, and you have to cover dark primer and/or light-blocking paint.
I recommend using black primer (sadly Tamiya don’t make any. Citadel Chaos Black is pretty smooth and light-blocking, though) and then some “silver” paint. Black absorbs light and the metal powder in the silvery paint blocks it. Paint lightly and test the LEDs after coats. You want the thinnest coat possible on outer surfaces. Multiple light coats are better than one heavy one, and airbrushes give you more control than rattlecans.
If you fill the underside interior with putty, as I suggested earlier, you should be able to keep paint off the underside interior of the control panels. But take your time - examine and mask each area carefully before painting!
I don’t recommend thicker and more opaque paint, such as black t-shirt paint, even on interior surfaces that aren’t visible. This is because you don’t want to mess up the tight joins. In particular, the upper half of the model fits extremely tightly over the lower half. In fact, because of the sphere curvature the upper half has to expand and bend slightly to fit. So don’t try too many dry run test fits, because you could end up weakening the upper sphere!
Painting details
The pods were mostly just a moderately shiny, but not glossy, white. They were supposed to be pristine vehicles that never saw anything other than the pod bay and space. There are relatively few areas, at least at this tiny scale, that weren’t white (though see the section below on earmuffs)
Earmuffs
The “earmuffs” are the two flattened cones on either side of the pod. Note that the black sections of the earmuffs are actually built into the lower sphere. The idea is to prime or paint these sections black, mask them with tape or weakly-adhering putty, paint the rest of the model white, and then glue the white earmuffs into place. This yields sharper and more precise results than masking off and painting the tiny black areas by hand.
Sadly it wasn’t possible to do this around the window opening. You might want to prime the pod black, mask the inner window frame, and then paint the exterior white. Again, don’t apply too many layers as then the earmuffs won’t fit. Black primer is sufficient.
The two earmuffs are not identical, as per the original vehicles. The back of each earmuff is marked with small triangles pointing up. They’re also labelled P and S for port and starboard, so it’s easy to tell which goes where. (port being the pilot’s left side)
Note: cut off the protruding runner completely after removing the part from the sprue, or else the earmuff won’t fit!
The arms
These are extremely fragile owing to their size. They’re boxed with protective sprues to help shield them in shipping, but you still have to exercise extreme caution when cutting them off and handling them. They’re slightly thicker than they should be for scale, but any thinner and they’d be unprintable using Shapeways’ acrylic processes!
This pod comes with both arms up for pod bay stowage and general flight. The arms all have straight cylindrical extensions that you keep intact when cutting off the sprues. You can then glue the painted arms into position, or you could just put them in and rely on friction. The latter approach also avoids the problem of glue oozing out, and lets you change arms.
Finally, did I mention that the arms are fragile and easily broken?
Drawbacks
Is this pod design 100% perfect? Well, no. There are a few compromises in detailing, especially the interior controls and lower exterior panel, that were necessary to make the design printable. The arms are unavoidably thicker. And the resin print process can result in tiny stairsteps or striped lines. But those are technological limitations at this point in time. Fortunately most are hard for the naked eye to see, and are only obvious in macro photographs.
So there you have it. The best teeny-tiny EVA pod ever. I’m looking forward to seeing what you can do with it!
Thanks.
The digital model making up this pod is entirely my own work. But I couldn't have made it as accurate as I could without the excellent prior research by Simon Atkinson, Thomas Reddie, Paul Bodensiek, UHU02, Eliot R. Brown and others. And not to mention Stanley Kubrick, Harry Lange, and the production crew of 2001 who made the original pods in the first place!
* Are these pods actually 1:144 scale? Probably not. But that's what the Moebius Discovery One kit says on the box, so I thought I'd label them the same way. Basically the pods were designed to look nice next to this particular kit.
Details
What's in the box:
EVA Pod 1-144 D

Dimensions:
Success Rate:
First To try.
What's this?
Rating:
Mature audiences only.