


HintererSchrankSchiebetuerSchiene
Made by
Print With Shapeways
 Choose Your Material
 Choose your color and finish
$92.27
Have a question about this product?
contact the designerYou must be logged in and verified to contact the designer.
Product Description
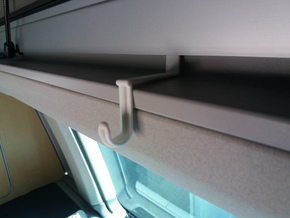
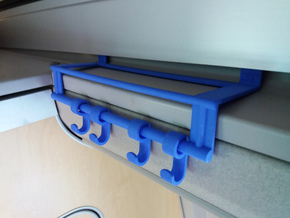
Habt Ihr das Problem bei eurem VW T5 California auch ?
Die "Rolltüre" bei dem hinteren Schrank zerlegt sich in ihre einzelnen Segmente. Was tun ?
Ersetzt die "Rolltüre" doch einfach durch eine einschiebbare Kunsstoffplatte !
Hier findet Ihr die notwendigen Führungsschienen und einen Griff dafür. Die Schienen werden einfach an Stelle des vorderen Originalführungsteils mit dem Schrank verschraubt (oben und unten, bitte ausprobieren, welche Schiene wo passt, sie sind spiegelverkehrt). Dazu könnt ihr direkt die Originalschraube nutzen. Ihr müsst nur noch eine passende Kunststoffplatte mit 3 mm Materialstärke passgenau zuschneiden und den Griff auf Höhe der Aussparung bei der linken Türe an die Kunststoffplatte klemmen. Die 3-Milimeter Platten gibt es in vielen Farben für wenig Geld in jedem Baumarkt.
Schaut euch die Photos an, die erklären mehr als 1000 Worte ;-)
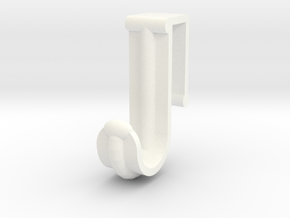
Inhalt des 3D-Tools:
Die Kunstoffplatte sowie die auf den Photos zu sehenden weissen Dichtungen sind NICHT Teil des 3D-Tools. Die Dichtungen sind nicht notwendig, aber sinnig, auch die gibt es für wenig Geld in jedem Baumarkt.
-----
Do you have the same problem with your VW T5 California ?
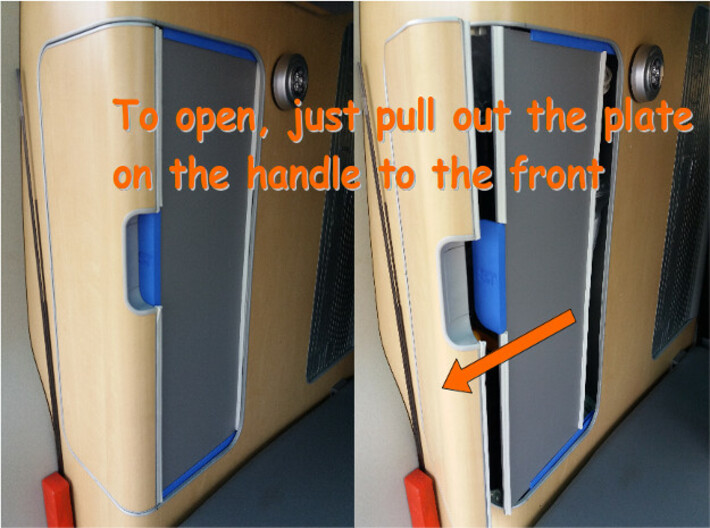
The "roller door" at the rear cabinet breaks down into its individual segments. What to do ?
Simply replace the "rolling door" by a retractable plastic plate !
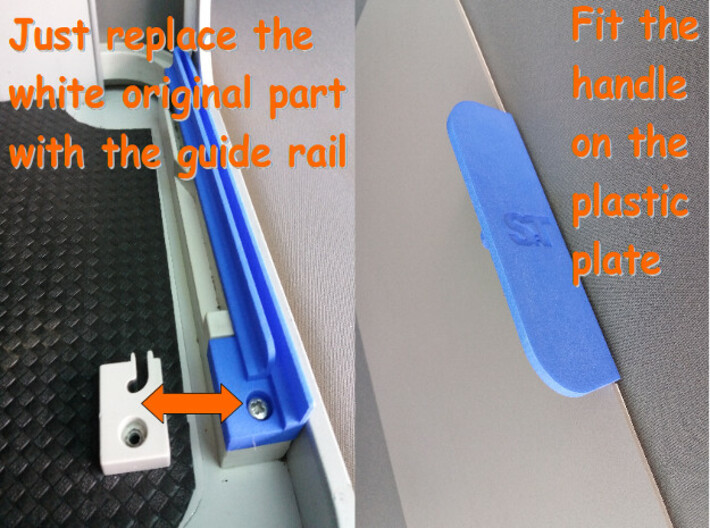
Here you will find the necessary guide rails and a handle for it. The rails are simply bolted to the cabinet instead of the front original guide part (top and bottom, please try out which rail fits where, they are mirror-inverted). You can directly use the original screw. All you have to do is cut a matching plastic plate with a thickness of 3 mm and fit the handle on the plastic plate at the level of the recess in the left-hand door. The 3-milimeter plates are available in many colors for little money in every hardware store.
Take a look at the pictures that explain more than 1000 words ;-)
Contents of the 3D tool:
The plastic plate and the white gaskets on the photos are NOT part of the 3D tool. The gaskets are not necessary, but they are useful, and they are also available for little money in any hardware store.
Die "Rolltüre" bei dem hinteren Schrank zerlegt sich in ihre einzelnen Segmente. Was tun ?
Ersetzt die "Rolltüre" doch einfach durch eine einschiebbare Kunsstoffplatte !
Hier findet Ihr die notwendigen Führungsschienen und einen Griff dafür. Die Schienen werden einfach an Stelle des vorderen Originalführungsteils mit dem Schrank verschraubt (oben und unten, bitte ausprobieren, welche Schiene wo passt, sie sind spiegelverkehrt). Dazu könnt ihr direkt die Originalschraube nutzen. Ihr müsst nur noch eine passende Kunststoffplatte mit 3 mm Materialstärke passgenau zuschneiden und den Griff auf Höhe der Aussparung bei der linken Türe an die Kunststoffplatte klemmen. Die 3-Milimeter Platten gibt es in vielen Farben für wenig Geld in jedem Baumarkt.
Schaut euch die Photos an, die erklären mehr als 1000 Worte ;-)
Inhalt des 3D-Tools:
- obere Führungsschiene
- untere Führungsschiene
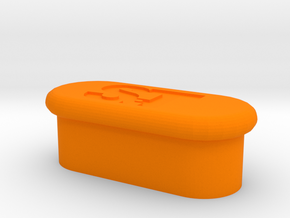
- Griff
Die Kunstoffplatte sowie die auf den Photos zu sehenden weissen Dichtungen sind NICHT Teil des 3D-Tools. Die Dichtungen sind nicht notwendig, aber sinnig, auch die gibt es für wenig Geld in jedem Baumarkt.
-----
Do you have the same problem with your VW T5 California ?
The "roller door" at the rear cabinet breaks down into its individual segments. What to do ?
Simply replace the "rolling door" by a retractable plastic plate !
Here you will find the necessary guide rails and a handle for it. The rails are simply bolted to the cabinet instead of the front original guide part (top and bottom, please try out which rail fits where, they are mirror-inverted). You can directly use the original screw. All you have to do is cut a matching plastic plate with a thickness of 3 mm and fit the handle on the plastic plate at the level of the recess in the left-hand door. The 3-milimeter plates are available in many colors for little money in every hardware store.
Take a look at the pictures that explain more than 1000 words ;-)
Contents of the 3D tool:
- upper guide rail
- lower guide rail
- Handle
The plastic plate and the white gaskets on the photos are NOT part of the 3D tool. The gaskets are not necessary, but they are useful, and they are also available for little money in any hardware store.
Details
What's in the box:
Back Cabinet Sango

Dimensions:
Success Rate:
First To try.
What's this?
Rating:
Mature audiences only.

More From This Shop
$9.00
$8.50