
Gray PA12

SquonkModY V1.0
Made by
Print With Shapeways
 Choose Your Material
 Choose your color and finish
$41.29
Have a question about this product?
contact the designerYou must be logged in and verified to contact the designer.
Product Description
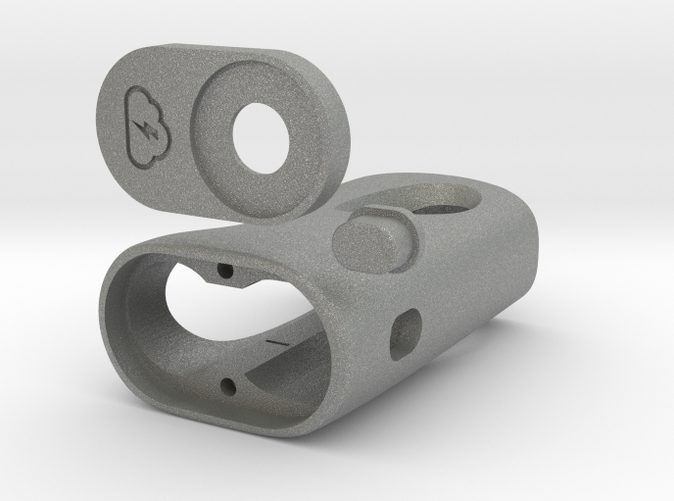
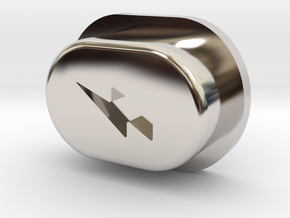
Ver 1.0 (18650 Battery /22mm 510)
Y-mod is a pure mech mod that uses ModDog components with a 22mm 510. Its is made up of three parts, the body, the top plate and the fire button. All three are included here. Should you want to print top plate and button in a different colour or to use a 16mm or 12mm 510, please see links below.
FOR ADVANCED USERS ONLY –– REFER TO OTHER SOURCES FOR UNDERSTANDING OHMS LAW AND BATTERY SAFETY. NOT FOR BEGINNERS. SAFETY ALWAYS COMES FIRST!
Whats included:
1. Body of the mod that holds battery and bottle
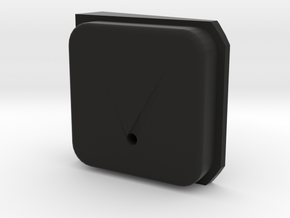
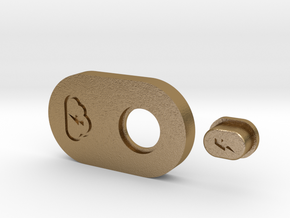
2. Top Plate for 12mm 510 with Logo Engraved
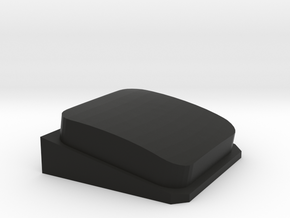
3. Fire Button
Optional extras for printing in other colours or steel (soon):
→ SquonkModY V1.0 22mm 510 Flat Top Plate and Button (included)
→ SquonkModY V1.0 16mm 510 Flat Top Plate and Button (for 16mm ModDog 510s)
→ SquonkModY V1.0 12mm 510 Flat Top Plate and Button (for 12mm ModDog 510s)
→ SquonkModY V1.0 22mm 510 MM510 Flat Top Plate and Button (for MM510s - requires custom top contact)
→ Beauty Rings: Angular 18/22 and Simple 18/22 for matchy-matchy
Dimensions: H71mm x W46mm x D28mm
Requires 22mm Nano Series V2 510 Connector 22 BF
Fits 18mm maximum diameter bottles (round)
WHAT YOU NEED:
– ModDog Nano Series V2 510 Connector 22 BF (default) or 16 BF/12 BF (for optional part)
– ModDog Bent Bottom Contact Plate
– ModDog Dimpled Top Contact Plate
– ModDog 510 Contact Plate
– Guys Magnets' 4 x 3x3mm Neodymium N52 Disk Magnets
Full bundle of parts also available for purchase from Stealthvape.
For custom build contacts, see this drawing here.
ModDog also offer alternative finishes to the above components including plain copper. Please check ModDog website for more information.
Alternative 510s:
– SVAsk 22mm by SVA
– MM510 with 22mm Washer and Large Postive Nut and Custom Top Contact
– ModMaker Micro 510
– Others TBC
Building the mod:
– Build 510 Connector from the components provided. Refer to ModDog Manual
– Fix 4x Magnets to the top plate and body (see tips below how to do this best)
– Position 510 into the top plate opening
– Add Dimpled Top Contact Plate to the underside of the 510
– Tighten the 510 large nut using the tightening kit
– Add 510 Contact Plate to the 510 positive and align towards the button
– Tighten the small 510 nut
– Position fire button into the opening of the body
– Place Bent Bottom Contact Plate inside the body of the mod using the 3 catch points.
– Adjust 510 contact plate to it makes flat contact with the bent plate (slightly rotate)
– Battery goes in POSITIVE DOWN
– Your mod is now complete.
CAUTION/NOTES
3D PRINT RESIDUE: Please clear any small gaps of residue left by the 3d printing. This is especially the case with the recessed areas that hold the bottom plate in place. There maybe some dust leftover preventing the plate to be in perfect position. Similarly, if there are any slight burls in the print around the edges, please do not sand them, leave them and they wear down with use. The colour finish on nylon plastics in particular is very thin and they have a white core to them, if you sand too much you’ll reveal the white.
TOLERANCES: If you find that there is some tolerances issues like for example the fire button doesn't smoothly go through the opening, please do not sand it, its just residue from the 3d printing and will smooth out after use. Simply running the button through the opening a few times will sort this out. Another issue maybe the magnets and while in theory they do not need gluing, magnets do vary slightly in size and try another if one is too loose. If all fails and they are coming out then do resort to super glue or epoxy.
MAGNETS: Please take care when positioning your magnets. First of all they need to be flush with the body of the mod and second, the polarity needs to be correct between the body and top plate. If you place them with incorrect polarity there is no way of getting them out. To place your magnets correctly start by first placing them into the top plate of the mod. Once they are in (flush), use the same top plate as a way to (1) ensure the right polarity and (2) to guide them into the mod body. Place the new magnet on top of the already inserted magnet in the top plate and then place the top plate into the body and guide your new magnet into its place in the body. Repeat the same process for the last magnet remaining. In the future if you decide to print more bodies and plates, use your first mod always to guide the magnets in the new mods. This will ensure that polarity on all your Y_mods is matched and you can mix and match bodies and top plates.
FIXING THE 510: I also recommend using MM 510 510 Tightening Kit or ModDog 510 Assembling Tool with 510 Connectors Wrench Keychain otherwise you may lock up your atty in 510 as you are screwing down the 510.
SAFETY: There are no locks on this mod so safety comes first. The contacts are known to bend over time and dirt may collect on the plates. This dirt can also act as a bridge and cause autofire. This is the case with ALL mech mods so regular cleaning of your contacts is a must. If silver coated contacts, use rubber ereaser to remove any residue/dirt that has collected. For colid copper contacts (custom made) please follow guidlines on maintaining copper. Finally, REMOVE BATTERY FROM YOUR MOD WHEN NOT IN USE – which is the only way to ensure 100% safety.
Making of photos and parts documentation is available here.
Q/A
Q: Do I have to use ModDog parts and contacts?
A: No, you don't. We chose ModDog because of their quality and availability. If you want to make your own contacts, you can and we provide drawings (see above). You can also use alternative 510s, see links above.
Q: Are there more pictures of the mods so I can see how they look IRL?
A: Yes, see link above for making of photos or join our Facegroup for regular updates and pictures from users.
Q: Is there a tube that hides the battery?
A: No, the battery is exposed in this version. If you prefer to hide it, check out the alternative "Nutter" edition.
Q: Can I adjust travel distance for my fire button?
A: Yes if you are using ModDog's Silver Plated Copper 510 Contact Plate. Alternativly you may need to bend your negative contact plate (not recomended).
Q: My fire button is a bit wobbly, how do I fix this?
A: Bend the contact plate slightly towards the button. This will force it into place and hold it there nice and tight.
Q: I made a mistake with my magnets and they are repelling each other instead of attracting?
A: Unless you can get them out (very hard/near imposible) you will need to order the new top plate.
Q: My battery seems too short for the mod and its not making contact. Can it be adjusted?
A: Bend either the positive or negative contact slightly towards the battery. If you bend it too much the top plate won't be flush with the top of the mod – find the right balance.
Q: My top plate is sticking out too much. What do I do?
A: Please check that your contacts are not bent too much and pushing the battery and plate out. Generally only 0.5mm bend is required for extra short 18650 batteries.
Need more help? Join the Facebook Group → https://www.facebook.com/groups/174399370002485/
Improvements planned for Ver 1.1
- None at the moment
Y-mod is a pure mech mod that uses ModDog components with a 22mm 510. Its is made up of three parts, the body, the top plate and the fire button. All three are included here. Should you want to print top plate and button in a different colour or to use a 16mm or 12mm 510, please see links below.
FOR ADVANCED USERS ONLY –– REFER TO OTHER SOURCES FOR UNDERSTANDING OHMS LAW AND BATTERY SAFETY. NOT FOR BEGINNERS. SAFETY ALWAYS COMES FIRST!
Whats included:
1. Body of the mod that holds battery and bottle
2. Top Plate for 12mm 510 with Logo Engraved
3. Fire Button
Optional extras for printing in other colours or steel (soon):
→ SquonkModY V1.0 22mm 510 Flat Top Plate and Button (included)
→ SquonkModY V1.0 16mm 510 Flat Top Plate and Button (for 16mm ModDog 510s)
→ SquonkModY V1.0 12mm 510 Flat Top Plate and Button (for 12mm ModDog 510s)
→ SquonkModY V1.0 22mm 510 MM510 Flat Top Plate and Button (for MM510s - requires custom top contact)
→ Beauty Rings: Angular 18/22 and Simple 18/22 for matchy-matchy
Dimensions: H71mm x W46mm x D28mm
Requires 22mm Nano Series V2 510 Connector 22 BF
Fits 18mm maximum diameter bottles (round)
WHAT YOU NEED:
– ModDog Nano Series V2 510 Connector 22 BF (default) or 16 BF/12 BF (for optional part)
– ModDog Bent Bottom Contact Plate
– ModDog Dimpled Top Contact Plate
– ModDog 510 Contact Plate
– Guys Magnets' 4 x 3x3mm Neodymium N52 Disk Magnets
Full bundle of parts also available for purchase from Stealthvape.
For custom build contacts, see this drawing here.
ModDog also offer alternative finishes to the above components including plain copper. Please check ModDog website for more information.
Alternative 510s:
– SVAsk 22mm by SVA
– MM510 with 22mm Washer and Large Postive Nut and Custom Top Contact
– ModMaker Micro 510
– Others TBC
Building the mod:
– Build 510 Connector from the components provided. Refer to ModDog Manual
– Fix 4x Magnets to the top plate and body (see tips below how to do this best)
– Position 510 into the top plate opening
– Add Dimpled Top Contact Plate to the underside of the 510
– Tighten the 510 large nut using the tightening kit
– Add 510 Contact Plate to the 510 positive and align towards the button
– Tighten the small 510 nut
– Position fire button into the opening of the body
– Place Bent Bottom Contact Plate inside the body of the mod using the 3 catch points.
– Adjust 510 contact plate to it makes flat contact with the bent plate (slightly rotate)
– Battery goes in POSITIVE DOWN
– Your mod is now complete.
CAUTION/NOTES
3D PRINT RESIDUE: Please clear any small gaps of residue left by the 3d printing. This is especially the case with the recessed areas that hold the bottom plate in place. There maybe some dust leftover preventing the plate to be in perfect position. Similarly, if there are any slight burls in the print around the edges, please do not sand them, leave them and they wear down with use. The colour finish on nylon plastics in particular is very thin and they have a white core to them, if you sand too much you’ll reveal the white.
TOLERANCES: If you find that there is some tolerances issues like for example the fire button doesn't smoothly go through the opening, please do not sand it, its just residue from the 3d printing and will smooth out after use. Simply running the button through the opening a few times will sort this out. Another issue maybe the magnets and while in theory they do not need gluing, magnets do vary slightly in size and try another if one is too loose. If all fails and they are coming out then do resort to super glue or epoxy.
MAGNETS: Please take care when positioning your magnets. First of all they need to be flush with the body of the mod and second, the polarity needs to be correct between the body and top plate. If you place them with incorrect polarity there is no way of getting them out. To place your magnets correctly start by first placing them into the top plate of the mod. Once they are in (flush), use the same top plate as a way to (1) ensure the right polarity and (2) to guide them into the mod body. Place the new magnet on top of the already inserted magnet in the top plate and then place the top plate into the body and guide your new magnet into its place in the body. Repeat the same process for the last magnet remaining. In the future if you decide to print more bodies and plates, use your first mod always to guide the magnets in the new mods. This will ensure that polarity on all your Y_mods is matched and you can mix and match bodies and top plates.
FIXING THE 510: I also recommend using MM 510 510 Tightening Kit or ModDog 510 Assembling Tool with 510 Connectors Wrench Keychain otherwise you may lock up your atty in 510 as you are screwing down the 510.
SAFETY: There are no locks on this mod so safety comes first. The contacts are known to bend over time and dirt may collect on the plates. This dirt can also act as a bridge and cause autofire. This is the case with ALL mech mods so regular cleaning of your contacts is a must. If silver coated contacts, use rubber ereaser to remove any residue/dirt that has collected. For colid copper contacts (custom made) please follow guidlines on maintaining copper. Finally, REMOVE BATTERY FROM YOUR MOD WHEN NOT IN USE – which is the only way to ensure 100% safety.
Making of photos and parts documentation is available here.
Q/A
Q: Do I have to use ModDog parts and contacts?
A: No, you don't. We chose ModDog because of their quality and availability. If you want to make your own contacts, you can and we provide drawings (see above). You can also use alternative 510s, see links above.
Q: Are there more pictures of the mods so I can see how they look IRL?
A: Yes, see link above for making of photos or join our Facegroup for regular updates and pictures from users.
Q: Is there a tube that hides the battery?
A: No, the battery is exposed in this version. If you prefer to hide it, check out the alternative "Nutter" edition.
Q: Can I adjust travel distance for my fire button?
A: Yes if you are using ModDog's Silver Plated Copper 510 Contact Plate. Alternativly you may need to bend your negative contact plate (not recomended).
Q: My fire button is a bit wobbly, how do I fix this?
A: Bend the contact plate slightly towards the button. This will force it into place and hold it there nice and tight.
Q: I made a mistake with my magnets and they are repelling each other instead of attracting?
A: Unless you can get them out (very hard/near imposible) you will need to order the new top plate.
Q: My battery seems too short for the mod and its not making contact. Can it be adjusted?
A: Bend either the positive or negative contact slightly towards the battery. If you bend it too much the top plate won't be flush with the top of the mod – find the right balance.
Q: My top plate is sticking out too much. What do I do?
A: Please check that your contacts are not bent too much and pushing the battery and plate out. Generally only 0.5mm bend is required for extra short 18650 batteries.
Need more help? Join the Facebook Group → https://www.facebook.com/groups/174399370002485/
Improvements planned for Ver 1.1
- None at the moment
Details
What's in the box:
Y_MOD_V1_B7
Dimensions:
Success Rate:
First To try.
What's this?
Rating:
Mature audiences only.

More From This Shop
$35.00