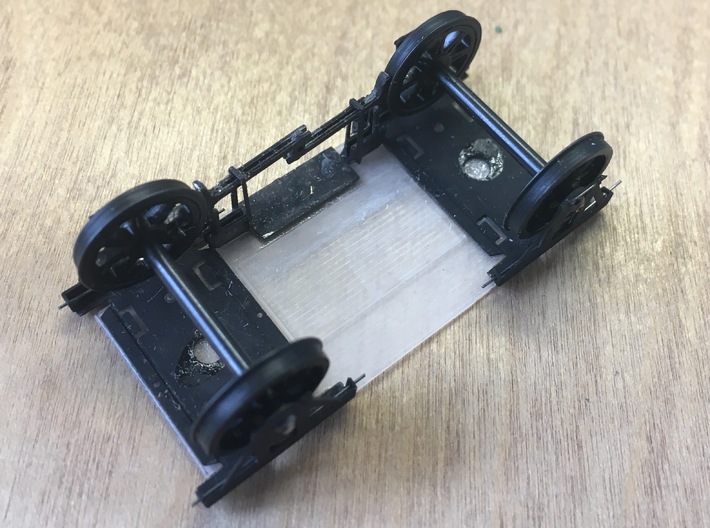
Baseplate with axleguards and brakes fitted. Etched parts not included in this product.

Product Description
A set of three of baseplates to align Bill Bedford's etched axleguards and brakes. These work with the etches BBWF001-4 "1907 RCH sprung axleguards - 4mm". They can be used with printed brake-assemblies from this shop (this is the mk2 version of the baseplate with the pegs to align the brakes) or with Bedford etch BBCES900-4 "RCH 9' wagon brake gear - 4mm".
The Bedford etches are a well-established solution for upgrading rolling stock, but they can only work to best advantage if properly aligned. This printed base aligns the axleguards in all three planes, giving the correct wheelbase. The 0.5mm thickness of the base under the axleguards gives the packing to get correct buffer-height for typical plastic kits and particularly for the Slaters' kits of Midland and PO wagons. The thin section of the base between the axles supports the brakes and sligns them so that the shoes do not rub on the wheels.
Instructions for use
Fold up the axleguards but leave the "bridge" connecting each pair of axleguard completely flat; don't fold up the sides of the bridge. If you want to spray-paint the axleguards, or to blacken them chemically, do it now as it will be harder to do when they are mounted. Don't fit the wheels yet as they would be in the way at the next step.
Open out the two 1mm-diameter holes on the bridge of each axleguard-pair until they just fit over the pegs on the printed base. A cutting broach is the best tool for this. Press the axleguards onto the pegs. If you have not over-widened the hole, friction should hold the axleguards in place for the next step. Once mounted, it's probably impossible to remove the axleguards from the base without breaking the pegs, but you shouldn't need to do so.
Now fit the springs and wheels and confirm the buffer height. If you are building a Slaters' kit for a PO wagon or MR wagon, if you put the floor where the kit designer intended, and if you weight the vehicle to the convential 40-50g, then the buffer height should be correct when the baseplate is sitting flush against the floor. For other arrangements you might need extra packing. If you find you need less packing than the 0.5mm built into the baseplate then this design may not be suitable for your needs; you could try mounting the baseplate the other way up sothat it is below the axleguard bridges when in the wagon.
When satisfied that you can get the buffer height right, glue the axleguards to the base. The pegs aren't strong enough to hold them permanently. I fix them by letting cyanoacrylate glue into the big hole at the centre of each axleguards bridge.
If using printed brakes, clip them onto the side pegs of the baseplate. This immediately positions the shoes so that they do not drag on the wheels. Slide the brakes laterally across the wagon to align the shoes with teh wheels; it should be possible to set them for P4, EM or OO. Makes sure that there is clearance between the inside of the shes and the wheel flanges to avoid drag; this is particularly important in OO. Fix the brakes to the baseplate with cyanoacrylate glue.
If you are using the etched brakes, make up and spray or blacken the units and test them for fit before gluing. I find that the faces of the brake shoes next to the wheels have to be reduced, by grinding or filing, to get working clearance; this is much easier to do before the brakes are fixed in place. Bear in mind that you need the shoes to clear the wheels when the springs are deflected by about 0.5mm by the weight of the wagon.
Remove the side pegs from the baseplate (cut them with side cutters and sand flat the stumps) to make a flat platform for the etched brakes.
For P4, the lateral position of the brakes should be right when the outer edge of their etched base aligns with the outer etch of the printed base. For EM, and certainly for OO, you may need to space them inboard slightly. Watch out for the shoes rubbing on the wheel flanges and bear in mind that you can bend the brake hangers outward very slighly to get clearance.