Smoothest Fine Detail Plastic


Docking Bay, 1:144
Made by
Print With Shapeways
 Choose Your Material
 Choose your color and finish
$42.52
Have a question about this product?
contact the designerYou must be logged in and verified to contact the designer.
Product Description
These are the scenic accessories you need to make a full diorama of Docking Bay 9 4. Recreate the audience's first sight of the Falcon in the first movie!
The parts are scaled to match the Bandai 1:144 Falcon kit, or the now-discontinued Fine Molds 1:144 Falcon. If you want a less expensive set containing just the props visible for the opening Falcon scene I have a partial Docking Bay 9 4 set. Finally, if you're looking for parts for the teeny "Vehicle 006" Bandai Falcon, I have a 1:350 version as well.
Please read the following if you're interested in these items.
These accurizing parts are not mass-market commercial products. I made them for my own use, and have put them here in case they're of interest to someone else. Possibly you, since you’re reading this.
These are components for the serious model maker who wants to build a more accurate miniature. They require finishing. If you don't want to trim, file, sand, and glue, then these aren't the parts you're looking for!
The parts are tiny, and easily broken. They push the limits of today's 3D printers. The detail in the digital previews is all there, but it won't always be visible at the miniscule sizes that this scale requires!
What you get.
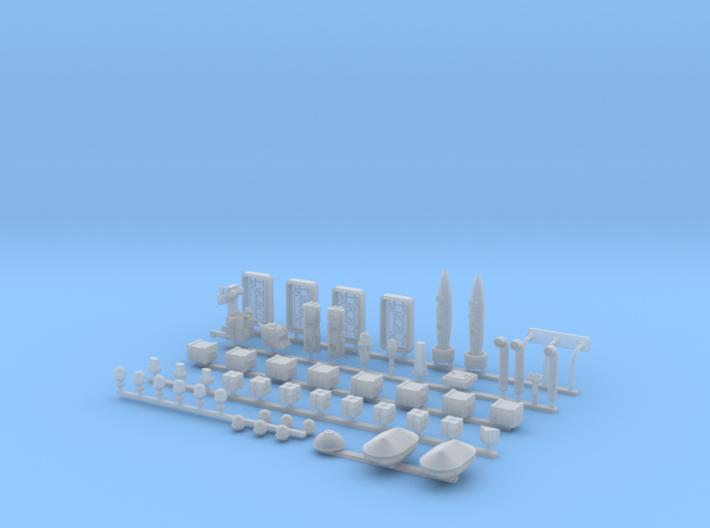
This excitingly fiddly set includes crates, ground lights, a forklift, doors, and various greeblies. Illuminated parts have holes for optional fibre optics. Since no full blueprints or complete photos of Docking Bay 9 4 are known to be publicly available, the models are based on screen grabs and behind-the-scenes shots, so they aren't necessarily 100% accurate.
Crates.
What self-respecting spaceport would be without a fine selection of space crates? Docking Bay 9 4 has a number of crates lying around - mostly cubes with circular patterns on each face, and bigger crates with rectangular grids. The grids are not modelled as they're too fine to be printable. The crates are too small to be printed individually, and so are attached to a flat plate. They'll need to be sawn off with a fine razor saw, and the sprue filed down. Or else keep the sprue attached and drill a 1mm hole in the diorama board. The parts are certainly much easier to paint on-sprue.
Greeblies.
There are additional random greebly thingies scattered around the set, conveying an air of general mechanical decrepitude, and I've made models of many of them. However I've omitted a few that are too small or are difficult to make out in the screen shots. The greeblies include:
Forklift.
Did you notice the ordinary British-made Lansing Bagnall red forklift (technically a "reach truck") in the docking bay? It's hidden in plain sight - just sitting quietly against the back wall, equipped with an enormous claw for lifting rolls of paper and other cylindrical objects. Since it appears in making-of shots, it was probably used to build the set in Elstree, England, back in 1976. And then it was just left there once the cameras started rolling. The model needs some thin wires for the safety bars and grid-like roof. These aren't included since they're unprintably small. I was barely able to get the steering wheel and pedals in there.
Ground lights.
Both episodes 4 and 5 feature these round lamps on the ground. They're actually US military runway lights from World War II - “Bartow” type D-1 beacons built by the Line Material Company of Pennsylvania; widely deployed in Britain to illuminate the runways of US airbases. Thirty years later some of these beacons were bought as surplus scrap by Roger Christian and the set decorating team, and became a minor footlight, er, footnote, in movie history.
Unfortunately the beacons are really difficult to model at 1:144 scale as they're so small. So I've made two versions. There are complete versions which can't be lit, but which can be sawn off the base plates. And there are hollow versions with a hole in the bottom. These have to be cut off the sprue, and 1mm fibre optic inserted into the hole. This fibre will serve both as a post and a light delivery mechanism, allowing you to light the suckers up.
This is extremely fiddly work. The beacon's hole will need to be thoroughly cleaned of support wax, which means running it under very hot water and gently poking a 0.75mm or 0.5mm wire into the hole until you can scrape out the softened wax. This takes time. Experiment with the correct location for the fibre to be positioned inside the beacon - too high and it won't illuminate the clear section, and too low and you'll lose light. Keep the fibre run really short - put a really bright light source immediately under the baseboard at each beacon point. Regardless you'll find that the beacon won't light up that brightly, which is okay as they weren't in the movie either. You'll need to prime and paint the lower half, and clear-coat the upper lit half to protect the acrylic resin.
Doorways.
There are a number of yellow-painted doors in the docking bay, and I've supplied doors and frames accordingly. These doors have the same pattern as the one behind which the robots hide from marauding troops in an earlier scene.
In fact, keen-eyed fans will notice that a door with the same rounded criss-cross pattern was painted gloss white and recycled as the front airlock of the ship in the opening sequence. Though seen at the start of the film, this hallway attack was actually one of the last scenes shot in England for the 1977 movie.
What you don't get in this set.
No human or alien figures. No robots. There are a number of tiny details omitted - mainly because you can't see them clearly in the film, or they're too small or finely built to make into printable models. Simple objects such as the pair of yellow waist-high posts, aren't here since they're easily made with some stretched sprue. Building features, such as air intakes, pipes, and the SE cranes, are omitted. Finally I didn't include any hoses or cables since they're best made using fine wire.
The parts are scaled to match the Bandai 1:144 Falcon kit, or the now-discontinued Fine Molds 1:144 Falcon. If you want a less expensive set containing just the props visible for the opening Falcon scene I have a partial Docking Bay 9 4 set. Finally, if you're looking for parts for the teeny "Vehicle 006" Bandai Falcon, I have a 1:350 version as well.
Please read the following if you're interested in these items.
These accurizing parts are not mass-market commercial products. I made them for my own use, and have put them here in case they're of interest to someone else. Possibly you, since you’re reading this.
These are components for the serious model maker who wants to build a more accurate miniature. They require finishing. If you don't want to trim, file, sand, and glue, then these aren't the parts you're looking for!
The parts are tiny, and easily broken. They push the limits of today's 3D printers. The detail in the digital previews is all there, but it won't always be visible at the miniscule sizes that this scale requires!
What you get.
This excitingly fiddly set includes crates, ground lights, a forklift, doors, and various greeblies. Illuminated parts have holes for optional fibre optics. Since no full blueprints or complete photos of Docking Bay 9 4 are known to be publicly available, the models are based on screen grabs and behind-the-scenes shots, so they aren't necessarily 100% accurate.
Crates.
What self-respecting spaceport would be without a fine selection of space crates? Docking Bay 9 4 has a number of crates lying around - mostly cubes with circular patterns on each face, and bigger crates with rectangular grids. The grids are not modelled as they're too fine to be printable. The crates are too small to be printed individually, and so are attached to a flat plate. They'll need to be sawn off with a fine razor saw, and the sprue filed down. Or else keep the sprue attached and drill a 1mm hole in the diorama board. The parts are certainly much easier to paint on-sprue.
Greeblies.
There are additional random greebly thingies scattered around the set, conveying an air of general mechanical decrepitude, and I've made models of many of them. However I've omitted a few that are too small or are difficult to make out in the screen shots. The greeblies include:
- The angular blue box - maybe some kind of power supply? - that sits beneath the Falcon. It has two red lights on the top - quite possibly German-built Hella 2RL rotating beacons with the motors turned off. I've added holes for running fibre optics (either 0.25mm or 0.75mm - see which option works best for you) to these lamps, though you may need to clean out the printing support wax from there. You'll also need to mask off the beacons before painting the body, and clear-coat instead of priming them. Finish off the lights with a little transparent red paint. Be really careful - the lights are insanely delicate and fragile! Behind-the-scenes photos show that this box has a kind of rectangular exhaust pipe thingie protruding from the top back, but it's too small to 3D print properly. I also put a small 0.25mm hole at the top for a fibre optic light.
- Two copies of the stacked barrel sort of objects - the props shown to the left of our heroes as they first enter the docking bay. These have holes for fibres for the green (left) and red (right) lights in the middle. 0.25mm fibres are closest to scale, but you could drill out the holes for 0.5mm to have them more noticeable. There's also space for an SMD LED to be installed. Ideally you'll putty over the hole when that's done, though since these props are against a wall the gap isn't too noticeable.
- The two mysterious tall totem pole things that we get a really brief glimpse of twice in the scene. I've had to guess the details on these stretched ovoid objects. They also need thin wire pipes or rails.
- The sort of low dome thing behind the Falcon, near the back wall. This is only briefly visible for a split second during the scene.
- Pipes that stand near the walls. One group also has a control panel on a short post, but since we never see the panel top I added a couple of random greeblies. I also put a 0.25mm hole through this panel and post for fibre, but you'll need to run some fine wire or something to clean the support wax out of that.
- The mysterious low yellow-painted tank-like things situated over on the left side of the set. Presumably they're just throbbing with magic spaceship fuel, but who knows? In the movie they're surrounded by piles of silvery accordionlike hoses, which I haven't included with this model - you're best off using fine wire for that. IMPORTANT NOTE: I have since learnt that the design of these objects is incorrect. The front is right, since that's the only bit we see in the film, but the back should actually be tapered. I'm working on corrected replacements for this issue if that's of concern to you
- Two cylindrical post thingies seen in the background behind the strange yellow tanks. These are barely visible in the film, and I haven't found any decent behind-the-scenes photographs showing any more details. So I've had to guess a lot of details on these objects, I'm afraid.
- Finally there are low grey tapered flattened cylinder things. (two under the Falcon and one hidden behind the forklift)
Forklift.
Did you notice the ordinary British-made Lansing Bagnall red forklift (technically a "reach truck") in the docking bay? It's hidden in plain sight - just sitting quietly against the back wall, equipped with an enormous claw for lifting rolls of paper and other cylindrical objects. Since it appears in making-of shots, it was probably used to build the set in Elstree, England, back in 1976. And then it was just left there once the cameras started rolling. The model needs some thin wires for the safety bars and grid-like roof. These aren't included since they're unprintably small. I was barely able to get the steering wheel and pedals in there.
Ground lights.
Both episodes 4 and 5 feature these round lamps on the ground. They're actually US military runway lights from World War II - “Bartow” type D-1 beacons built by the Line Material Company of Pennsylvania; widely deployed in Britain to illuminate the runways of US airbases. Thirty years later some of these beacons were bought as surplus scrap by Roger Christian and the set decorating team, and became a minor footlight, er, footnote, in movie history.
Unfortunately the beacons are really difficult to model at 1:144 scale as they're so small. So I've made two versions. There are complete versions which can't be lit, but which can be sawn off the base plates. And there are hollow versions with a hole in the bottom. These have to be cut off the sprue, and 1mm fibre optic inserted into the hole. This fibre will serve both as a post and a light delivery mechanism, allowing you to light the suckers up.
This is extremely fiddly work. The beacon's hole will need to be thoroughly cleaned of support wax, which means running it under very hot water and gently poking a 0.75mm or 0.5mm wire into the hole until you can scrape out the softened wax. This takes time. Experiment with the correct location for the fibre to be positioned inside the beacon - too high and it won't illuminate the clear section, and too low and you'll lose light. Keep the fibre run really short - put a really bright light source immediately under the baseboard at each beacon point. Regardless you'll find that the beacon won't light up that brightly, which is okay as they weren't in the movie either. You'll need to prime and paint the lower half, and clear-coat the upper lit half to protect the acrylic resin.
Doorways.
There are a number of yellow-painted doors in the docking bay, and I've supplied doors and frames accordingly. These doors have the same pattern as the one behind which the robots hide from marauding troops in an earlier scene.
In fact, keen-eyed fans will notice that a door with the same rounded criss-cross pattern was painted gloss white and recycled as the front airlock of the ship in the opening sequence. Though seen at the start of the film, this hallway attack was actually one of the last scenes shot in England for the 1977 movie.
What you don't get in this set.
No human or alien figures. No robots. There are a number of tiny details omitted - mainly because you can't see them clearly in the film, or they're too small or finely built to make into printable models. Simple objects such as the pair of yellow waist-high posts, aren't here since they're easily made with some stretched sprue. Building features, such as air intakes, pipes, and the SE cranes, are omitted. Finally I didn't include any hoses or cables since they're best made using fine wire.
Details
What's in the box:
Docking Bay 94, 1:144

Dimensions:
Success Rate:
First To try.
What's this?
Rating:
Mature audiences only.


