One of the fans in action! Painted black


Perfect Grade Falcon, 1:72, motorizable fans FUD
Made by
Print With Shapeways
 Choose Your Material
 Choose your color and finish
$51.56
Have a question about this product?
contact the designerYou must be logged in and verified to contact the designer.
Product Description
Bandai "Perfect Grade" 1:72 Falcon, engine deck fans.
Go for the ultimate in PG Falcon realism with motorized cooling fans!
Version 1: Motorizable Fans, FUD (“Frosted Ultra Detail”) Plastic
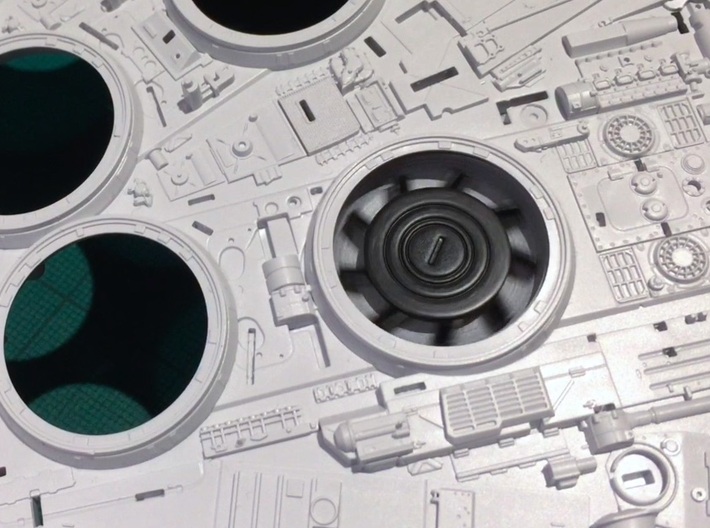
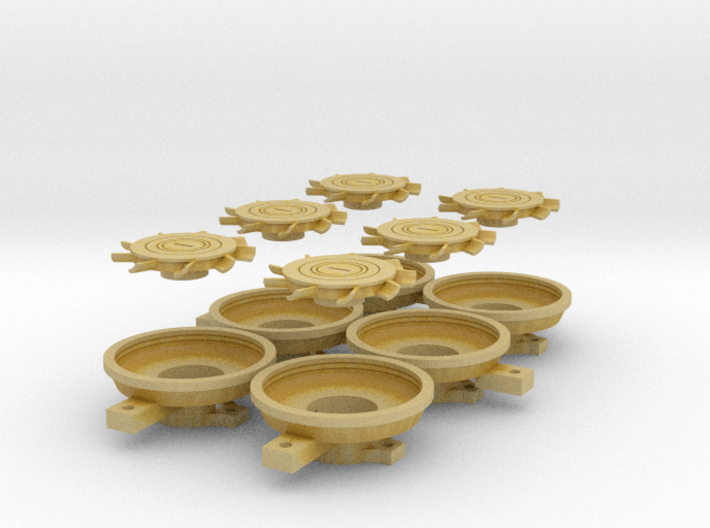
The simulated engine deck fans that come with Bandai's 1:72 "Perfect Grade" Falcon model kit have four problems.
First, they're injection moulded as a single component with the whole back piece, so the blades sort of meld into the sides and bottom of the fan interior. This doesn't look right and makes them a little awkward to paint. Second, the rectangular slots in the middle of each fan seem longer than those on the movie miniature, and some are misaligned. Third, the tops of the fans should be aligned individually to the curvature of the top hull, but the Bandai 1:72 fans are all vertically aligned to the horizon, as it were. And finally, you can't motorize the fans because they're all one piece of plastic.
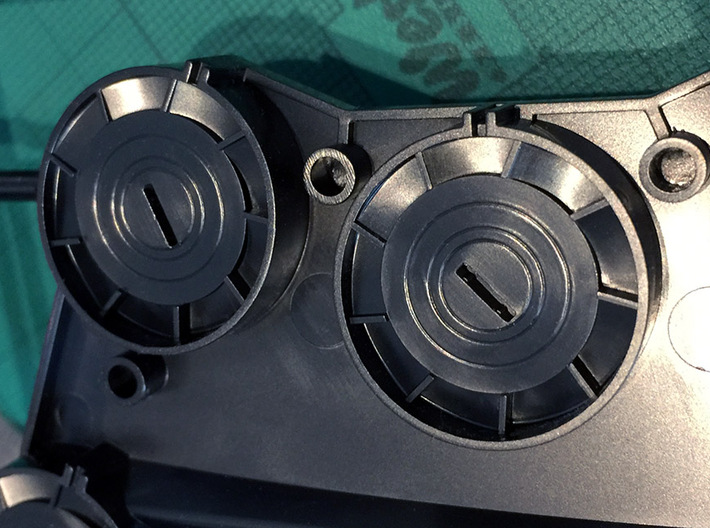
So I decided to make this 3D print, which addresses all four points. Photos of the prototype suggest that the discs and blades were black plastic, and the general dish area of the fan was a medium-dark grey. Since the Bandai grilles let a lot more light through than the Koolshade original parts, you may want to darken the dish area for less contrast, and make sure all surfaces are matte. Though having said that, if you have a lighter dish colour you'll be able to see the blades turning more easily.
For a video of one of my Falcon fans in action, check out this link!
Model accurate.
A lot of add-on fans for various Falcon kits feature all kinds of random designs, but I tried to make these as accurate to the 1976/77 five foot shooting miniature as possible. That means a big flat central disc with concentric scribed rings, nine blades, and a rectangular slot.
Not that it really matters, of course, since you can't see the fan details in any of the movies anyway. But if we're going for accuracy, let's go all out!
The big gotcha.
There's one huge problem with motorizing the fans: the motors extend down, and will interfere with the engine area's internal frame, the edge of Bandai's engine lighting system, and the battery box.
You will need to cut half-circle notches into the top saucer frame, and cut notches into the top of the curved LED holder, in order to clear the down-pointing motors. If you plan on using Bandai's battery box you'll have to cut out some supports and lower it within the saucer section. (I'm replacing the Bandai box with a lithium pack, both to extend lighting runtime and to avoid the battery box entirely) Having motors in the top deck will also make it fiddly to remove to access the batteries.
You're going to have to make some special modifications to install these fans. If you'd rather not mess with this, and are OK with more accurate fans that don't move, I have static versions of the fan design as well.
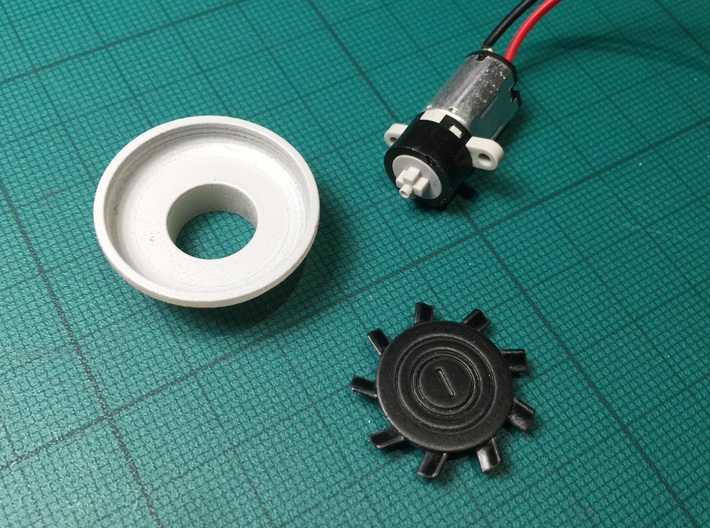
Motors.
These parts are designed to accommodate tiny DC motors with planetary gears. Why? Why not just use a teeny tiny 25mm cooling fan from a computer?
Very simply, such actual cooling fans spin so quickly you can't really see the blades. So what's the point of modelling them, then? Why not just have the central discs without blades? Unless your goal is to blow air out of them, which isn't necessary with LED illumination!
No, for the fans to spin in a visible way you need to have a lower speed. The geared motors let you have really slow rotational speeds - around 60-90 rpm when running at low voltages. They're also pretty cheap. Of course, real cooling fans are considerably quieter than motors with planetary gears, so that's one drawback of the idea.
If these seem too slow, maybe think of them as suited to a parked and idling Falcon, with cooling engines. Or something.
Now I can't guarantee motor-fan compatibility. I have no control over whether these planetary gear motors will be discontinued or if their specifications will change. Sorry. The ones I used are here, though they also seem to be sold by Robotshop. They're DC motors 10mm wide and 19mm long, with planetary gears. They have 4mm cross-shaped output shafts. They're available in 3 volt and 6 volt, nominal, versions.
Installation.
If you're not worried about the motors failing someday and needing to be replaced, you can of course glue the dishes straight to the engine quarter plate.
However, if you want to keep things accessible in case of failure, things get more complicated. I moulded tabs into each dish. But because the engine quarter deck part isn't thick enough to accommodate screws, and there are no convenient nearby posts or brackets, you'll have to cement some nuts to the plastic around the dish openings. Use metal-compatible epoxy. Then you can use M1.6 bolts to fasten the dishes to the nuts.
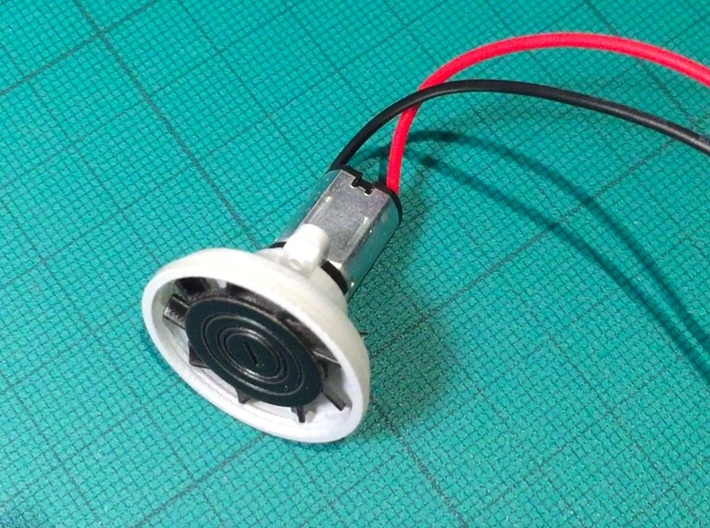
Attaching the motors to the printed dishes, by contrast, is pretty straightforward. I've built lugs into the cylinder ends, designed to fit M1.6 (1.6mm) bolts, 6mm long. The fan dishes also have notches cut into each cylinder that will accommodate M1.6 nuts.
Do NOT screw the motors to the dish brackets, because the brittle 3D printed plastic will crack! Glue also won't work, since the black plastic rings on the motors seem to be made from Delrin or a similar flexible ungluable plastic.
Solder the motors together in parallel, and use a simple two-pin electrical connector if you want the whole assembly to be easily detachable.
This isn't a super-sturdy way of attaching the dishes, but it should be okay. And you'll be able to replace the motors if they were to fail, and you would be able to detach the fans from the motors easily. (assuming you kept the engine quarter plate as a removable component)
Print resolution of this version: Ultra or Extreme.
The fans are available in "Frosted Ultra Detail" only. This version is not available in the slightly higher resolution "Frosted Extreme Detail" because the single sprued part is too large to print in Extreme.
This isn't a big deal, though. The fans are underneath a grille, and are dark in colour, so you don't really need the highest resolution possible. Note that I didn't sprue the fan blades to minimize the risk of bits of plastic sticking out, causing the fans to become unbalanced.
However, if you really want this fan set modelled in the "Frosted Extreme Detail" high-resolution process, I have another version available. It's pretty expensive, though.
Two material version.
In an attempt to lower the cost I experimented with making the fans available using the "Strong and Flexible" plastic. However, only the dishes could be made using that material - the fan blades cannot unless they're hugely thickened. So I also make this version available using prints in two kind of plastic, resulting in minimal price savings. Still, if you want them they're here!
Fan dishes only in "Strong and Flexible" plastic.
Fan blades only in "Frosted Detail" plastic.
Go for the ultimate in PG Falcon realism with motorized cooling fans!
Version 1: Motorizable Fans, FUD (“Frosted Ultra Detail”) Plastic
The simulated engine deck fans that come with Bandai's 1:72 "Perfect Grade" Falcon model kit have four problems.
First, they're injection moulded as a single component with the whole back piece, so the blades sort of meld into the sides and bottom of the fan interior. This doesn't look right and makes them a little awkward to paint. Second, the rectangular slots in the middle of each fan seem longer than those on the movie miniature, and some are misaligned. Third, the tops of the fans should be aligned individually to the curvature of the top hull, but the Bandai 1:72 fans are all vertically aligned to the horizon, as it were. And finally, you can't motorize the fans because they're all one piece of plastic.
So I decided to make this 3D print, which addresses all four points. Photos of the prototype suggest that the discs and blades were black plastic, and the general dish area of the fan was a medium-dark grey. Since the Bandai grilles let a lot more light through than the Koolshade original parts, you may want to darken the dish area for less contrast, and make sure all surfaces are matte. Though having said that, if you have a lighter dish colour you'll be able to see the blades turning more easily.
For a video of one of my Falcon fans in action, check out this link!
Model accurate.
A lot of add-on fans for various Falcon kits feature all kinds of random designs, but I tried to make these as accurate to the 1976/77 five foot shooting miniature as possible. That means a big flat central disc with concentric scribed rings, nine blades, and a rectangular slot.
Not that it really matters, of course, since you can't see the fan details in any of the movies anyway. But if we're going for accuracy, let's go all out!
The big gotcha.
There's one huge problem with motorizing the fans: the motors extend down, and will interfere with the engine area's internal frame, the edge of Bandai's engine lighting system, and the battery box.
You will need to cut half-circle notches into the top saucer frame, and cut notches into the top of the curved LED holder, in order to clear the down-pointing motors. If you plan on using Bandai's battery box you'll have to cut out some supports and lower it within the saucer section. (I'm replacing the Bandai box with a lithium pack, both to extend lighting runtime and to avoid the battery box entirely) Having motors in the top deck will also make it fiddly to remove to access the batteries.
You're going to have to make some special modifications to install these fans. If you'd rather not mess with this, and are OK with more accurate fans that don't move, I have static versions of the fan design as well.
Motors.
These parts are designed to accommodate tiny DC motors with planetary gears. Why? Why not just use a teeny tiny 25mm cooling fan from a computer?
Very simply, such actual cooling fans spin so quickly you can't really see the blades. So what's the point of modelling them, then? Why not just have the central discs without blades? Unless your goal is to blow air out of them, which isn't necessary with LED illumination!
No, for the fans to spin in a visible way you need to have a lower speed. The geared motors let you have really slow rotational speeds - around 60-90 rpm when running at low voltages. They're also pretty cheap. Of course, real cooling fans are considerably quieter than motors with planetary gears, so that's one drawback of the idea.
If these seem too slow, maybe think of them as suited to a parked and idling Falcon, with cooling engines. Or something.
Now I can't guarantee motor-fan compatibility. I have no control over whether these planetary gear motors will be discontinued or if their specifications will change. Sorry. The ones I used are here, though they also seem to be sold by Robotshop. They're DC motors 10mm wide and 19mm long, with planetary gears. They have 4mm cross-shaped output shafts. They're available in 3 volt and 6 volt, nominal, versions.
Installation.
If you're not worried about the motors failing someday and needing to be replaced, you can of course glue the dishes straight to the engine quarter plate.
However, if you want to keep things accessible in case of failure, things get more complicated. I moulded tabs into each dish. But because the engine quarter deck part isn't thick enough to accommodate screws, and there are no convenient nearby posts or brackets, you'll have to cement some nuts to the plastic around the dish openings. Use metal-compatible epoxy. Then you can use M1.6 bolts to fasten the dishes to the nuts.
Attaching the motors to the printed dishes, by contrast, is pretty straightforward. I've built lugs into the cylinder ends, designed to fit M1.6 (1.6mm) bolts, 6mm long. The fan dishes also have notches cut into each cylinder that will accommodate M1.6 nuts.
Do NOT screw the motors to the dish brackets, because the brittle 3D printed plastic will crack! Glue also won't work, since the black plastic rings on the motors seem to be made from Delrin or a similar flexible ungluable plastic.
Solder the motors together in parallel, and use a simple two-pin electrical connector if you want the whole assembly to be easily detachable.
This isn't a super-sturdy way of attaching the dishes, but it should be okay. And you'll be able to replace the motors if they were to fail, and you would be able to detach the fans from the motors easily. (assuming you kept the engine quarter plate as a removable component)
Print resolution of this version: Ultra or Extreme.
The fans are available in "Frosted Ultra Detail" only. This version is not available in the slightly higher resolution "Frosted Extreme Detail" because the single sprued part is too large to print in Extreme.
This isn't a big deal, though. The fans are underneath a grille, and are dark in colour, so you don't really need the highest resolution possible. Note that I didn't sprue the fan blades to minimize the risk of bits of plastic sticking out, causing the fans to become unbalanced.
However, if you really want this fan set modelled in the "Frosted Extreme Detail" high-resolution process, I have another version available. It's pretty expensive, though.
Two material version.
In an attempt to lower the cost I experimented with making the fans available using the "Strong and Flexible" plastic. However, only the dishes could be made using that material - the fan blades cannot unless they're hugely thickened. So I also make this version available using prints in two kind of plastic, resulting in minimal price savings. Still, if you want them they're here!
Fan dishes only in "Strong and Flexible" plastic.
Fan blades only in "Frosted Detail" plastic.
Details
What's in the box:
1:72 Bandai PG Falcon engine fans

Dimensions:
Success Rate:
First To try.
What's this?
Rating:
Mature audiences only.


