Smoothest Fine Detail Plastic


Falcon Ramp and Landing Gear, 1:350
Made by
Print With Shapeways
 Choose Your Material
 Choose your color and finish
$17.23
Have a question about this product?
contact the designerYou must be logged in and verified to contact the designer.
Product Description
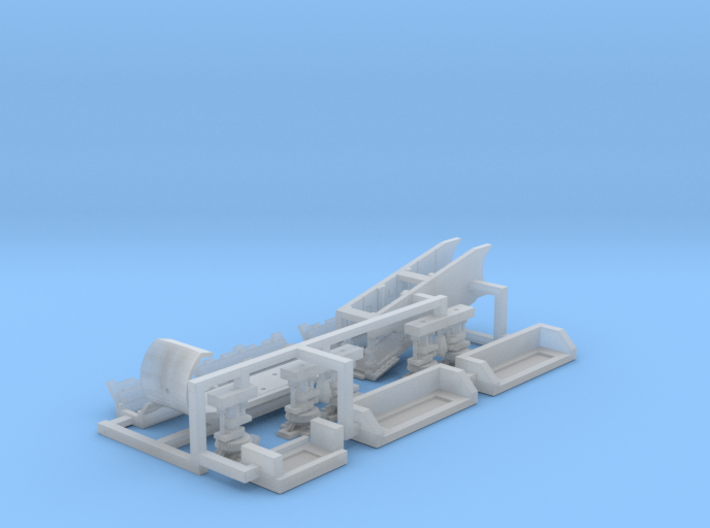
Bandai 1:350 Falcon. Set 3: Ramp and Landing Gear.
So, you bought the incredibly tiny Bandai Vehicle 006 model kit and want to show the Falcon parked on the ground. Maybe in a docking bay on a certain desert planet, or aboard an improbably huge space station.
Now you can, with this unbelievably small add-on landing gear and boarding ramp kit! The parts are scaled to 1:350 to match the 006 model.
IMPORTANT NOTE. This set was designed for the original release of the Bandai Falcon 006 kit, which represented the 1977 ANH Falcon with 3 landing gear boxes. It appears that in early 2018 a silent production change was made, and the model is now a representation of the ESB-era Falcon with 5 landing gear boxes. Also, there's a "Resistance" set which includes a TFA era Falcon now, and an "ESB"-era Falcon version.
This means that you shouldn't buy this set if you have 5 landing gear boxes, because the set does not include the two extra boxes and legs. I need to get around to making another set with 5 legs...
What you get.
You get the internal boarding ramp and back corridor. And you get 3 sets of landing gear with 5 feet, since the Bandai 006 model represents the original 1977 model. (all subsequent versions of the ship have featured 5 sets of landing gear with 7 feet) Each set of landing gear has simulated door flaps and an internal bracket for installation.
Installation Note.
This is one of the more complex accurizing sets I've produced, in terms of the amount of work required to install. Because the 1:350 kit is designed to be shown in-flight only, it doesn't have openings for either the ramp or the landing gear, the way its 1:144 sibling does.
So to install these parts you have to cut precise rectangular openings in the lower saucer. I'd recommend cutting a slightly smaller hole, and carefully filing and cutting the opening to fit the parts. Then you can glue the parts in place and patch with putty if required.
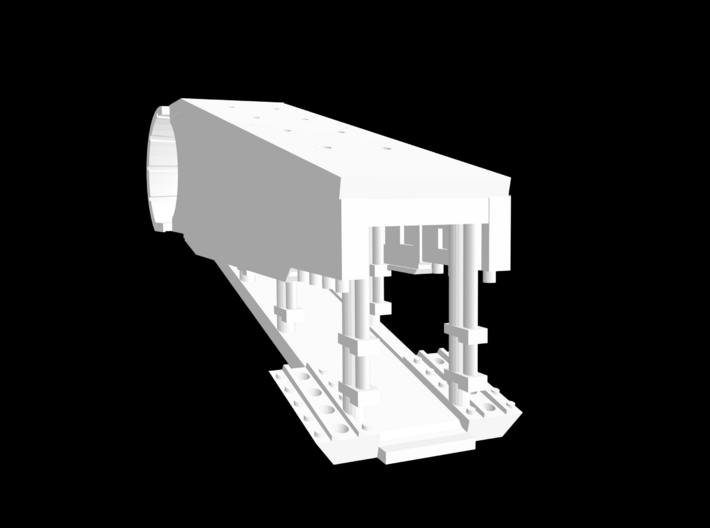
Ramp.
The ramp is fixed in a down position - the model is just too tiny to engineer a reliable moving ramp - and includes the visible sections of corridor. The ramp roof is equipped with holes for fibre optic lighting, and is a separate part in order to facilitate painting somewhat. The back wall of the internal corridor is included, with a hole for a fibre light. Note that the middle is a bit compressed. Partly to keep it simple and partly to clear the gunbays. However it's really hard to see up the tiny ramp, so it isn't too noticeable. But notice that I modelled the corridor correctly - it's a curved toroid corridor, which means the two rows of wall cushions curve outwards the way they should! How's that for insane attention to detail?
The ramp is NOT easy to install - you need to cut a perfect rectangular opening in the underside, glue in the ramp, and putty any slight gaps. The struts are a bit oversized, but unfortunately necessarily so to be printable and not too fragile. The ramp is constructed in two sections to facilitate painting of the interior.
The top of the ramp includes a very short segment of the internal corridor, including the famous Falcon hall cushions. There are small holes on the corridor wall and the ramp ceiling for fibres, so you can install lighting if you want.
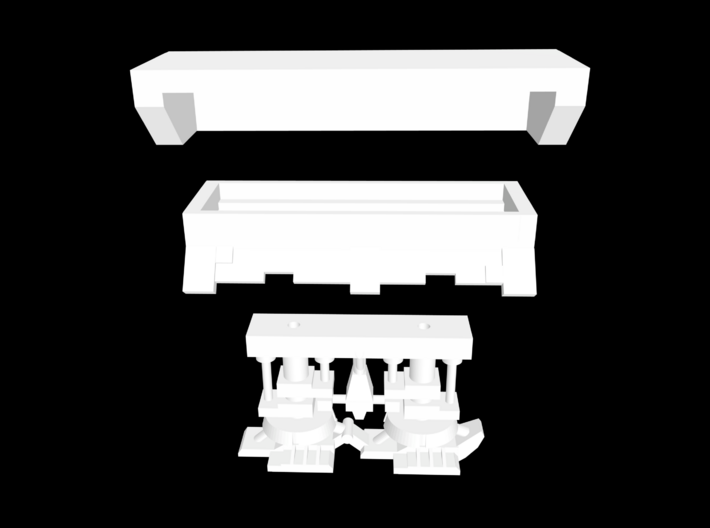
Landing gear with doors and brackets.
As noted, the 1977 Falcon has three landing gear boxes. You'll need to cut the Bandai gear boxes to install the internal support brackets from the inside. You can then install the landing gear from below, gluing them to the box. There is also a rectangular frame with the gear bay doors in a fixed open position. As with the ramp, this is not an easy modification to make, as it's such a tiny model.
All components are slightly overscale, as they'd be unprintably small if they were correct sizes! The gear rings are not pierced for the same reason. In fact, the legs are a little simplified because the Shapeways printing process can't actually render detail as sharply and precisely as Bandai's injection moulding process.
The legs are partly hollow so you can install a length of 0.5mm brass wire to improve the strength of the part. This makes a big difference, since the legs are pretty vulnerable to lateral pressure and will simply snap if bumped. To add a wire you'll need to use a tiny 0.6mm drill, and carefully and slowly drill out the landing gear legs by hand. I put a pilot hole at the top to simplify this process. I couldn't, however, make the legs hollow all the way down as it would have caused problems with printing.
Doors/flaps.
Next, there are the landing gear hatch doors. These are designed to represent the film set's doors, though the detailwork is a bit of an approximation as the available photographic documentation is a bit hard to come by. The doors are formed with rectangular brackets that fit into the opening, and so they need to be fitted before you glue the legs into place!
One cool aspect to this design, incidentally, is that the doors conceal the long edges of the rectangular hole, so if your hole in the saucer isn't perfect they'll be partly covered up. The frame doesn't help conceal flaws in the short edge of the hole, though.
Obviously there are no landing gear cables supplied with this set - for that you could use the thinnest magnet wire you can find, painted black, hanging in loops.
Please read the following if you're interested in these items.
These accurizing parts are not refined commercial products. They won't easily snap together like a Bandai plastic kit. I made them for my own use, and have put them here in case they're of interest to anyone else.
These are components for the serious model maker who wants to build a more accurate miniature. If you don't want to trim, sand, and glue, then these aren't the parts you're looking for!
The parts are tiny and easily broken. They push the limits of today's 3D printers. The detail in the digital previews is all there, but it won't always be visible at the miniscule sizes that this scale requires!
November 2019: Shapeways' changing algorithms affect pricing quite a bit. But by sprueing all the parts and rearranging them I was able to drop the price significantly. However this does mean you have to cut the parts off each sprue/runner very carefully! This is brittle 3D printed acrylic here. Use flush-cut sprue cutters - side-shear cutters tend to break things.
So, you bought the incredibly tiny Bandai Vehicle 006 model kit and want to show the Falcon parked on the ground. Maybe in a docking bay on a certain desert planet, or aboard an improbably huge space station.
Now you can, with this unbelievably small add-on landing gear and boarding ramp kit! The parts are scaled to 1:350 to match the 006 model.
IMPORTANT NOTE. This set was designed for the original release of the Bandai Falcon 006 kit, which represented the 1977 ANH Falcon with 3 landing gear boxes. It appears that in early 2018 a silent production change was made, and the model is now a representation of the ESB-era Falcon with 5 landing gear boxes. Also, there's a "Resistance" set which includes a TFA era Falcon now, and an "ESB"-era Falcon version.
This means that you shouldn't buy this set if you have 5 landing gear boxes, because the set does not include the two extra boxes and legs. I need to get around to making another set with 5 legs...
What you get.
You get the internal boarding ramp and back corridor. And you get 3 sets of landing gear with 5 feet, since the Bandai 006 model represents the original 1977 model. (all subsequent versions of the ship have featured 5 sets of landing gear with 7 feet) Each set of landing gear has simulated door flaps and an internal bracket for installation.
Installation Note.
This is one of the more complex accurizing sets I've produced, in terms of the amount of work required to install. Because the 1:350 kit is designed to be shown in-flight only, it doesn't have openings for either the ramp or the landing gear, the way its 1:144 sibling does.
So to install these parts you have to cut precise rectangular openings in the lower saucer. I'd recommend cutting a slightly smaller hole, and carefully filing and cutting the opening to fit the parts. Then you can glue the parts in place and patch with putty if required.
Ramp.
The ramp is fixed in a down position - the model is just too tiny to engineer a reliable moving ramp - and includes the visible sections of corridor. The ramp roof is equipped with holes for fibre optic lighting, and is a separate part in order to facilitate painting somewhat. The back wall of the internal corridor is included, with a hole for a fibre light. Note that the middle is a bit compressed. Partly to keep it simple and partly to clear the gunbays. However it's really hard to see up the tiny ramp, so it isn't too noticeable. But notice that I modelled the corridor correctly - it's a curved toroid corridor, which means the two rows of wall cushions curve outwards the way they should! How's that for insane attention to detail?
The ramp is NOT easy to install - you need to cut a perfect rectangular opening in the underside, glue in the ramp, and putty any slight gaps. The struts are a bit oversized, but unfortunately necessarily so to be printable and not too fragile. The ramp is constructed in two sections to facilitate painting of the interior.
The top of the ramp includes a very short segment of the internal corridor, including the famous Falcon hall cushions. There are small holes on the corridor wall and the ramp ceiling for fibres, so you can install lighting if you want.
Landing gear with doors and brackets.
As noted, the 1977 Falcon has three landing gear boxes. You'll need to cut the Bandai gear boxes to install the internal support brackets from the inside. You can then install the landing gear from below, gluing them to the box. There is also a rectangular frame with the gear bay doors in a fixed open position. As with the ramp, this is not an easy modification to make, as it's such a tiny model.
All components are slightly overscale, as they'd be unprintably small if they were correct sizes! The gear rings are not pierced for the same reason. In fact, the legs are a little simplified because the Shapeways printing process can't actually render detail as sharply and precisely as Bandai's injection moulding process.
The legs are partly hollow so you can install a length of 0.5mm brass wire to improve the strength of the part. This makes a big difference, since the legs are pretty vulnerable to lateral pressure and will simply snap if bumped. To add a wire you'll need to use a tiny 0.6mm drill, and carefully and slowly drill out the landing gear legs by hand. I put a pilot hole at the top to simplify this process. I couldn't, however, make the legs hollow all the way down as it would have caused problems with printing.
Doors/flaps.
Next, there are the landing gear hatch doors. These are designed to represent the film set's doors, though the detailwork is a bit of an approximation as the available photographic documentation is a bit hard to come by. The doors are formed with rectangular brackets that fit into the opening, and so they need to be fitted before you glue the legs into place!
One cool aspect to this design, incidentally, is that the doors conceal the long edges of the rectangular hole, so if your hole in the saucer isn't perfect they'll be partly covered up. The frame doesn't help conceal flaws in the short edge of the hole, though.
Obviously there are no landing gear cables supplied with this set - for that you could use the thinnest magnet wire you can find, painted black, hanging in loops.
Please read the following if you're interested in these items.
These accurizing parts are not refined commercial products. They won't easily snap together like a Bandai plastic kit. I made them for my own use, and have put them here in case they're of interest to anyone else.
These are components for the serious model maker who wants to build a more accurate miniature. If you don't want to trim, sand, and glue, then these aren't the parts you're looking for!
The parts are tiny and easily broken. They push the limits of today's 3D printers. The detail in the digital previews is all there, but it won't always be visible at the miniscule sizes that this scale requires!
November 2019: Shapeways' changing algorithms affect pricing quite a bit. But by sprueing all the parts and rearranging them I was able to drop the price significantly. However this does mean you have to cut the parts off each sprue/runner very carefully! This is brittle 3D printed acrylic here. Use flush-cut sprue cutters - side-shear cutters tend to break things.
Details
What's in the box:
Falcon Ramp, Landing Gear, 1/350

Dimensions:
Success Rate:
First To try.
What's this?
Rating:
Mature audiences only.


