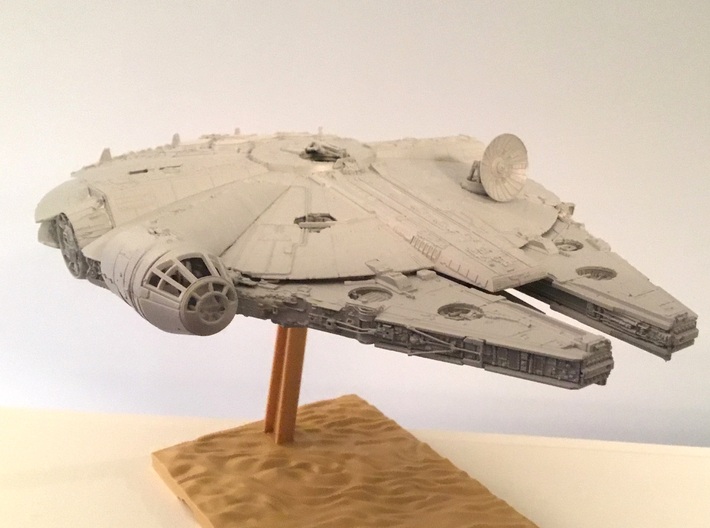
A beautiful build in progress by the RPF's Gregatron. He's used these sidewall parts, amongst other pieces. FALCON KIT NOT INCLUDED!


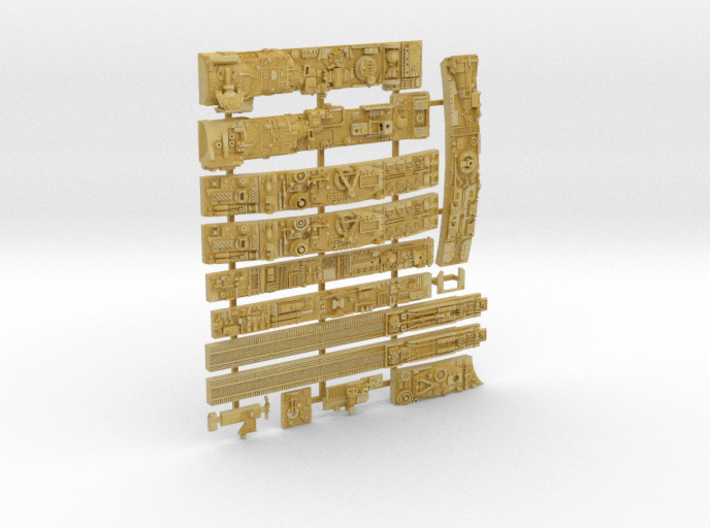
Bandai Falcon Sidewalls, 1:144
Made by
Print With Shapeways
 Choose Your Material
 Choose your color and finish
$36.64
Have a question about this product?
contact the designerYou must be logged in and verified to contact the designer.
Product Description
Bandai's 1:144 model of the Falcon is modeled after the TFA/Episode VII version, which has a bunch of pipes and other details (greeblies) located on the sides (sidewalls) of the ship, compared to the Original Trilogy spacecraft. I have nothing against the TFA design but, since I'd prefer an OT model, I've made a bunch of replacement sidewall parts. The sidewalls are compatible with all three Bandai 1:144 Falcons: the TFA version, the TLJ version, and the TROS version.
Take your Bandai TFA Falcon back in time to the Original Trilogy days! Complete the job with replacement maintenance pits, replacement docking rings, and additional details.
Five Foot Prototype
All of these components are closely based on the original five foot Falcon created in 1976 for the first movie. If you're used to the details of the 32" Falcon, such as the De Agostini or Fine Molds products, these sidewalls will look quite different.
My designs are based on photo documentation. I've done my best to reproduce every single greebly but there are a handful of minor deviations from the actual model. Note also that I've tried to replicate the model as it existed during shooting, based on photos taken during that time. More recent photos often have blank black spots where pieces have fallen off!
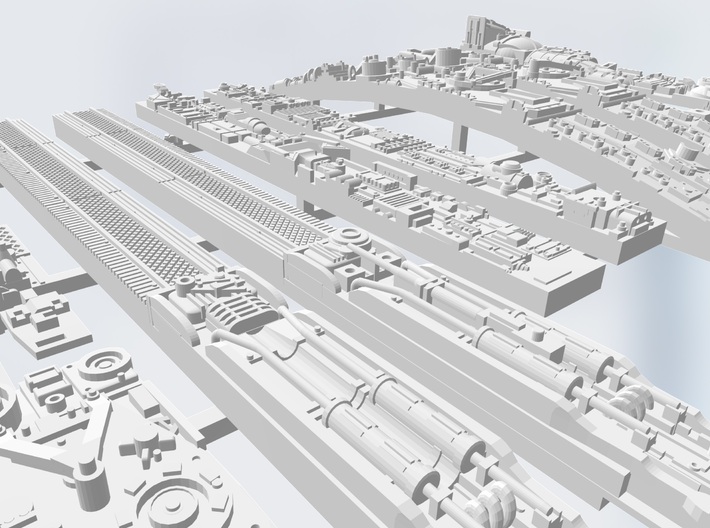
I've also created replacement sidewalls for the mandible interiors. This is partly because the Bandai ones aren't quite right - they're mirrored, for one thing, whereas the actual five foot model had minor differences between them. But also because the inner sections of the Bandai mandibles lack any engraved texture. The interior mandible parts I've made have overscaled engraved lines, but I think they capture the look a bit better.
Finally I've also had to make the sidewalls fit the shape, structure, and saucer details of the Bandai model. So there are a few areas where things have been stretched or moved slightly to accommodate existing parts of Bandai's base model.
Fitting the parts
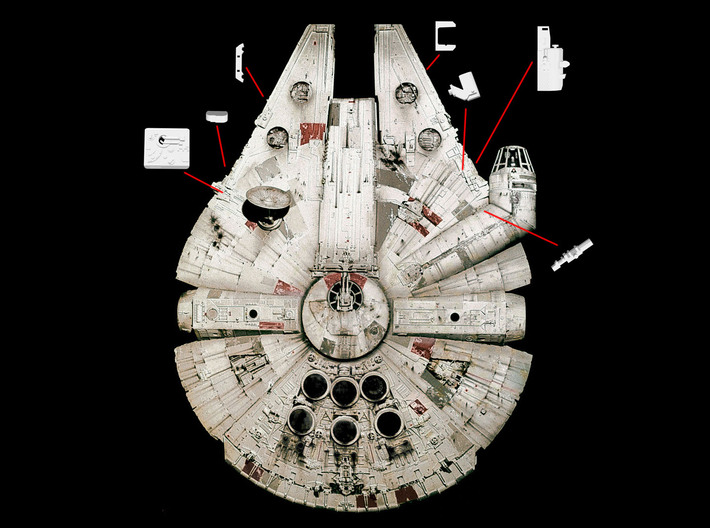
It was really tricky designing these pieces owing to the odd shapes and joins involved; especially for the curved section of the saucer. So I'm afraid that these sidewalls are NOT drop-in replacements for the Bandai ones! They will require some filing and sanding and cutting and adjusting, not to mention careful gluing in place, to fit properly. The areas around the two halves of the Entex rotary engine part (the bulgy bits at the wide ends of the outer mandibles) are particularly difficult to fit - they'll require a lot of cutting back of the Bandai plastics, installation of the additional small detail pieces, filing of the printed part, and gap filling with putty. I'd probably recommend using epoxy glue over superglue since epoxy can fill small gaps well.
These are parts for experienced model makers, not for people just starting out, I'm afraid!
Extra parts
There are a handful of struts or pipes missing, all in areas where you're better off making your own parts from thin wire and supergluing them in place. The triangular arrow shaped pipes on the right (starboard) mandible sidewall are one example. 3D printing isn't always the best solution for this sort of thin pipe shape. There lots of extra details that are attached by small sprues. Those will need to be carefully cut off with a razor saw (I don't recommend using snippers or a knife as they tend to make the acrylic shatter) and glued on separately. And a few components, such as the vertical half-cylinder greebly on the right (starboard) mandible sidewall will require careful drilling with a tiny (eg: .25mm) bit, since I couldn't get the holes to print correctly owing to their small size. And finally, I've made a few small detail parts to fit over the Entex engines, where the sidewalls join the saucer end of the mandibles. These will require some cutting back of the Bandai plastics.
Cleaning
Note that there are a number of components with significant overhangs and layering that will require careful cleaning to remove any support wax. But be very careful - the parts (especially the pipes) are thin, delicate, and easily broken!
Sprues
Shapeways now charges per part, so I've sprued the parts together to save a little money.
Finally, please read the following if you're interested in this thing.
These accurizing parts are not a mass-market commercial product. I made them for my own use, and have put them here in case they're of interest to someone else. Possibly you, since you’re reading this.
These items are components for the serious model maker who wants to build a more accurate miniature. They require finishing. If you don't want to trim, file, and sand, then these aren't the parts you're looking for!
The parts are tiny, and easily broken. They push the limits of today's 3D printers. The detail in the digital previews is all there, but it won't always be visible at the miniscule sizes that this scale requires!
The original filming miniature was designed by Joe Johnston and the ILM model-making team.
Big thanks to all the fans over the years who have generously posted photos of the 5 foot Falcon miniature, and Joshua Maruska, who built a fantastic model of the Entex engine that was a very useful resource for creating my version. Though I should point out that none of his files were incorporated into this model!
Take your Bandai TFA Falcon back in time to the Original Trilogy days! Complete the job with replacement maintenance pits, replacement docking rings, and additional details.
Five Foot Prototype
All of these components are closely based on the original five foot Falcon created in 1976 for the first movie. If you're used to the details of the 32" Falcon, such as the De Agostini or Fine Molds products, these sidewalls will look quite different.
My designs are based on photo documentation. I've done my best to reproduce every single greebly but there are a handful of minor deviations from the actual model. Note also that I've tried to replicate the model as it existed during shooting, based on photos taken during that time. More recent photos often have blank black spots where pieces have fallen off!
I've also created replacement sidewalls for the mandible interiors. This is partly because the Bandai ones aren't quite right - they're mirrored, for one thing, whereas the actual five foot model had minor differences between them. But also because the inner sections of the Bandai mandibles lack any engraved texture. The interior mandible parts I've made have overscaled engraved lines, but I think they capture the look a bit better.
Finally I've also had to make the sidewalls fit the shape, structure, and saucer details of the Bandai model. So there are a few areas where things have been stretched or moved slightly to accommodate existing parts of Bandai's base model.
Fitting the parts
It was really tricky designing these pieces owing to the odd shapes and joins involved; especially for the curved section of the saucer. So I'm afraid that these sidewalls are NOT drop-in replacements for the Bandai ones! They will require some filing and sanding and cutting and adjusting, not to mention careful gluing in place, to fit properly. The areas around the two halves of the Entex rotary engine part (the bulgy bits at the wide ends of the outer mandibles) are particularly difficult to fit - they'll require a lot of cutting back of the Bandai plastics, installation of the additional small detail pieces, filing of the printed part, and gap filling with putty. I'd probably recommend using epoxy glue over superglue since epoxy can fill small gaps well.
These are parts for experienced model makers, not for people just starting out, I'm afraid!
Extra parts
There are a handful of struts or pipes missing, all in areas where you're better off making your own parts from thin wire and supergluing them in place. The triangular arrow shaped pipes on the right (starboard) mandible sidewall are one example. 3D printing isn't always the best solution for this sort of thin pipe shape. There lots of extra details that are attached by small sprues. Those will need to be carefully cut off with a razor saw (I don't recommend using snippers or a knife as they tend to make the acrylic shatter) and glued on separately. And a few components, such as the vertical half-cylinder greebly on the right (starboard) mandible sidewall will require careful drilling with a tiny (eg: .25mm) bit, since I couldn't get the holes to print correctly owing to their small size. And finally, I've made a few small detail parts to fit over the Entex engines, where the sidewalls join the saucer end of the mandibles. These will require some cutting back of the Bandai plastics.
Cleaning
Note that there are a number of components with significant overhangs and layering that will require careful cleaning to remove any support wax. But be very careful - the parts (especially the pipes) are thin, delicate, and easily broken!
Sprues
Shapeways now charges per part, so I've sprued the parts together to save a little money.
Finally, please read the following if you're interested in this thing.
These accurizing parts are not a mass-market commercial product. I made them for my own use, and have put them here in case they're of interest to someone else. Possibly you, since you’re reading this.
These items are components for the serious model maker who wants to build a more accurate miniature. They require finishing. If you don't want to trim, file, and sand, then these aren't the parts you're looking for!
The parts are tiny, and easily broken. They push the limits of today's 3D printers. The detail in the digital previews is all there, but it won't always be visible at the miniscule sizes that this scale requires!
The original filming miniature was designed by Joe Johnston and the ILM model-making team.
Big thanks to all the fans over the years who have generously posted photos of the 5 foot Falcon miniature, and Joshua Maruska, who built a fantastic model of the Entex engine that was a very useful resource for creating my version. Though I should point out that none of his files were incorporated into this model!
Details
What's in the box:
Bandai 1:144 Sidewalls

Dimensions:
Success Rate:
First To try.
What's this?
Rating:
Mature audiences only.


