
Michaels Leica Parts
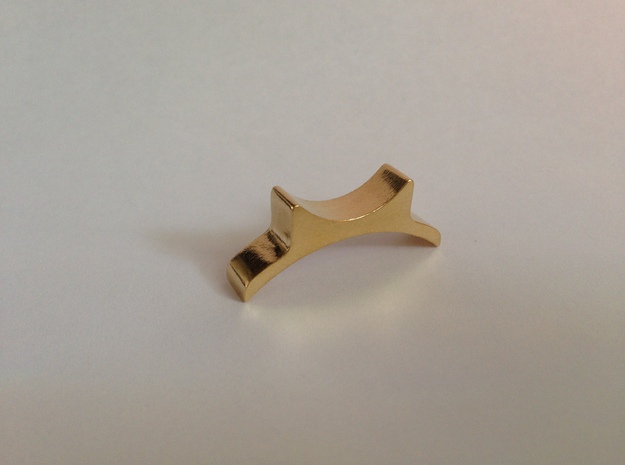
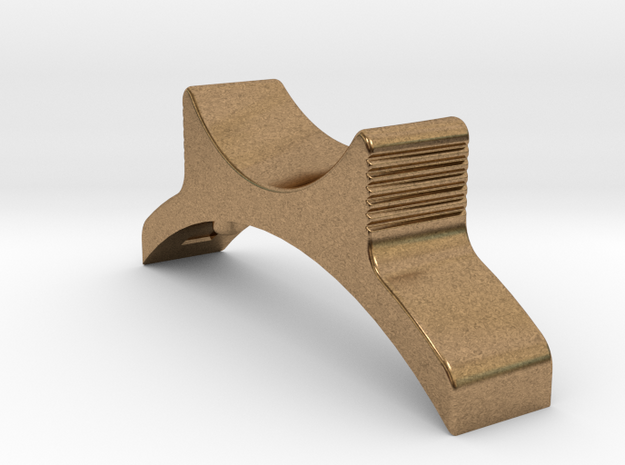
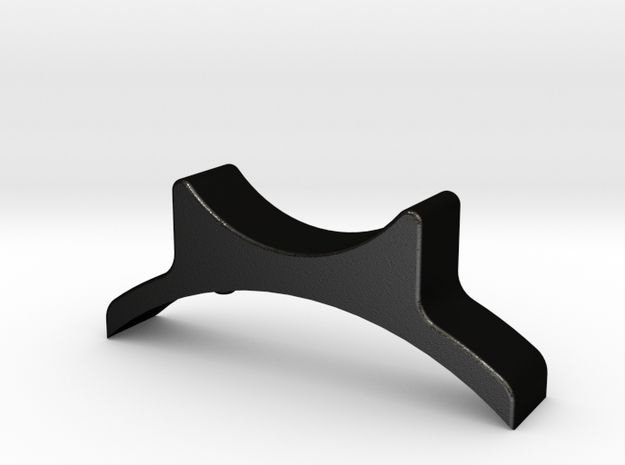
Custom designed Focus Tabs for Leica lenses that used the cheap plastic breakable add-on one.
All focus tabs are available in Brass (US$40), Matt Black Steel (US$40), or Silver (US$85).
Matt Black Steel matches the black lenses quite well, while Silver is a nice touch on the Chrome or Titanium lenses. Brass looks great raw or painted black.
All focus tabs are available in Brass (US$40), Matt Black Steel (US$40), or Silver (US$85).
Matt Black Steel matches the black lenses quite well, while Silver is a nice touch on the Chrome or Titanium lenses. Brass looks great raw or painted black.

About
Leica no longer sell their original plastic part to independent repair shops, requiring you to send your lens to Germany to replace the part at an exorbitant cost for a trivially easy job. Anyway, the original part is rubbish - doesn't provide a good grip and breaks easily. My designs provide a more secure grip, and won't break like the plastic version. They are also designed so that in the unlikely event that you hit the tab with enough force, it comes off before the lens itself is damaged. They affix without gluing the tab to the lens, and are perfectly removable if you want to swap it out for a different one or back to the original spec.
All of my focus tabs affix to the lens with an M1.6 nut (not supplied) glued into the back of the focus tab. An M1.6x3mm screw then screws into the tab from inside the lens (the head of the screw may need to be filed down to fit).
All focus tabs are available in Brass (US$40), Matt Black Steel (US$40), or Silver (US$75).
-->How to change over the original plastic focus tab for my brass focus tab*
1. Read all the instructions before starting.
2. Get the focus tab, and paint it if you want. It’s up to you to work out how to do that.
3. Glue in a nut. The focus tab is designed to be completely removable and not required to be glued onto the lens. On the back side there is space to glue an M1.6 hex nut to secure it. I used standard superglue to fix it. If it's going to fail, I want this to be the weak point so it doesn't ruin the lens. Please don’t use too much – this is designed to be the weak point of the tab.
4. Get the screw ready. The screw to go with it is M1.6x3mm. It needs to be 3mm, too long or too short it won't fit. The head of the standard M1.6 screw is too big though. The rough dimensions it needs to be is 2.2mm diameter and 1mm high - I filed it down slowly so it fits, but screws are available with smaller heads, I just couldn't get any at a decent price. A Dremel tool would work better than hand filing.
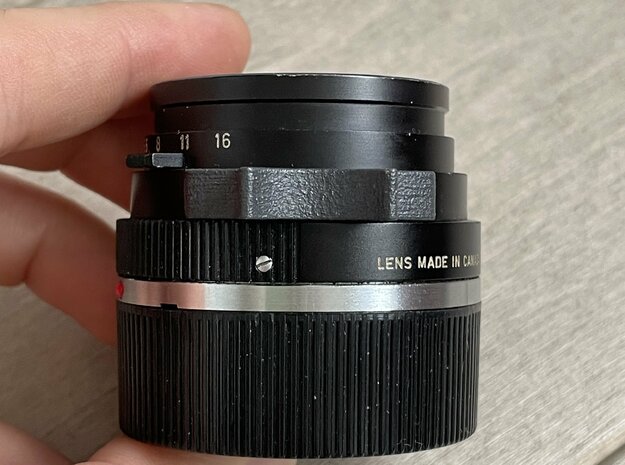
5. Remove the old one. To do this you first need to take the optical cell out of the focusing mount. Hold the front of the lens - NOT the aperture ring, but the part where the hood attaches - and the rear chrome part with the red dot and unscrew it. It is a standard direction thread, and it might be tight if it hasn't been opened recently. Persevere with the usual caveats and put the optical cell somewhere out of the way for now.
Once it's apart you should be able to see how the focus tab is secured to the focusing mount. If along the way it has broken the tab might be glued on. You'll need to get it off and clean the area. If there is a screw in there you will see how small the head needs to be - it needs to stick out no further than the rim at the top of the focus mount and not go through the hole.
6. Install the new tab. It will only go on one way without obstructing the focus mount or going over the rim. I use a bit of medium strength Loctite so it won't wiggle off.
7. Now you just need to put the optical cell back it. The threads only catch in one position, so the aperture dot should end up in the right position. Take care as you screw it down that the head of the screw clears the cell, rack the focus carefully while listening closely.
8. Happy shooting!
Thanks for your interest and I hope you get a lot of pleasure from using it.
*These instructions are a guide only and I take no responsibility for broken or damaged lenses. Take care. If you don't feel comfortable, take it to a professional.
All of my focus tabs affix to the lens with an M1.6 nut (not supplied) glued into the back of the focus tab. An M1.6x3mm screw then screws into the tab from inside the lens (the head of the screw may need to be filed down to fit).
All focus tabs are available in Brass (US$40), Matt Black Steel (US$40), or Silver (US$75).
-->How to change over the original plastic focus tab for my brass focus tab*
1. Read all the instructions before starting.
2. Get the focus tab, and paint it if you want. It’s up to you to work out how to do that.
3. Glue in a nut. The focus tab is designed to be completely removable and not required to be glued onto the lens. On the back side there is space to glue an M1.6 hex nut to secure it. I used standard superglue to fix it. If it's going to fail, I want this to be the weak point so it doesn't ruin the lens. Please don’t use too much – this is designed to be the weak point of the tab.
4. Get the screw ready. The screw to go with it is M1.6x3mm. It needs to be 3mm, too long or too short it won't fit. The head of the standard M1.6 screw is too big though. The rough dimensions it needs to be is 2.2mm diameter and 1mm high - I filed it down slowly so it fits, but screws are available with smaller heads, I just couldn't get any at a decent price. A Dremel tool would work better than hand filing.
5. Remove the old one. To do this you first need to take the optical cell out of the focusing mount. Hold the front of the lens - NOT the aperture ring, but the part where the hood attaches - and the rear chrome part with the red dot and unscrew it. It is a standard direction thread, and it might be tight if it hasn't been opened recently. Persevere with the usual caveats and put the optical cell somewhere out of the way for now.
Once it's apart you should be able to see how the focus tab is secured to the focusing mount. If along the way it has broken the tab might be glued on. You'll need to get it off and clean the area. If there is a screw in there you will see how small the head needs to be - it needs to stick out no further than the rim at the top of the focus mount and not go through the hole.
6. Install the new tab. It will only go on one way without obstructing the focus mount or going over the rim. I use a bit of medium strength Loctite so it won't wiggle off.
7. Now you just need to put the optical cell back it. The threads only catch in one position, so the aperture dot should end up in the right position. Take care as you screw it down that the head of the screw clears the cell, rack the focus carefully while listening closely.
8. Happy shooting!
Thanks for your interest and I hope you get a lot of pleasure from using it.
*These instructions are a guide only and I take no responsibility for broken or damaged lenses. Take care. If you don't feel comfortable, take it to a professional.