Tool, and other items not included.


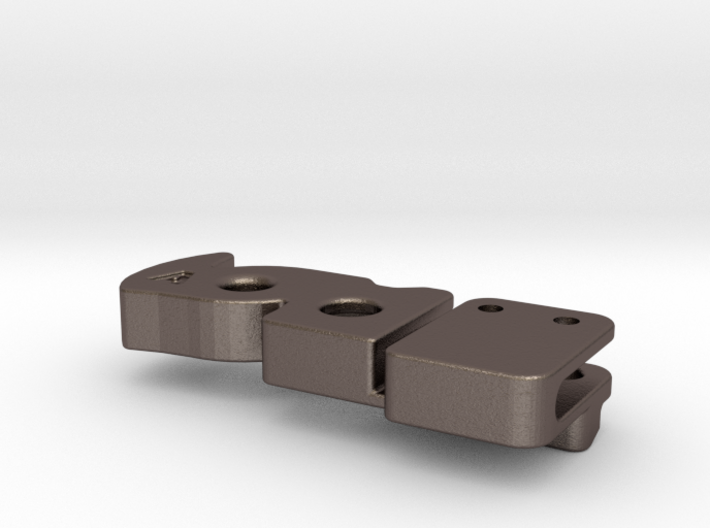
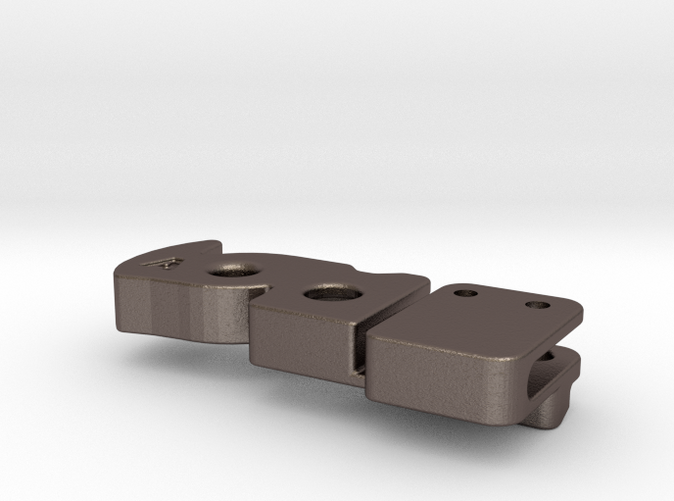
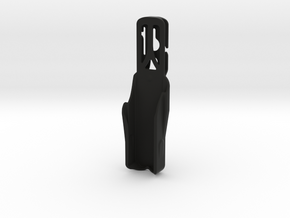
T-Shank Blade Holder for Leatherman FREE P4
Made by
Print With Shapeways
 Choose Your Size
 Choose Your Material
 Choose your color and finish
$41.00
Have a question about this product?
contact the designerYou must be logged in and verified to contact the designer.
Product Description
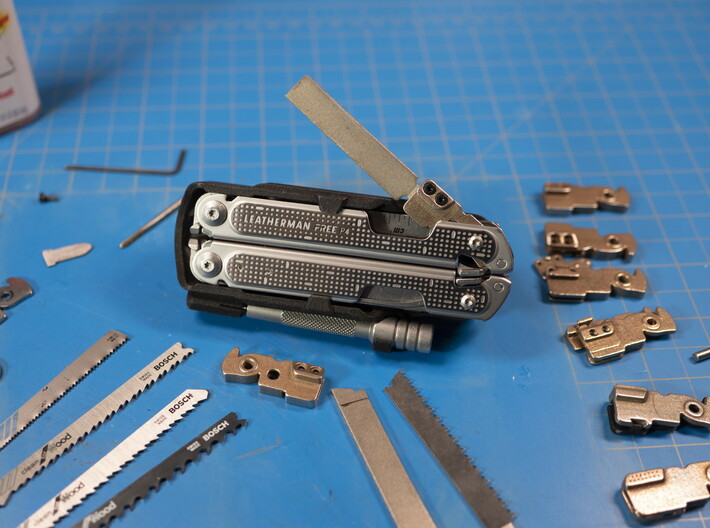
This modification adds an T-Shank Jig-Saw Blade Holder to your Leatherman FREE P4.
You can also install this on the Leatherman FREE P2, if your willing to replace the main blade, or the scissors. (Details below)
Not compatible with the FREE K or T series.
See the video at the end of this page for details, and how to install this mod.
Features:
Design:
Made from stainless steel with a bronze binding agent. The result of six physical prototypes, combined with input from the folks at Multitool.org. Click the link to see how these was designed.
User installed modification:
This is a user-installed modification. It is a bit more complex than my bit-holders, so please read below.
You must remove the existing saw, and one of the other smaller impliments to use this mod. It also requires some light metal work such as tapping threads into the holes. Taking the tool apart is a non-distrcutive process, however any warranty concerns are entirely up to the user. Instructions on how to install are below.
T-Shank Blades:
This has been designed and tested to fit Bosch brand blades as well as the Leatherman T-shank blades. If you want to store a blade in the tool, it needs to be cut to a length of 78 mm +/- 1 mm. Note: Iif the blade is cut too short, it can pop-out when the pliers are deployed.
Two variants:
The default "Medium" variant can replace the Saw or Main Blade on the FREE P4. This is the version seen in the video. It can also be installed in place of the Main Blade on a FREE P2.
The alternate "Large" variant is a mirrored design. It can replace the Serrated Blade or Scissors on a FREE P4, or the Scissors on a FREE P2.
If installing the T-Shank on the same side as the two thick implements: Then you need to trade one of the thick implements with a thin one from the other side. Alternate configurations are up to the end user. Other adjustments to the tool order/washers may be needed to keep the correct stack-up height. The T-Shank holder takes up 0.18" of the tool stack height.
Screws and tap tool:
Shapeways only produces and ships the 3D printed parts, so the screws and tools cannot be included with your order. Please keep this in mind before ordering. The cost of these parts from McMaster is $30+shipping, or about half that price from eBay.
The mod requires two M2 x 0.4 mm Thread, 5 mm long, Alloy Steel screws.
I recommend McMaster-Carr P/N: 91290A012
You also will need a M2 x 0.4 mm tap to finish the two holes. The tap must be able to handle stainless steel. I recommend McMaster P/N: 8305A77 I also recommend using cutting fluid or oil to prevent the tap from binding.
If the tap doesn't bite, you can ream out the hole using a 1/16" (1.6mm) drill bit.
To drive the set screws you need a 1.5mm hex bit, or allen key. I recommend getting a few of McMaster P/N: 7289A11, and then cutting one down to fit in the tool, and leaving a second with your spare T-Shank blades. Also, the Leatherman Flat Bit Kit does include a 1.5mm Hex bit. This can be stored in the tool in my Flat bit holder, or on one of my holsters.
Post Processing:
The parts are made by a bonding stainless steel powder. The resulting part is sintered and impregnated with bronze to fully meld the two metals together. Because a powder is used: Some internal areas of the part may end up with stuck powder that needs to be cleared away using drill bits or files. If your part has an excessive amount of stuck powder, or filled holes, contact Shapeways with a photo of your part for a replacement.
The part is similar to a casting, and shrinks a small amount during processing. The CAD model has been desgined to compensate for this, but some manual filing may be needed on some parts if the parts fit too tight or bind. Use a needle file to clean up any burrs or places that are sticking. The material is stainless steel, so diamond needle files may be required.
The mounting hole may require reaming using a drill bit capable of handling stainless steel. A 1/8" or 3.2mm drill bit may be used for this task.
Installation:
The tool must be taken apart to install this modification. See the video below.
How ordering from Shapeways Works:
I am the part designer, and I receive a fixed portion of the total order. Shapeways.com handles the part production and shipping based on your order input.
Shipping costs and any other related fees are controlled by Shapeways.com:
Shipping time and costs
I cannot customize, alter or process any returns after your order has been placed. All post-sales issues must be handled through Shapeways customer service.
Order FAQ
Leaving any text in the "Personal Message" box will be printed on a gift card included with your shipment. I do not see these messages.
You can also install this on the Leatherman FREE P2, if your willing to replace the main blade, or the scissors. (Details below)
Not compatible with the FREE K or T series.
See the video at the end of this page for details, and how to install this mod.
Features:
- Holds T-Shank Jig-Saw blades
- Can also hold the Leatherman Surge Saw or Diamond File
- The blade can be stored in the tool
- Blades need to be cut to length to be stored in-tool.
- Holds blades ranging from 1 to 2 mm thick
- 1 mm blades may require use of a shim (See video)
- The blade is held in place using two M2 screws
- Shapeways only makes 3D printed parts, sorry the screws cannot be included.
- Available in three finishes:
- Select "Bronze Silver Steel" for the closest fit to the tool
- Select "Bronze Steel " for a fully bronze color
- Select "Bronzed Black Steel" for a contrasting dark bronze look
Design:
Made from stainless steel with a bronze binding agent. The result of six physical prototypes, combined with input from the folks at Multitool.org. Click the link to see how these was designed.
User installed modification:
This is a user-installed modification. It is a bit more complex than my bit-holders, so please read below.
You must remove the existing saw, and one of the other smaller impliments to use this mod. It also requires some light metal work such as tapping threads into the holes. Taking the tool apart is a non-distrcutive process, however any warranty concerns are entirely up to the user. Instructions on how to install are below.
T-Shank Blades:
This has been designed and tested to fit Bosch brand blades as well as the Leatherman T-shank blades. If you want to store a blade in the tool, it needs to be cut to a length of 78 mm +/- 1 mm. Note: Iif the blade is cut too short, it can pop-out when the pliers are deployed.
Two variants:
The default "Medium" variant can replace the Saw or Main Blade on the FREE P4. This is the version seen in the video. It can also be installed in place of the Main Blade on a FREE P2.
The alternate "Large" variant is a mirrored design. It can replace the Serrated Blade or Scissors on a FREE P4, or the Scissors on a FREE P2.
If installing the T-Shank on the same side as the two thick implements: Then you need to trade one of the thick implements with a thin one from the other side. Alternate configurations are up to the end user. Other adjustments to the tool order/washers may be needed to keep the correct stack-up height. The T-Shank holder takes up 0.18" of the tool stack height.
Screws and tap tool:
Shapeways only produces and ships the 3D printed parts, so the screws and tools cannot be included with your order. Please keep this in mind before ordering. The cost of these parts from McMaster is $30+shipping, or about half that price from eBay.
The mod requires two M2 x 0.4 mm Thread, 5 mm long, Alloy Steel screws.
I recommend McMaster-Carr P/N: 91290A012
You also will need a M2 x 0.4 mm tap to finish the two holes. The tap must be able to handle stainless steel. I recommend McMaster P/N: 8305A77 I also recommend using cutting fluid or oil to prevent the tap from binding.
If the tap doesn't bite, you can ream out the hole using a 1/16" (1.6mm) drill bit.
To drive the set screws you need a 1.5mm hex bit, or allen key. I recommend getting a few of McMaster P/N: 7289A11, and then cutting one down to fit in the tool, and leaving a second with your spare T-Shank blades. Also, the Leatherman Flat Bit Kit does include a 1.5mm Hex bit. This can be stored in the tool in my Flat bit holder, or on one of my holsters.
Post Processing:
The parts are made by a bonding stainless steel powder. The resulting part is sintered and impregnated with bronze to fully meld the two metals together. Because a powder is used: Some internal areas of the part may end up with stuck powder that needs to be cleared away using drill bits or files. If your part has an excessive amount of stuck powder, or filled holes, contact Shapeways with a photo of your part for a replacement.
The part is similar to a casting, and shrinks a small amount during processing. The CAD model has been desgined to compensate for this, but some manual filing may be needed on some parts if the parts fit too tight or bind. Use a needle file to clean up any burrs or places that are sticking. The material is stainless steel, so diamond needle files may be required.
The mounting hole may require reaming using a drill bit capable of handling stainless steel. A 1/8" or 3.2mm drill bit may be used for this task.
Installation:
The tool must be taken apart to install this modification. See the video below.
- You will need two Torx T9 bits to remove the screws holding the tool together.
- The screws need to be loosened by holding one side with a bit, and turning the other side.
- The screws are secured using thread-locking compound, and heat may be required to loosen the compound.
- Care should be taken to open the tool on a clean surface.
- To install you need to remove the following items from the Leatherman FREE P4
- Saw blade
- Can opener (Or any of the other four small implements)
- The Thin spacer washers. Keep one washer in the stack if your removed the File or Ruler.
- One Thick spacer washer (Near scale on saw side)
- After removing those components, stack the three remaining small implements up against the serrated blade.
- Place the spring arm next to the implements.
- Install the two halves into the remaining space.
- Silicone based lubricant may be added during assembly.
- Re-install the post and screws. The tightness of the tool will depend on the amount of torque you apply during reassembly.
How ordering from Shapeways Works:
I am the part designer, and I receive a fixed portion of the total order. Shapeways.com handles the part production and shipping based on your order input.
Shipping costs and any other related fees are controlled by Shapeways.com:
Shipping time and costs
I cannot customize, alter or process any returns after your order has been placed. All post-sales issues must be handled through Shapeways customer service.
Order FAQ
Leaving any text in the "Personal Message" box will be printed on a gift card included with your shipment. I do not see these messages.

Details
What's in the box:
T-Shank, A
Dimensions:
Success Rate:
First To try.
What's this?
Rating:
Mature audiences only.
